⚙️ 5R55S Torque Converter Alignment Tool
Calculate pilot depth, end float, pump drive engagement & converter seating specs for Ford 5R55S transmissions
| Measurement | Spec Min (in) | Spec Max (in) | Metric Min (mm) | Metric Max (mm) | Action if Out |
|---|---|---|---|---|---|
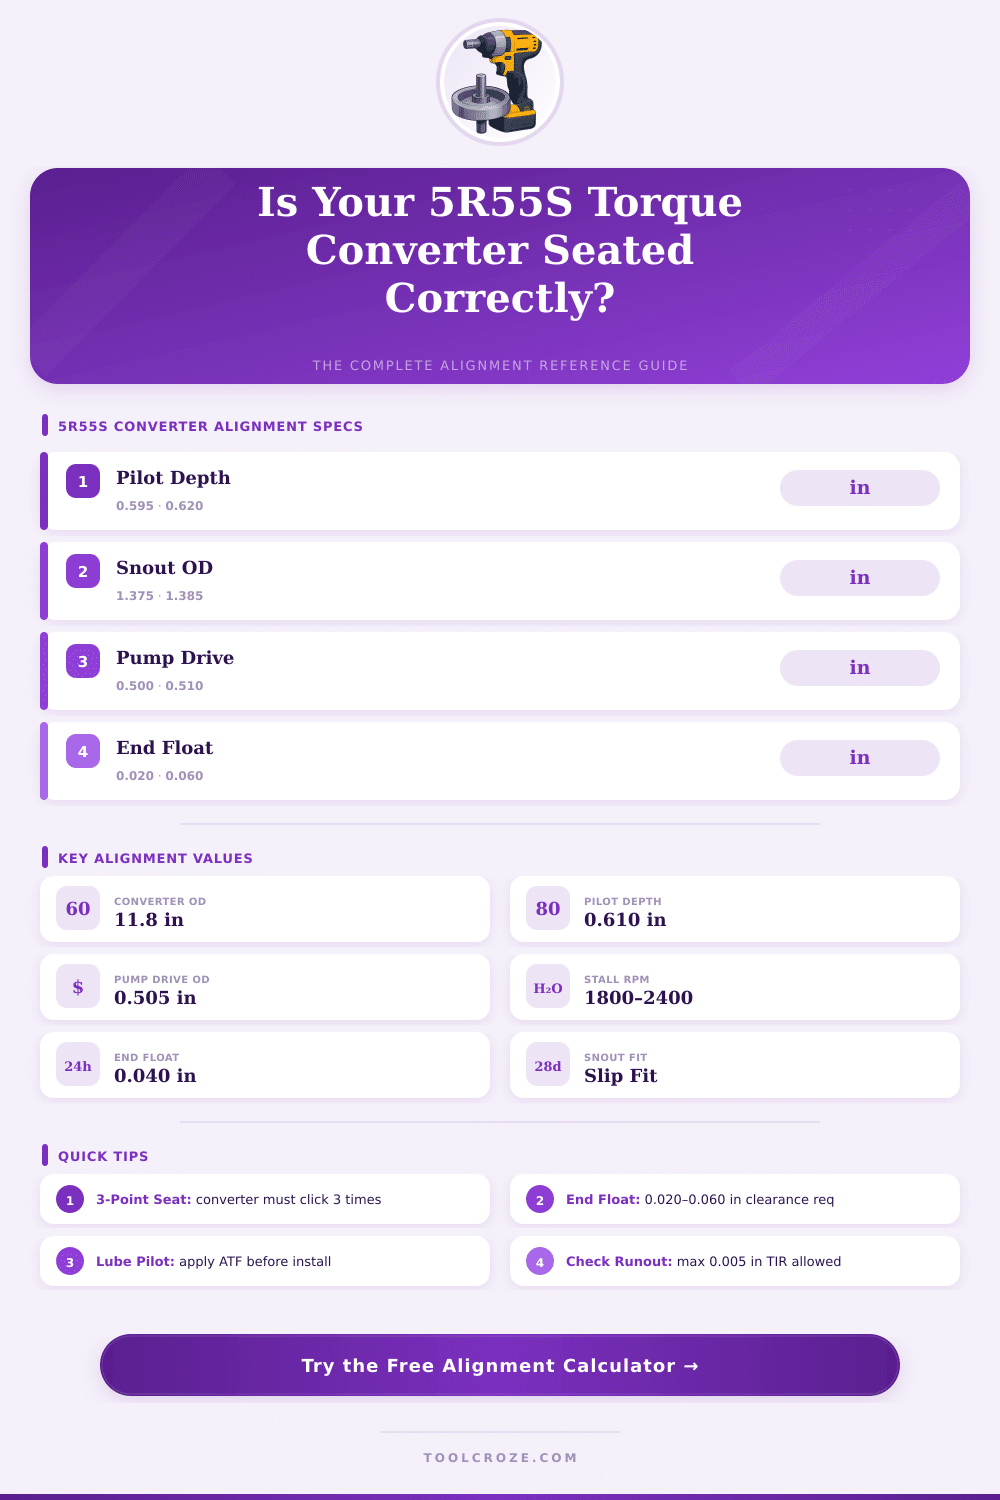
| Pilot Depth (Snout Engagement) | 0.595 | 0.625 | 15.11 | 15.88 | Replace converter |
| Snout OD | 1.375 | 1.385 | 34.93 | 35.18 | Check bushing wear |
| Trans Pilot Bore ID | 1.388 | 1.395 | 35.26 | 35.43 | Replace pump bushing |
| Pump Drive Hub OD | 0.500 | 0.510 | 12.70 | 12.95 | Replace converter |
| Pump Drive Bore ID | 0.510 | 0.515 | 12.95 | 13.08 | Replace pump gerotor |
| End Float (Axial Clearance) | 0.020 | 0.060 | 0.508 | 1.524 | Shim or replace thrust |
| Runout TIR (Converter Face) | 0.000 | 0.005 | 0.000 | 0.127 | Check flex plate / mount |
| Drive Stud Protrusion | 0.590 | 0.620 | 14.99 | 15.75 | Replace studs |
| Engine | OEM Stall RPM | Mild Perf Stall | High Stall | Peak Torque (ft‑lbs) | Torque Mult. |
|---|---|---|---|---|---|
| 4.6L 2V (Mustang GT) | 1,800–2,000 | 2,200–2,600 | 3,000–3,600 | 290–310 | 2.0–2.2x |
| 4.6L 4V (Cobra / Mach 1) | 2,000–2,200 | 2,600–3,000 | 3,400–4,000 | 320–350 | 2.1–2.3x |
| 5.4L 4V (GT500) | 2,200–2,400 | 2,800–3,200 | 3,600–4,200 | 480–530 | 2.2–2.5x |
| 3.0L V6 (Ranger) | 1,600–1,900 | 2,000–2,400 | 2,600–3,000 | 180–200 | 1.9–2.1x |
| 4.0L SOHC V6 (Explorer) | 1,700–2,000 | 2,100–2,500 | 2,800–3,200 | 235–250 | 2.0–2.2x |
| 4.2L V6 (F-150) | 1,700–1,950 | 2,100–2,500 | 2,700–3,100 | 255–265 | 2.0–2.1x |
| Tool Purpose | OEM Part / Ref | Measurement Range (in) | Measurement Range (mm) | Accuracy |
|---|---|---|---|---|
| Converter Depth Gauge | T74P-77001-A | 0 – 2.000 | 0 – 50.8 | ±0.001 in |
| Pump Drive Alignment Arbor | T80L-77001-A | 0.500 – 0.515 | 12.70 – 13.08 | ±0.0005 in |
| Snout Bushing Gauge | T89P-77001-B | 1.375 – 1.400 | 34.93 – 35.56 | ±0.001 in |
| Dial Indicator / TIR Stand | Universal | 0 – 0.500 | 0 – 12.70 | ±0.0001 in |
| End Float / Thrust Gauge | T74P-77100-A | 0 – 0.200 | 0 – 5.08 | ±0.001 in |
| Flex Plate Stud Depth Tool | T87L-6375-A | 0.500 – 0.750 | 12.70 – 19.05 | ±0.001 in |
| Scenario | Converter Type | Expected Pilot Depth | Expected End Float | Verify Steps |
|---|---|---|---|---|
| Stock OEM Replacement | Stock ratio | 0.605–0.615" | 0.035–0.050" | 3 clicks, check TIR |
| Remanufactured Converter | Reman stock | 0.595–0.625" | 0.025–0.055" | Verify pump drive OD first |
| High Stall Performance | 2,800–3,600 stall | 0.600–0.620" | 0.030–0.050" | Check flex plate clearance |
| Aftermarket HD Unit | Billet cover | 0.590–0.620" | 0.020–0.060" | Measure snout OD carefully |
| Worn Pump / Bushing | Any | May vary | May exceed 0.060" | Replace pump bushing first |
The tool for lining the 5r55s torque converter helps to ensure that it seats well against the flexplate and engages the pump of the transmission in the right way. If the parts do not join correctly, damage can happen to the pump, transmission or leaking of fluids. Because right fitting is so important those tools simplify the work and make it safer.
One famous tool is the T-0519AC. It works for transmissions 5R55N, 5R55W and 5R55S, that one finds in cars like Jaguar, Lincoln LS, Explorer, Mountaineer and Thunderbird. Those devices stop complaints because of vibrations and prevent early wear of the converter, bushing or pump.
Fitting the 5R55S Torque Converter
It holds a strong bushing from DuPont Delrin, that stays flat without grinding. The bushings are a bit narrowed, so installing and removing it becomes simpler. The tool is exactly cut from metal and has holes for access, so that one can follow the right torque even while it stays in place.
From the first time it works well untli much more than a hundred uses.
A version called T-0519 suits transmissions 4R44E, 4R55E, 5R44E and 5R55E. It includes an extension to stop turning and fits models of 1995 and later. Besides that, the tool T-109 was used for full control in cars like the Aviator of 2005.
Some manuals in workshops explain how to use the tool: one loosens the screws of converter to flexplate, later places the guide in the bell of the transmission at the diameter of the pilot and above the pump shaft. Later one turns the converter some turns to check the fitting. With a dial gauge one measures the runout at the nave of the converter, witch should not pass 0.004 inches.
Even so not every case requires a special tool. A bit of time a guide pin or cone shaped tools work. One turns the flywheel to close it, and then the tool goes through the opening while the converter twists until the parts join.
In some cases one screw from the group has a small cone shoulder, and that enters first as a guide screw. The rest can enter in any order after that.
Ensuring that the 5r55s torque converter seats fully in the transmission is really important. It can seem seated, but actually it must slip more deeply into the parts of the pump. The converter stays open until it connects with the flexplate and the crankshaft.
While one pushes the transmission upward against the engine, starting it on the guide point by hand is a good check. Also, none of the screws from flexplate to converter should tighten until all are placed. The screws of the bellhousing need the right torque, so that they do not loosen later.
Marking the parts before removing themalways simplifies the refitting.