
The coolant is hot, and engine fires up. The hose won’t quite seat. Your bin clamp is either too big to get tight or too small to expand and seat properley. Ugh! It is that annoying moment where it all goes sideways in nearly every garage.
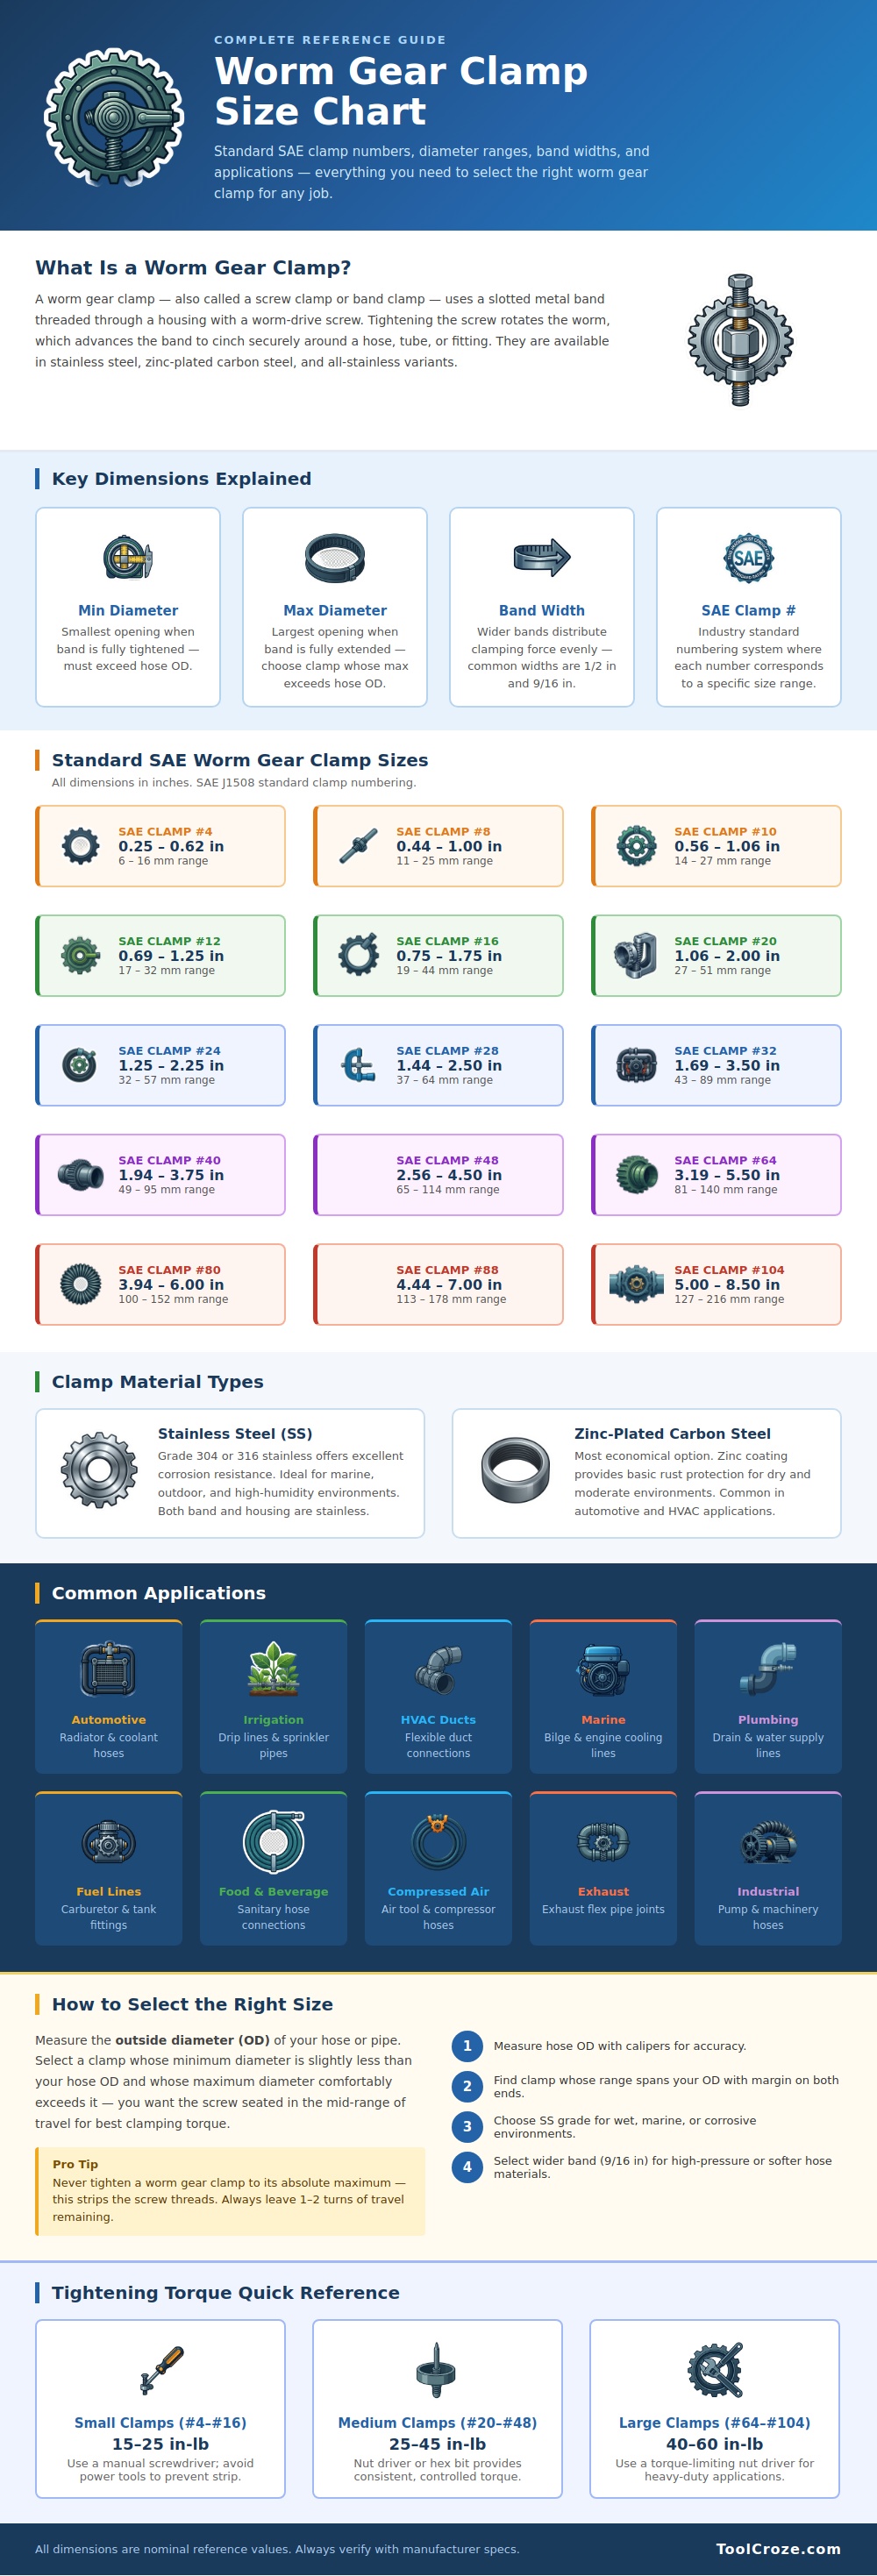
On paper, worm gear clamps are easy tools. But selecting the incorrect one can turn a five minute repair job into a headache. To break this down, I made a chart (above) that matches SAE number ranges to its actual diameters. So when you need a clamp for a three-quarter-inch line, you don’t have to guess if a Clamp #10 is going to do the trick.
How to Choose the Right Hose Clamp
And it’s not simply looking for something that fits snugly over tube. You’re looking for something that holds it. Why? Because of mechanical advantage. Screw clamps (they’re also known as worm gear clamps) gets their name from the internal mechanism: a threaded screw within a housing pulls a slotted piece of metal tighter onto itself. And there’s the beauty part, the mechanical advantage come from the worm driving the teeth along the band while the screw is turned and circumference constricts evenly all the way around. Spring clamps tend to pinch at one spot, so this distribution of pressure are the beauty of it. These is high-pressure lines for coolant and fuel. If you crush the hose at one end, you create a weak spot or restrict flow. This restricted area will burst under heat. We want uniform compression, not localized crushing.
Most of us only look at size when considering new clamp: we want the largest clamp that will physically slide onto the hose. That’s where folks go wrong. In addition to checking the max diameter, you should also check the min. The difference between these two numbers are how much adjustment you have on the clamp. How much travel does the screw have? Do you have all that travel available or are you barely using any? If your hose happens to sit directly on the high end of this range, then you aren’t using very much of the screw’s travel and the clamp won’t hold very well. It won’t clamp down hard because the worm isn’t being engaged deep enough. On the other hand, if you’re sitting on the low end, you run the risk of cranking it down too hard and stripping the threads out of your clamp. You want the diameter of your hose to fall somewhere comfortabley in the middle of that range.
As infographic demonstrates, small clamps (number fours) can take tiny lines less than an inch thick. Heavy duty clamps (number eighty) can take diameters as large as six inches on industrial hoses. The size is also important, but no less so than material selection. A bargain basement clamp is going to be made of zinc plated carbon steel. While suitable for short term applications or dry locations, it won’t last long out in the elements. You’ll see this material in most auto repair shops because cost matters when you’re replacing a clamp every few years. In outdoor uses like irrigation systems or boats, the zinc coating flakes off within months if it is exposed to moisture and salt. Go with stainless. Grade 316 (or even better 304) is slightly more expensive up front but will never fail in wet conditions. In this application, being corrosion resistant isn’t a luxury. It’s the difference between knowing your connection is solid versus having your hose come loose while you’re anchored offshore.
The other part is band width. The wider the band, the larger surface area the clamp has to grip the hose, spreading the load out across a larger area of the hose. That matters especially if you’re using a soft rubber hose or at higher pressures where you don’t want to cut through the wall of the tube as much. A narrow band on a soft hose is like a wire and digs in until it fails. Also, a wider band lays flatter against the hose and grips better without harming the hose itself. This is another small detail people may not notice when they grab whatever clamp fits by diameter.
The final piece of the puzzle is tightening the technique. When cranking on a worm gear clamp don’t go all the way to where the screw bottoms out. You want at least a turn or two of thread showing so you have some adjustment room if necessary later. Cranking too hard will strip the threads and ruin the housing. With small clamps use a manual screwdriver and feel for the resistance as you tighten. With the bigger ones, a nut driver provides more control. Tighten them until the hose becomes firm and does not compress any farther with continued pressure. That’s your sweet spot. It should be solid, but not too tight. It takes a little practice to get the tension correct, but after you do you’ll know.
Lastly, and this goes without saying, measure twice; cut once. But knowing how the clamp reacts to being tightened provides the real insurance against future leaks. You should of checked it first.
