⚡ Welding Rod Amperage Calculator
Find the correct amperage for any electrode size, type, and base material
| Electrode | Diameter | Min Amps | Max Amps | Typical Range | Current Type | Best For |
|---|---|---|---|---|---|---|
| E6010 | 1/16" (1.6mm) | 20 | 40 | 25–35A | DCEP | Pipe root, thin sheet |
| E6010 | 3/32" (2.4mm) | 40 | 80 | 50–70A | DCEP | Pipe welding |
| E6010 | 1/8" (3.2mm) | 75 | 130 | 85–115A | DCEP | Structural, pipe |
| E6010 | 5/32" (4.0mm) | 110 | 165 | 125–150A | DCEP | Heavy plate |
| E6011 | 3/32" (2.4mm) | 40 | 80 | 50–70A | AC/DC | Rusty/dirty steel |
| E6011 | 1/8" (3.2mm) | 75 | 125 | 85–110A | AC/DC | All-position repair |
| E6011 | 5/32" (4.0mm) | 110 | 165 | 120–150A | AC/DC | General repair |
| E6013 | 1/16" (1.6mm) | 20 | 45 | 25–40A | AC/DC | Sheet metal, beginners |
| E6013 | 3/32" (2.4mm) | 45 | 90 | 55–80A | AC/DC | General fab |
| E6013 | 1/8" (3.2mm) | 80 | 130 | 90–115A | AC/DC | General purpose |
| E6013 | 5/32" (4.0mm) | 105 | 180 | 120–160A | AC/DC | Thicker mild steel |
| E6013 | 3/16" (4.8mm) | 150 | 230 | 165–210A | AC/DC | Heavy plate |
| E7018 | 3/32" (2.4mm) | 65 | 100 | 70–90A | DCEP/AC | Low hydrogen welds |
| E7018 | 1/8" (3.2mm) | 110 | 165 | 120–150A | DCEP/AC | Structural steel |
| E7018 | 5/32" (4.0mm) | 130 | 200 | 145–180A | DCEP/AC | Heavy structural |
| E7018 | 3/16" (4.8mm) | 175 | 250 | 190–230A | DCEP/AC | Very heavy plate |
| E7024 | 1/8" (3.2mm) | 100 | 150 | 115–135A | AC/DC | High deposition flat |
| E7024 | 5/32" (4.0mm) | 140 | 190 | 155–175A | AC/DC | Fillet welds, flat only |
| E308L | 3/32" (2.4mm) | 50 | 90 | 60–80A | DCEP | 304/308 stainless |
| E308L | 1/8" (3.2mm) | 80 | 130 | 90–115A | DCEP | Stainless fabrication |
| E316L | 3/32" (2.4mm) | 50 | 90 | 60–80A | DCEP | 316 stainless / marine |
| E4043 | 3/32" (2.4mm) | 55 | 95 | 65–85A | AC | Aluminum alloys |
| E4043 | 1/8" (3.2mm) | 90 | 140 | 100–125A | AC | Aluminum fabrication |
| Position | Code | Amp Adjustment | Notes |
|---|---|---|---|
| Flat | 1F / 1G | Baseline (0%) | Maximum amperage allowed |
| Horizontal | 2F / 2G | -5% to -10% | Slightly reduce to control puddle |
| Vertical Up | 3F / 3G | -10% to -15% | Reduce to prevent sag; whip or weave |
| Vertical Down | 3F / 3G | -5% to -10% | Faster travel; E6013 preferred |
| Overhead | 4F / 4G | -10% to -15% | Reduce to prevent drip; use small rods |
| DCEP (DC+) | — | Baseline | More heat at workpiece; deeper penetration |
| DCEN (DC-) | — | +10% possible | More heat at electrode; faster melt |
| AC | — | -5% vs DCEP | Intermediate penetration; lower open-circuit V |
| Electrode | Tensile Str. | Coating Type | Penetration | Polarity | Positions | Key Use |
|---|---|---|---|---|---|---|
| E6010 | 62,000 psi | High Cellulose Na | Deep | DCEP only | All | Root passes, pipe |
| E6011 | 62,000 psi | High Cellulose K | Deep | AC / DCEP | All | Dirty/rusty steel |
| E6013 | 62,000 psi | High Titania K | Medium | AC / DC± | All | General purpose |
| E7016 | 70,000 psi | Low Hydrogen Na | Medium | AC / DCEP | All | Low hydrogen welds |
| E7018 | 70,000 psi | Low Hydrogen Fe | Medium | AC / DCEP | All | Structural steel |
| E7024 | 70,000 psi | Iron Powder Titania | Medium | AC / DC± | Flat/horiz only | High deposition rate |
| E308L | 80,000 psi | Lime | Medium | DCEP | All | 304/308 stainless |
| E309L | 80,000 psi | Lime | Medium | DCEP | All | Stainless to carbon |
| E316L | 75,000 psi | Lime | Medium | DCEP | All | Marine / chemical |
| E4043 | 27,000 psi | — | Shallow | AC | All | Aluminum alloys |
| Metal Thickness | Metric | Recommended Rod | Amperage Range | Notes |
|---|---|---|---|---|
| 1/16" | 1.6 mm | 1/16" rod | 20–40A | Use E6013; very low heat |
| 3/32" | 2.4 mm | 1/16" – 3/32" | 25–60A | Thin sheet; reduce amps at edges |
| 1/8" | 3.2 mm | 3/32" | 45–90A | Standard thin plate |
| 3/16" | 4.8 mm | 3/32" – 1/8" | 60–115A | Common structural |
| 1/4" | 6.4 mm | 1/8" | 80–130A | Single or multi-pass |
| 3/8" | 9.5 mm | 1/8" – 5/32" | 100–165A | Bevel and multi-pass |
| 1/2" | 12.7 mm | 5/32" – 3/16" | 130–225A | V-groove, multi-pass required |
| 3/4" | 19.0 mm | 3/16" – 1/4" | 175–300A | Pre-heat recommended |
| 1"+ | 25.4 mm+ | 3/16" – 1/4" | 200–350A | Pre-heat required; multi-pass |
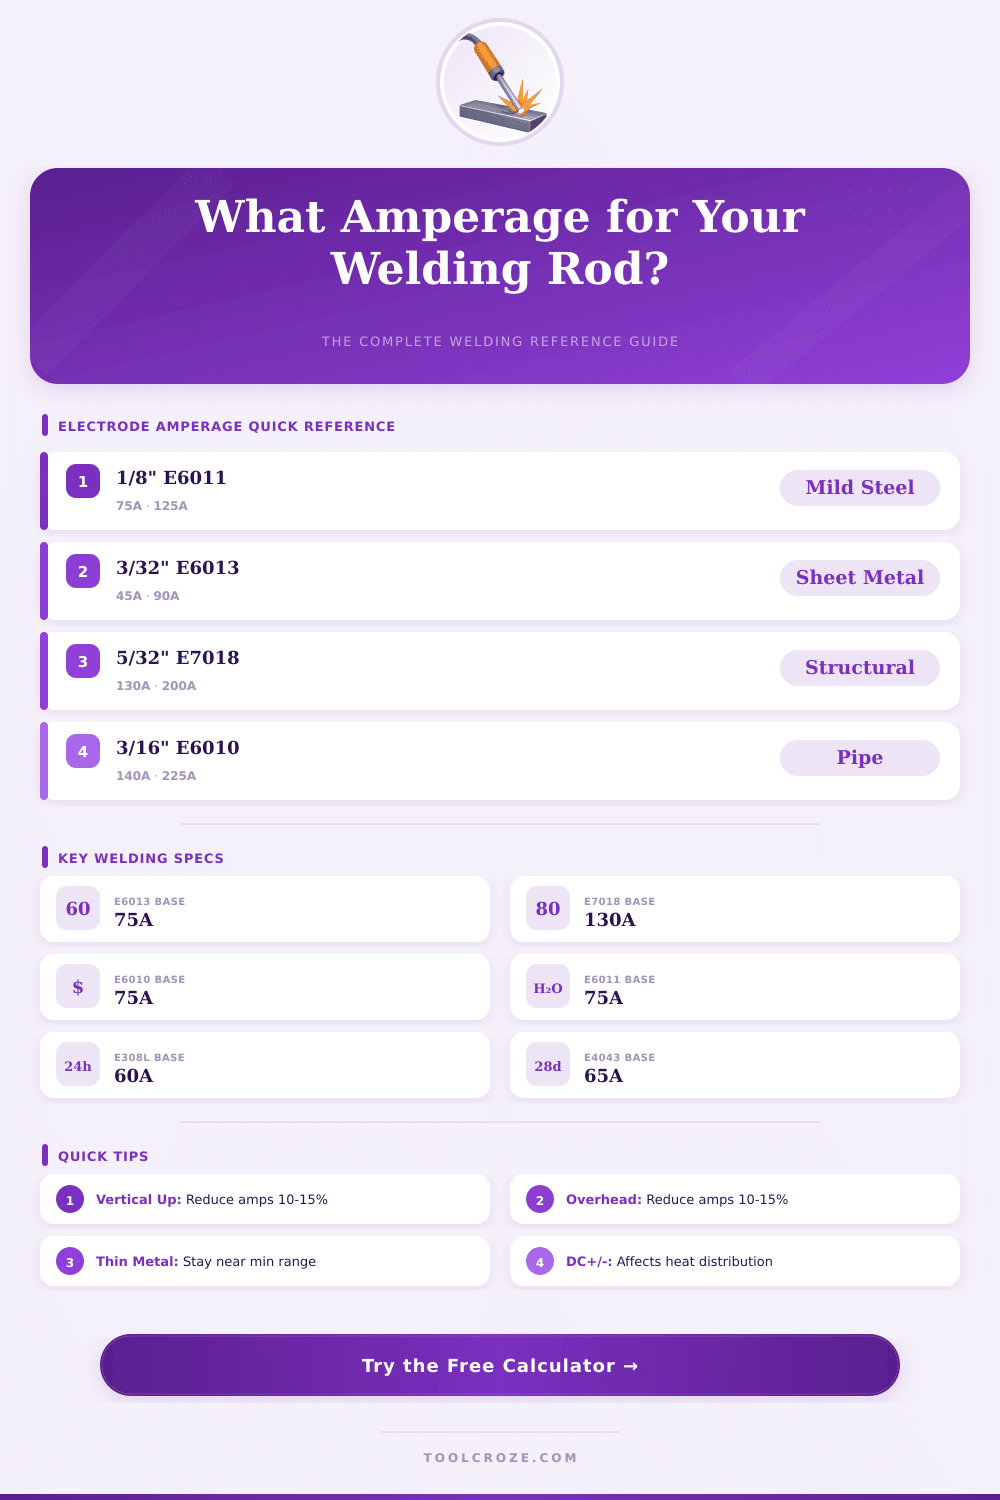
Choosing the right amperage for any welding rod is really important. That can mark the difference between smooth and strong welds against messy ones full of troubles. The right current setting mostly depends on the diameter and kind of the used electrode.
For instance welding rod 6010 of 1/8-inch works well at 75 to 125 amps, while welding rod 7018 of 5/32-inch welds even at flows to 220 amps.
How to Pick the Right Amps for Welding Rods
Different amperage ranges appear for every diameter of welding rod. When you choose an electrode, recall that. For flat round welds, it is good to start with amps in the center of the range.
Like this, for welding rod 6011 of 1/8-inch, the middle amperage is around 100. The rods of the 60-series, as 6010, 6011 and 6013 in size 1/8-inch, have middle starting ampearges around 100 amps.
A practical trick is to convert the diameter of the welding rod to decimals and use that to set the amps. A welding rod of 1/8-inch matches 0.125, so 125 amps. When the metal is thinner than the welding rod, simply drop the amps by 5 or 10.
Other than that, another rule of thumb says 30 amps for every 1/32-inch of rod size, like this welding rod 3/32 wood start at 90 amps.
Also the position plays a role. With a welding rod of 1/8-inch for flat welds, around 130 amps make a good start. For vertical upward, it drops to 110-115 amps.
Horizontal positions need around 110-120 amps, while overhead is roughly 120-130 amps.
The E6013 rods work with AC and DC settings. On AC it creates a stable arc, which works well for home welding. DCEN gives less deep reach, but faster buildup, while DCEP gives stronger reach for thick materials.
This flexibility makes it handy for outside, vertical or overhead welds even on machines with low voltage. A welding rod 3/32 E6013 goes well at around 60-75 amps for general welds. For 7018 of 1/8-inch, expect between 110-160 amps.
And 7018 of 3/32 runs at 60-100 amps.
All these are the most popular rods among everyday users, because they can weld materials up to 1/4-inch thickness with need of up to 200 amps of power. Even so, that rule of thumb really only counts up to materials of 1/4-inch thickness, and always test and adjust.
When the arc cracks too much or the welding rod sticks, you change the amps up or down. Welds that look high and lumpy show that the amps must rise. If it is too flat or forms burn holes, turn the amps down.
The right sound is like frying bacon in a pan. Any amp charts are only guides. Your eyes andears decide in the end.