
For example: A stripped thread occurs when you overtighten a bolt. What happens? You no longer get any resistance as you try to tighten it down, then you start getting shavings of metal in the hole. Your part is now compromised.
The impulse is to go buy something bigger; a bigger screw or drill out the hole, and then use it. But those are band-aids at best and they makes the problem even worse. Threaded inserts are actual fix for this. They’re tiny little round reinforcement pieces that return strength and holding power to a material that can’t support a thread by itself.
How to Choose and Use Thread Inserts
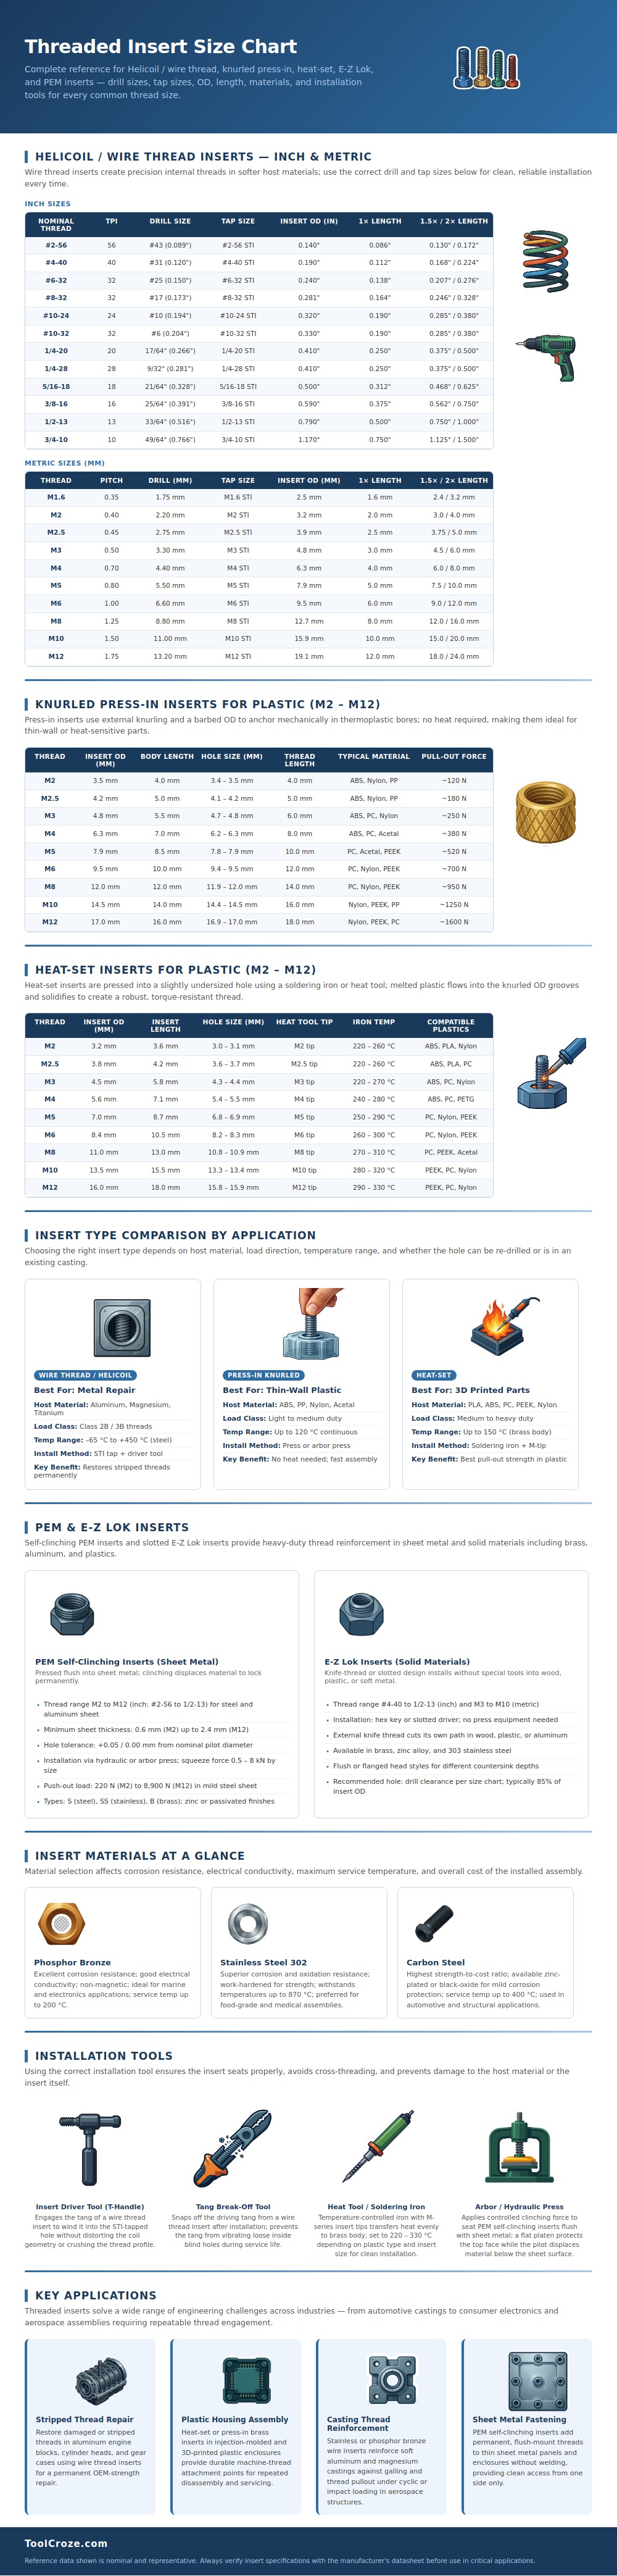
Whether your repair succeeds or not comes down to knowing what kind of insert to use (and also how big of a hole to prepare). If there is vibration involved, will it last or fail? The chart separates plastic-friendly options from wire thread inserts because their installation logic are entirely different. This is because the method used to install them is different than before.
For wire thread inserts, we’re talking about materials such as titanium, magnesium and aluminum. Wire thread inserts is typically made with a helical coil shape and form a replaceable layer that absorbs wear rather than the softer host material. The tap and drill sizes given here for the inserts are exact. If you try to tap one using a regular tap rather than a special thread insert tap, the coil will be too large to fit into the hole. Alternatively, there may not be enough wall thickness for it to holds its place. The geometry is based off an interference fit inside the tapped hole so the tolerance is very close. Mess up this step and you’ll screw up many of your repair.
In general, plastic parts with press-in inserts aren’t as good as those with heat set ones. Whether your prototype is 3d printed or an injection molded housing, heat sets are better. It’s all about how much heat to use to make the plastic flow into the brass insert knurling. You must avoid overheating the part so the plastic doesn’t lose its properties or warp the rest of the enclosure. Different plastics has different temp ranges, so guesswork fails. ABS isn’t like PLA, and neither are Nylon or PEEK. The chart tells you the right range, including all that thermal difference in the mix. Trial and error means trashing a bunch of prototype. No thanks.
The benefit of press-ins is you don’t need any heat, just apply force and they’re in there. But their success rely completely on how tightly the insert fits against the hole wall. They are great for a thin wall enclosure under light load. If you intend to torque something important in there, pull out force numbers say you want the melted-plastic-around-a-brass-insert kind of bond.
Finally, there is sheet metal, one of those special applications where use of PEM self-clinching inserts is also suitable. The hole used for insertion is just under the diameter of the insert. The insert is then pressed into the hole which causes the sheet metal to form up and mechanically lock the insert firmly into position. The result is a strong anchor point from thin gauge aluminum or steel with no adhesives or welding involved. But here, too, there’s wide variation in the amount of force needed depending on size. Pressing too hard can cause bending instead of clinching the nut.
Material choices matter too. If you’re dealing with marine environments or sensitive electronic assemblies where interference can be a problem, phosphor bronze is your best bet thanks to its great non-magnetic qualities and corrosion resistance. Carbon steel is less expensive but gives you raw strength where structure is needed, such as in some automotive applications. Stainless steel handles harsh chemicals and much hotter temperatures. The proper alloy helps avoid early failure issues way before thread wear will becomes a factor.
So what? Taking some time to read the sizing chart and learn how to use their installation tool helps them last longer. From building an electronics case for consumers to fixing that hole you stripped on your engine block bolt, the insert bridges the gap between weak material and strong fastener. If you do it right the first time, your stuff stays together and survives the test of the real world. Verifying your drill size now takes only five more minutes but would of saved hours down the road because something doesn’t fit or is holding loose. You should of checked the measurements first so things dont dissapear or break. Actually, it is better to check than to fix later.
