
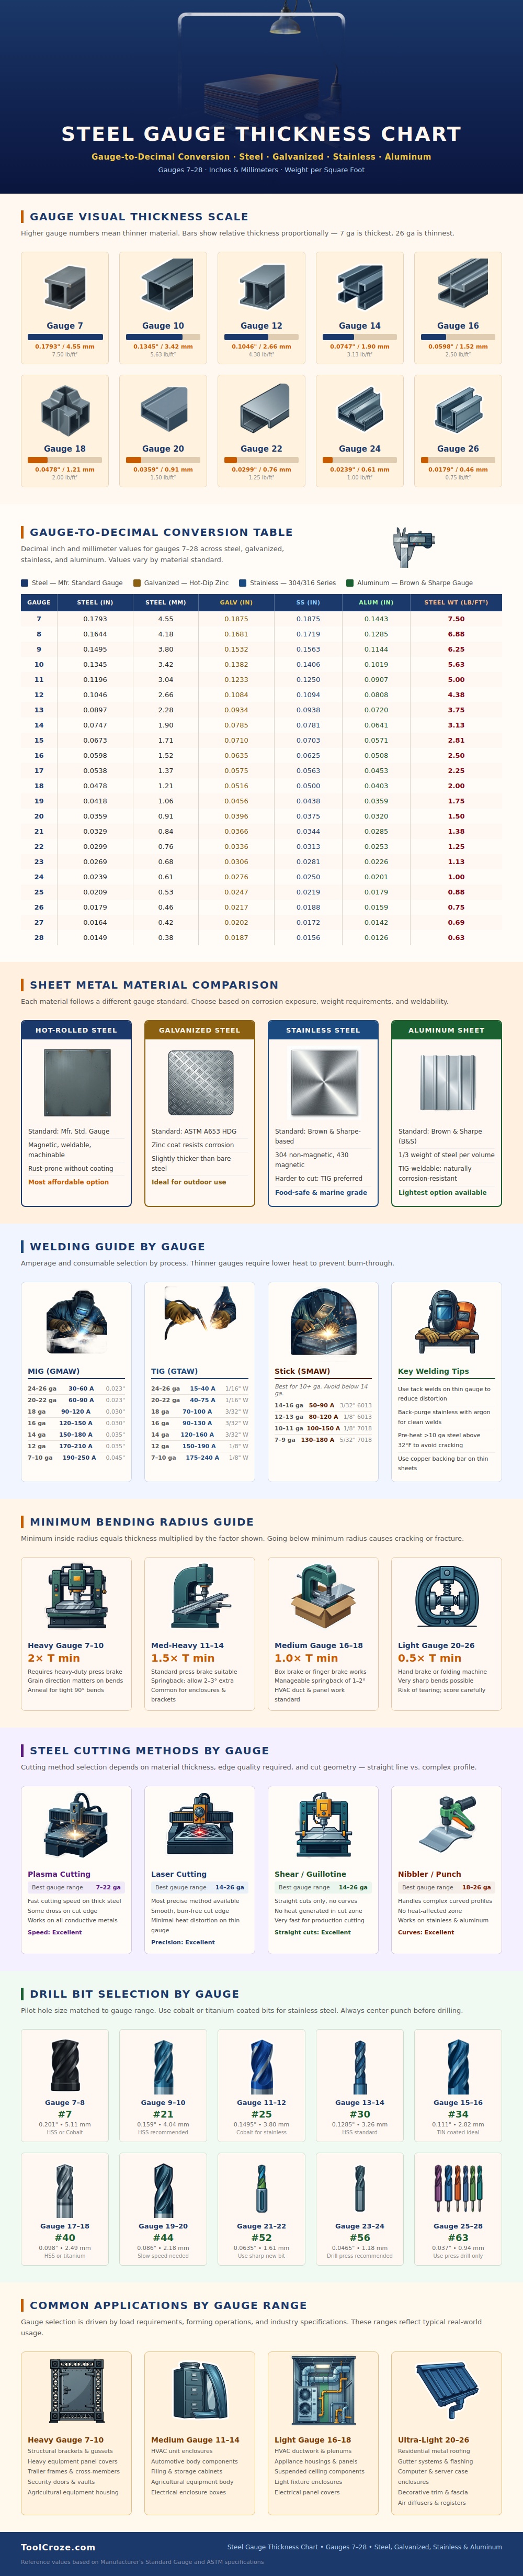
So what’s wrong? The problem is the gauge system is backwards! It is an old-school relic. Under there own numbering system, a larger number mean a thinner piece of material. So how do I know if a sheet of steel is going to hold up or buckle when I put it under some pressure. Most folks don’t have a clue until after making an expensive mistake. That is where sheet metal gets frustrating. Until you do, it doesn’t make any sense. Then once you do, you quit guessing and start measuring confidenty.
A guide to sheet metal gauges For instance, here’s what gauge seven through twenty-eight looks like on the chart above. And it details the differences between aluminum, standard steel, galvanized, and stainless. Most shop manual just lump everything together, which is a recipe for disaster. A number fourteen gauge of standard steel are noticeably thicker then a number fourteen gauge of aluminum. The chart will clarify this as it lists both the millimeter and decimal inch measurements for all types of materials side by side. So you don’t assume that a generic gauge fit universally. Aluminum is a totally different standard altogether. This means that oftentimes you get a thinner sheet with the same gauge number. This can make a difference in fitment or load bearing capacity.
Why Sheet Metal Gauges Are Important
The trick is understanding where the line is based off your own projects. For instance, if it’s going to be hit with actual impact, then lean towards higher gauge. This applies to all welding and fabrication project. If a piece is going to recieve wear and tear, go heavy; otherwise, keep it light.
For enclosures: Lighter gauges (24-26) are super flexible for things like duct work and cosmetic panels. They can also be cut easily and bent without much effort, reducing labor and cost. Heavier gauges (7-8) is overkill for simple enclosures but perfect for structural brackets. The material alone make them rigid enough to resist bending. No need for fancy bracing in those cases. Where the line is drawn depends entirely on your application.
When it comes to working on thin metal, the process of welding is entirely different than that of plate steel. If you up the amperage too much, those thin sheets will burn through within milliseconds. There’s a welding guide on the infographic that links amperage settings with gauge range for both MIG and TIG. As you can see, you need significantly less heat for gauges twenty-four and above. A lot of newbies make this mistake and put same amperage settings on a twenty gauge panel as they did with a ten gauge bracket. You end up with a holey, warped mess. To combat distortion, tack weld the thin gauges to keep them in place before doing the full run. This is a little technique that makes a huge difference in the finished product.
The other big change in cutting technique depends on material thickness. On thicker material a plasma cutter works great, quick and efficient. On really thin sheet metal, it’s not as good at precise cuts. A laser cuts nicely for thin stuff. No more burrs to take off after. If you’re doing a straight line on thinner gauge, shearing is the way to go. Shearing generates no heat affected zone. Thinner metal will bend from the heat before your cut is complete. Having the proper machine for thickness will save clean up time. It will also allow part to fit properly the first time.
Another overlooked thing of great importance is bending radius. If you bend a thick sheet too tightly, the metal will crack or fracture at the outside of the bend. According to the guide, they recommends a minimum radius by gauge size. Heavier gauges need bigger bends. Trying to force a tight radius onto heavy steel would of caused the metal to crack without softening the grain first. Lighter gauges can be bent tighter but with care not to tear. Knowing their physical limitations saves effort & ruined furnitures.
You need bits to drill and patience. Use smaller pilot holes for thinner sheets. Slow speed, don’t pull bit, no chipping. It doesn’t matter what kind of material it is, such as stainless steel. Cobalt bits last longer with stainless. It makes a good cut.
Chart Visually, The visual scale of the chart helps you visualize how much material you are removing at each gauge. Hole size matters but so does surrounding area.
The bottom line is that mastering the steel thickness chart turns guesswork into precision. The gauging chart becomes second nature. Guesswork evolves into precision. No more asking yourself if this material will hold up. Now you know exactly. It is a simple number, one you come to know well. And with that comes the confidence to create something lasting. It could be a delicate enclosure or a heavy duty frame. It’s not rocket science. But it is about the details. The details are in the gauge.
