
Now take your freshly quenched piece of high-carbon steel. It’s red hot, then starts cooling until it becomes brittle. Now it’s really hard, but what happens is that it’s also realy fragile. Hit it with a hammer and it’ll crack in half like glass.
This is what tempering do. It sacrifices some of the hardness for toughness. You’re looking for that happy medium between a tough tool that retains its edge but doesn’t snap when under pressure.
How Steel Color Changes Its Strength
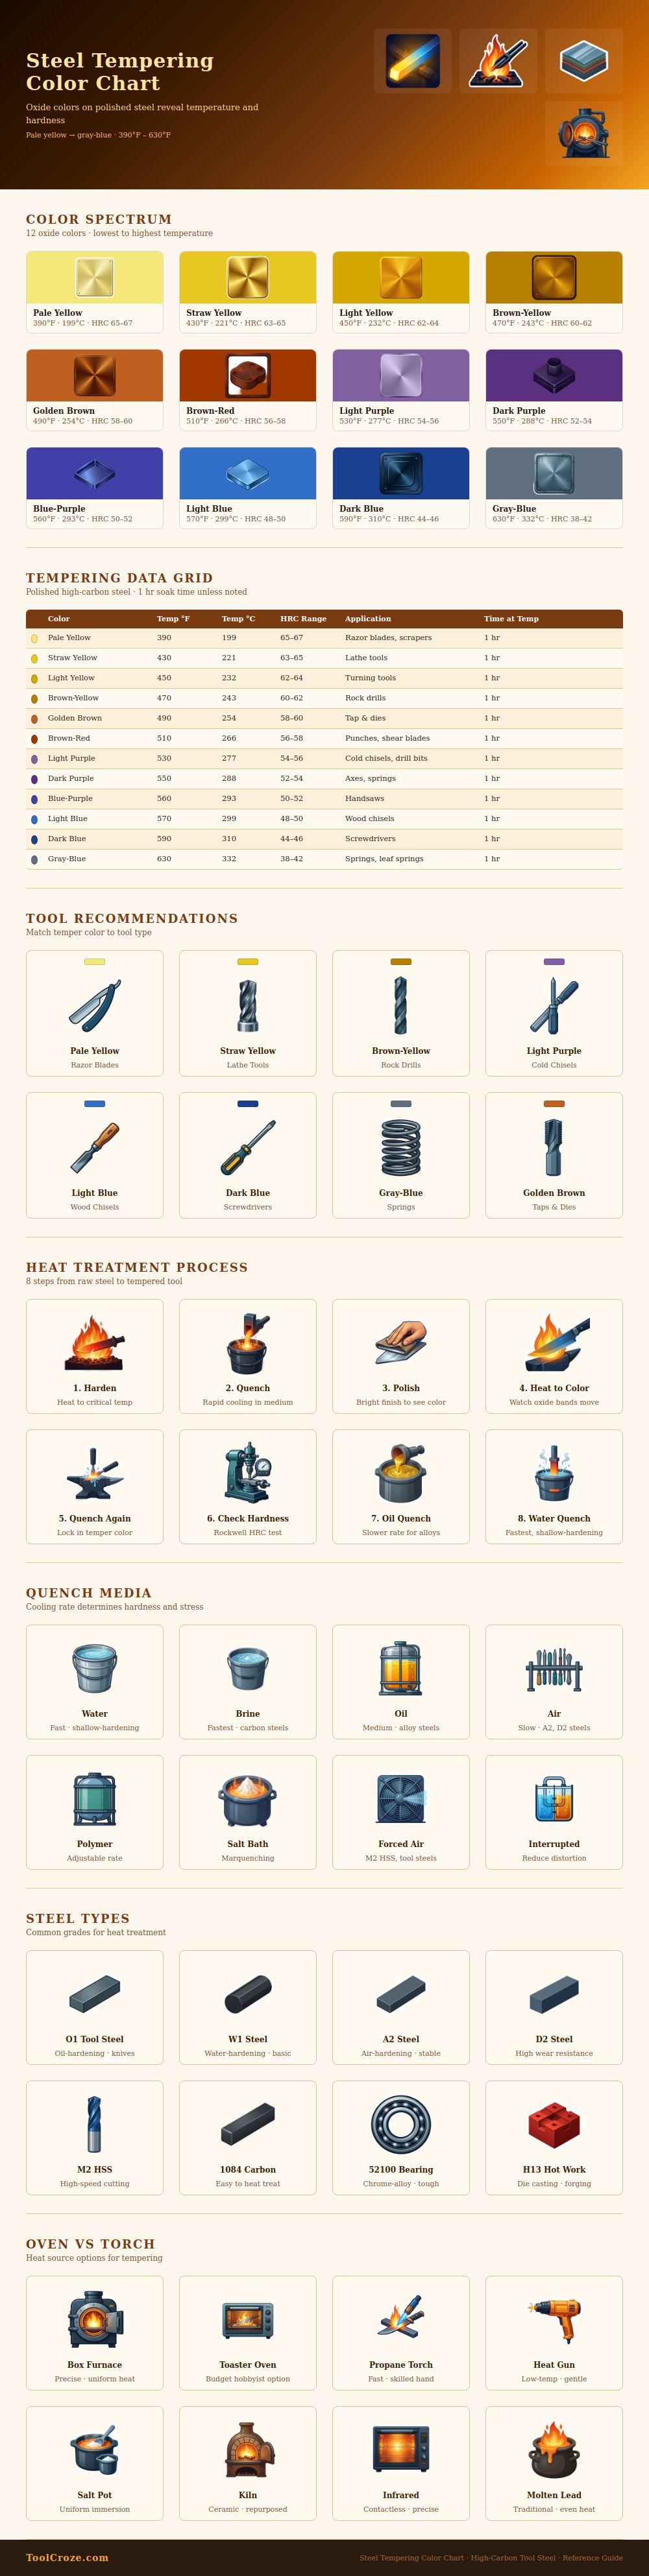
The chart depicts a color spectrum of oxides that forms on the surface of the metal as it heats up. As these colors appears visually, they provide confirmation of temperature. They also correlate directy to Rockwell hardness.
What about those colors? Those are the result off something called thin-film interference, like you might see on an oil puddle or sheen on a soap bubble. When heated, the steel’s surface creates a super-skinny layer of iron oxide. Different wavelengths of light will bounce back into your eyeballs depending on how thick this layer is.
If it’s really thin (and the temperature was low), the layer will be pale yellow. Steel at this stage will still be hard but brittle. That’s perfect for items like scrapers or razors where the goal is cutting paper-thin slice. If the temperature rise, the color will change from pale yellow, then to brown, then to purple, and finally to blue. If the oxide layer is blue, the layer are thicker. This means the resulting metal will have less hardness. This is good for springs and screwdrivers that needs to flex without snapping in two.
It’s tempting for beginners to eyeball these colors in low-light conditions, but this will result in mistakes. Dark vs. Light blue mean the world of difference when it comes to rolling or holding an edge with a wood chisel. To identify these slight changes properly, you must be working under bright, neutral light source. Before anything else begins, make sure your steel is polished free of rust or scale, which will hide its natural hue. Guessing isn’t as good than seeing. It is better to overshoot a little and work harder than to go too easy. However, understanding where every shade falls on the rainbow would of save you from wasting time.
The result is very dependent on how you choose to apply the heat. Whether it’s an oven or a propane torch, the end result will vary based off your observations of color and what you use to apply heat. Because an oven heats evenly, you should be able to achieve your target temperature throughout the whole tool. With a propane torch, you need steady hands since the flame concentrate heat into hot spots. This can cause one part to get too hot and not temper other parts as well. Tempering a long knife like this allows you to move the heat down from handle to tip slowly and have a gradient of harder and softer depending on where the heat was applied. The edge is hard, while the spine is tough yet soft.
Each stage of color on the chart is also accompanied by typical uses to help you decide what you’re looking for. Lathe tools tend toward the yellow end of spectrum, since they has to be as hard as possible when cutting through another metal. A woodworking chisel will get a mild blue (lighter than blue) temper, since wood carries grit with it that might otherwise chip away at a too-rigid edge. Automotive parts and springs typically fall somewhere within the blue-gray to darker blue end of the scale. Flexibility is more important than abrasion resistance here.
Knowing the compromises involved makes this whole heat-treating thing reasonable. It’s not “just heating up some metal.” It’s changing its moddern molecular makeup to fit the task at hand. The type of quenched media will affect the steel as well. Thin sections are less prone to crack with oil versus water (which is slower and safer). However, air-hardened steels does not show these colors as distinctly, but the color progression can still be expected on common high carbon tool steels.
Rushing this process yields an inconsistent outcome; the key is patience. Allow the color to gradually shift. Let it sit in the fluid for at least one hour then re-quench it to make sure the hardness stays. As you become familiar with interpreting these oxide hues, they will serve as a clear sign of condition of the metal.
