
You’re driving screws into hardwood maple with a Phillips bit when you get frustrated with your screw slipping out of recess on the screw head. You try turning and pushing down but the screw strips. Your wrist hurts, and your project doesn’t go as quickly than you expected. That’s enough to make a woodworker think twice about his choice of fastener.
It is also the exact moment they remember the square drive. P.L. Robertson invented this system, which is officialy called Robertson. Robertson received the patent for his design in 1908. In short, the system was designed to not come out. The recess is square sided and grips the bit tightly so there’s no “cam-out” effect. You will fight your tool less and cooperate with it more.
How to Choose Robertson Screw Sizes
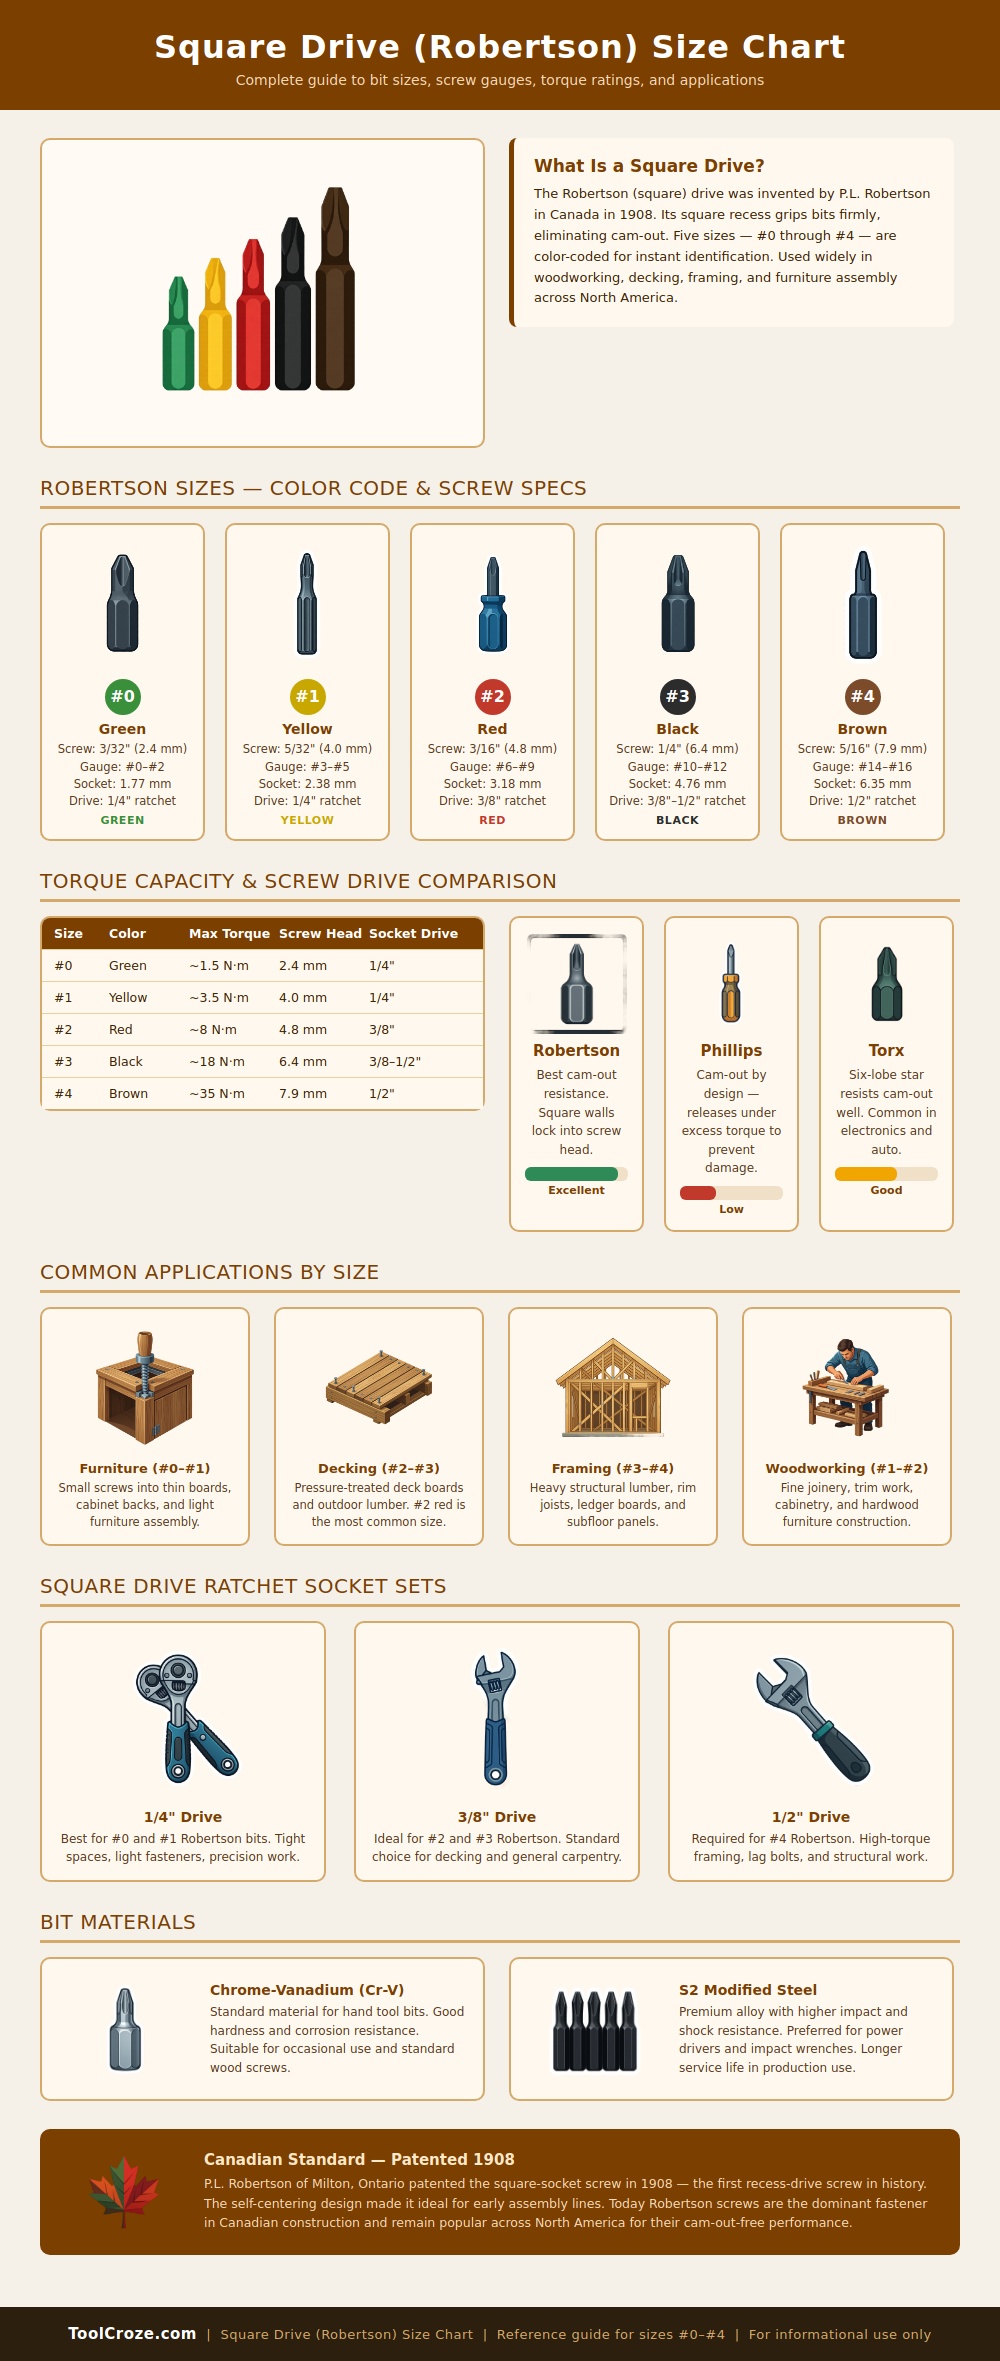
There are five common sizes that you’ll be using, but they’re broken out nicely in the visual guide. Sizes range from zero up to four. They’re all color coded, making them easy to spot on a crowded jobsite. There’s no more having to strain your eyes to read small lettering in low light.
A green handle insert means you’ve got yourself a number zero bit. It is great for thin cabinet backs and other delicate furnitures assembly. Next we have yellow which represents a number one. It’s kind of a jack-of-all-trades bit that works great on most general woodworking trim work. Yellow is a versatile middle ground, while red is known as the deck-building workhorse. It’s tough enough for pressure-treated lumber but still manageable enough to swing all day long. Then black is used for the big daddy number three driver. You’ll want to save this one for heavy structural joints like stud framing. Last, but certainly not least, is the brown bit, which is the main one: the number four bit. Use it for those subfloor panels and lag bolts where brute force meets high torque demand.
Instead, most folks will pick one that appears to be similar in length and get it into the screw. Guess what? You’ve got stripped heads coming your way! What’s really important here is knowing which size goes with which ratchet drive (shown in infographic). Sizes range from a half inch for heavy duty structural stuff to a quarter inch for precise work.
Here’s why… Diameter makes a big difference when it comes to torque capacity. If you try to use a small bit for something that requires a lot of rotational force, it’ll shear right off. On the flip side, if you go too big and use an oversized driver on a fine joint, you run the risk of crushing surrounding wood. The chart shows the torque limits, which is where things get interesting. As you slide across from green to brown, you gain a ton more control over the amount of power you’re able to apply. It’s not all about brawn here, it’s about selecting the correct tool for the material tolerance.
Rather than treating these sizes as random numbers, think of them more like a solution to a problem posed by physics. When building a bookshelf, the green and yellow bits let you control where things go. The gentle ones protects fine veneer. The black and brown versions give you mechanical advantage when framing a house in the rain. Driving long structural screws deep into wet lumber is hard, but the black and brown bits provides the mechanical advantage needed to prevent stalling. There’s an experience between these uses: anticipating resistance before it shows up. You select which bit gives you just enough grip while leaving enough clearance.
So what about the bits? Bits are made of stuff too. For light uses where they’ll be used by hand occasionally, conventional chrome-vanadium steel is just dandy. But run one of those impact drivers day after day on a production line and that same bit will snap when repeatedly hit with sudden blows. That’s why the chart includes “standard” and “modified S2 steel.” The latter is more resistant to impact.
That’s the difference between a tool kit of toys and a pro-grade setup. You will have fewer broken-off tips in your pocket. Less downtime replacing worn gear. And that’s why the square drive design has dominated Canadian construction for well over a hundred years: it addresses a basic mechanics issue. The bit is locked onto the screw head. The energy transfer is efficient rather than wasted in slippage. More energy in the fastener; less in your swearing.
So how do you know what Robertson size to get? Respect the joint. For that matter respect the piece of wood you’re trying to join. If it’s a deck board, go big. If it’s a fine cabinet, go small. That’s where the color code comes into play. Decision made immediately. No guessing required. Outside = red. Inside = green. And since it actualy works, so does the whole system.
So the next time you grab a Phillips bit and it slips on you, remember that square alternative in your drawer. It might save your wrist, your screw head, and your patience. Rarely is there any mystery as to what’s the right tool for the job. Usually it’s simply about choosing the proper color.
