
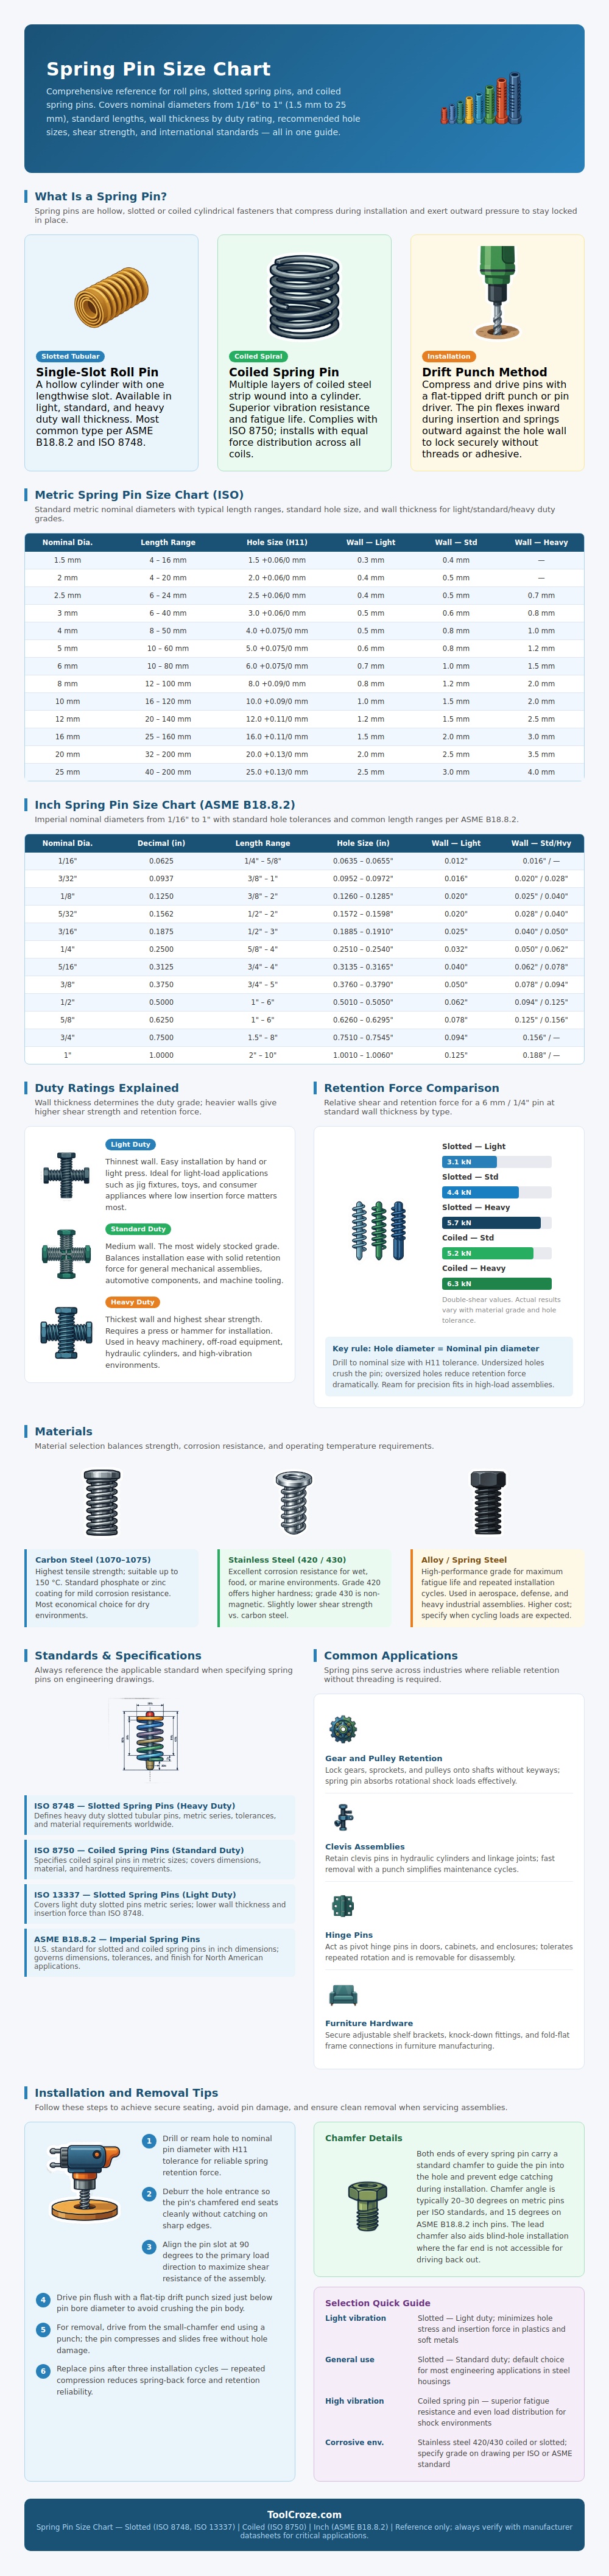
Those spring pins you see is carefully made fasteners that compress, lock and hold against shear force. But don’t let their similarity to generic metal tubes fool you: those little suckers are no common thing. If you’ve ever put together a machine only to find one of those little guy has sheared in half, you know what I mean, it’s when you realize that size matter. The graphic above takes a crack at explaining the sizes (and sizes again) in imperial and metric versions. So if you’re wondering which goes into which, you don’t have to wonder anymore.
Basically, a spring pin is cylindrical tube with hole down the middle. You push it into another hole. When it’s in there, the walls of second hole squeeze it and it comes back out and rests against those walls. This causes it to stick because now you have something trying to turn against another thing. There are no threads on which this pin depend to hold itself in place. It is just physical interference.
How to Choose a Spring Pin
Because of this, your hole needs to be drilled to within a certain size tolerance, which is typically H11. That means “just barely bigger” then the nominal diameter of the pin itself. Drill it too big and it falls out from vibration, too small and you end up crushing the pin. Everything else about dealing with these fasteners depend on achieving that balance.
So when do you use one or the other? That comes down to what the assembly must withstand. A slotted pin feature a long groove along its length. They’re the bread-and-butter pins for most general machinery application. Pins feature various wall thicknesses: light duty, regular, or heavy duty. Thicker walled pins offers much greater shear strength but take longer to install.
A coiled pin is produced by winding a steel strip into a coil. That way the stress is distributed evenly across their entire circumference. This makes them great for high vibration use. Examples include off-road use or automobile suspension. Under cyclic loading, the coiled design prevents cracks from starting and dissapears in any single spot.
The same holds true for material used. For a dry indoor application, carbon steel provide the most tensile strength. They might need to coat it typically with zinc for some minimal rust prevention. For something like a food-processing environment or marine, go straight to the stainless steel. There’s always the risk of corrosion out there and although stainless steel does sacrifice some sheer strength, it’s the obvious way to go. In the middle lie the alloy steels. They has increased fatigue life that works well for defense or aerospace applications where failure isn’t an option. These cost more but you’re buying peace of mind.
Most fail during installation, typicaly from impatience. The drift punch must fit snugly within the bore of the pin. Mangle the outside wall? That is no good. Position a slotted pin with the slot perpendicular to the main load path. That way, you’re increasing surface area of metal resisting shear forces. Drive it crooked and you’re giving the stress concentration right to the weak spot.
Be sure to deburr the entrance hole. The slightest sharpness will catch the chamfer on the pin before it even seats completly. You should of also know the number of pin compressions is limited, too. After several compression, the metal hardens and becomes less elastic. When removing a pin for service, swap in a new one. Don’t attempt to save pennies by reinstalling the old fastener. It will lack the spring-back force that’s so important. That results in rattling joints that eventually shake themselves loose.
So what’s the bottom line on how to choose a spring pin? First of all, it’s less about looking up a table and more about knowing the forces involved. Whether it’s holding a hinge pin in a cabinet door or a gear locked on to a shaft, the principle are the same: You want enough to hold things in place without making them impossible to install. The chart will tell you how much to use, but sense will tell you when. Choose based off the duty rating for the amount of stress. Carefully drill your hole then push it in straight. A little part, but it holds the whole picture in place.
