
Then there’s this: you pull a solid rivet out of tin and think “oh crap, I don’t know if that’s gonna fit”. You drill your hole and stack your plates. And then suddenly aerospace engineering come down to fitting a single little piece of metal. Too short and it won’t clamp what you need. If it is too long, the shank bend before you can form a proper head. Until you learn the math behind it, getting the size of a rivet right seem magical.
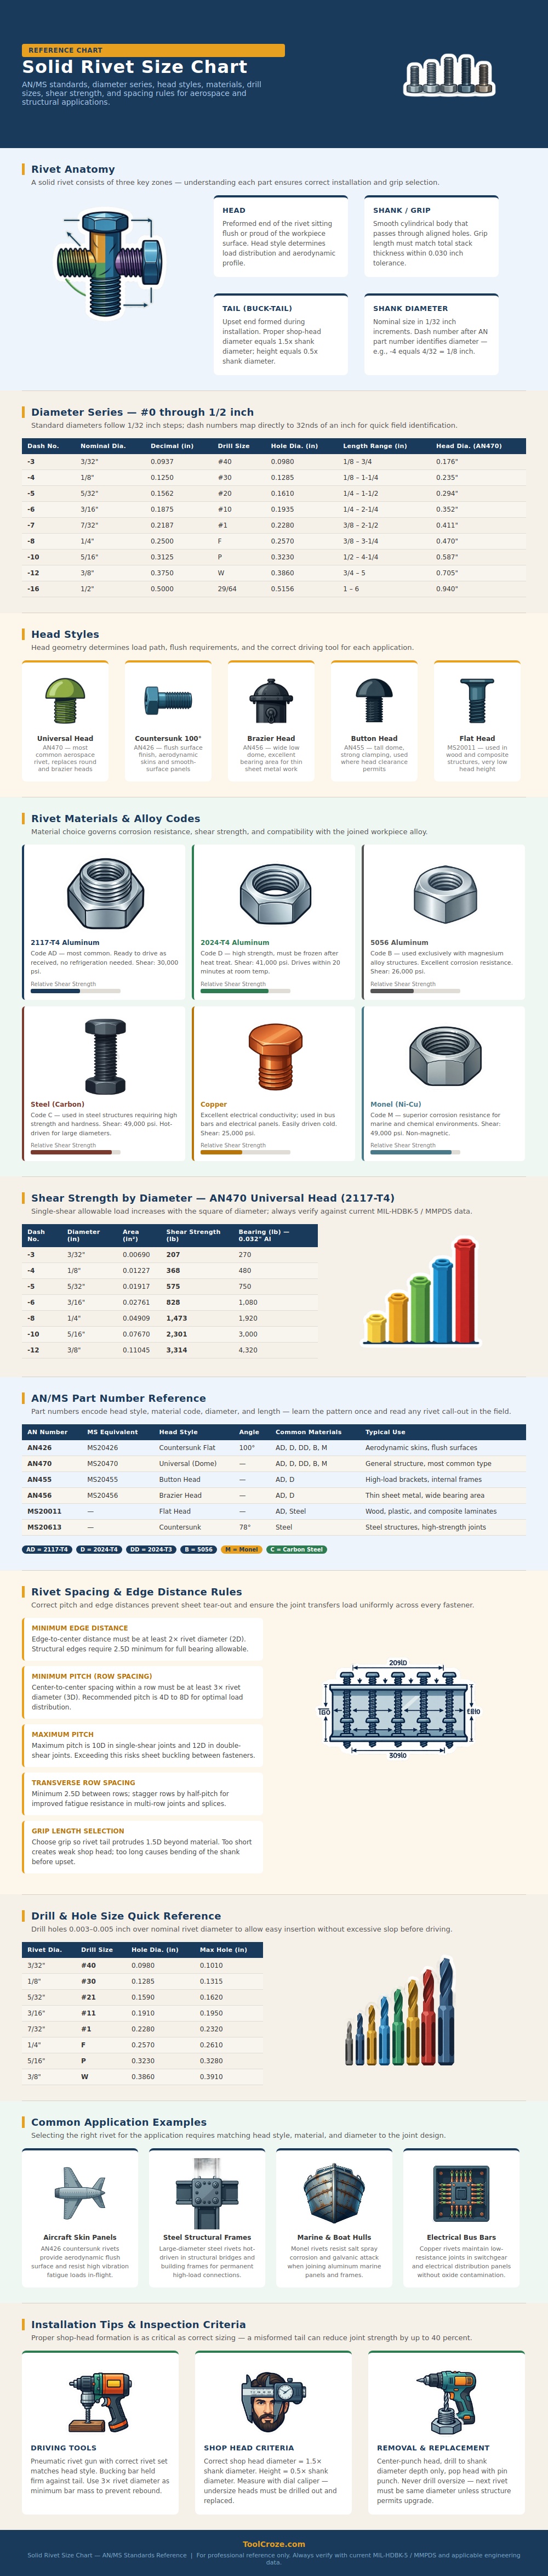
But that math turns out to be mostly geometry + material science. This chart explains it all in terms of head style, length and diameter. It gives you all of these variables which combine into a permanent connection designed to stand up to real world stress. Every failure goes back to one of these three areas; start with anatomy.
How to Choose and Use Rivets Correctly
On top is a manufactured head. Then below that is the shank running through whatever material you’re using. Below that is the head you create at install time, when forming that tail into an upset shape. And that tail has to be perfect. Your formed head needs to have a geometry that’s half as tall as diameter of the shank, and roughly one and a half times the diameter of the shank itself. It is half as tall and one and a half diameters wide. Why? Because that’s what industry standards say.
But it’s precise for a reason: it has to be. If you didn’t have proper grip length, or if your bucking bar technique was sloppy, that geometry is shot. Lose up to forty percent of your joint strength here.
The next step is to choose the diameter which is in the part number. Those seemingly random codes are actualy part numbers. The size is measured in thirty-seconds of an inch and the dash number tells you which size it is. For instance, a dash four is four thirty-seconds. Convert that to inches and it’s one eighth of an inch. Now you want to know what drill bit to use on that hole.
A good rule of thumb for drill bits is to make the hole just barely bigger than rivet diameter. In most cases, that means three thousandths of an inch oversize. That little gap lets the rivet slip in without any force. It helps avoid work hardening and cracking thin sheet material as you try to get them started. It’s a fine line but makes all the difference when you fit it up.
Rivet material selection can be another wrinkle that tricks inexperienced people. Aluminum doesn’t always equal any aluminum rivet. In fact, magnesium alloys needs to be riveted with five-zero-five-six rivets and not any other type to avoid galvanic corrosion issues. General structural uses call for two-one-one-seven. These do not have to be kept in the fridge before they are driven.
Two-zero-two-four have more shear strength but age very quickly at room temperature. What this means is once these come from the fridge, you only has so long to actually drive these things. It is a big pain when you are not ready for it, but it is well worth it on high load applications where every pound of strength matters.
Form and function come together in head style. Aviation’s workhorses is universal heads. A combination of profile height and bearing area works well. When a flush surface is required, countersunk heads are mandatory. Aircraft skin panels fall into this category, as do many others where aerodynamics are more important than bearing area. For thin sheet metal requiring a wide bearing surface without tearing out the material, brazier heads fit the bill. These head styles is illustrated well by the infographic. Use it to visualize your stack-up and decide if you want width, smoothness, or strength.
So we come to the spacing. Theory and practice meet in the shop. The rivet should have at least twice its diameter clearance on each side which gives it some room for expansion without ripping the material away from the cut edge. Pitch is how far the rivets should be from each other along a row. Three to eight diameters is usually good. Too wide will allow the material to buckle between fasteners. Too close reduces sheet strength because you’re taking too much material away. Row staggering spreads fatigue loads across more area, increasing life of the structure dramatically. These are not suggestions but rather structural requirements intended to keep it all together when vibrating.
A well-installed rivet is not seen. A good rivet is not felt as you flex the joint. A good rivet is not noticed at all; you simply have faith in it. And that faith, that confidence, springs from selecting the proper alloy. It’s born of giving it sufficient room. Of shaping that tail precisely. It comes from understanding and respecting the dimensions.
So the next time you reach for your hammer and punch, consider what is really bearing the load: That little piece of metal. And if you’ve given it the strength and space to get it done right, it will do its job.
