
Your resolve is not the issue; it’s never really about you gritting out your way through problems. That little metal cone on the business end of the hose are the issue. Selecting an appropriate sandblasting nozzle isn’t as much guesswork as it is matching physics with the task at hand.
There you stand, the grimy deck or rusted fender before you, hose in one hand, ready to beat away the years of neglect. Compressor fired up, finger on the trigger. Then there was nothing but a gentle mist, as the abrasive stream hit the surface like a feather duster instead of a hammer blow. Your air gauge read “0” and the material remains stubbornely stuck-on. Frustrating, expensive, and avoidable.
How to Choose the Right Sandblasting Nozzle
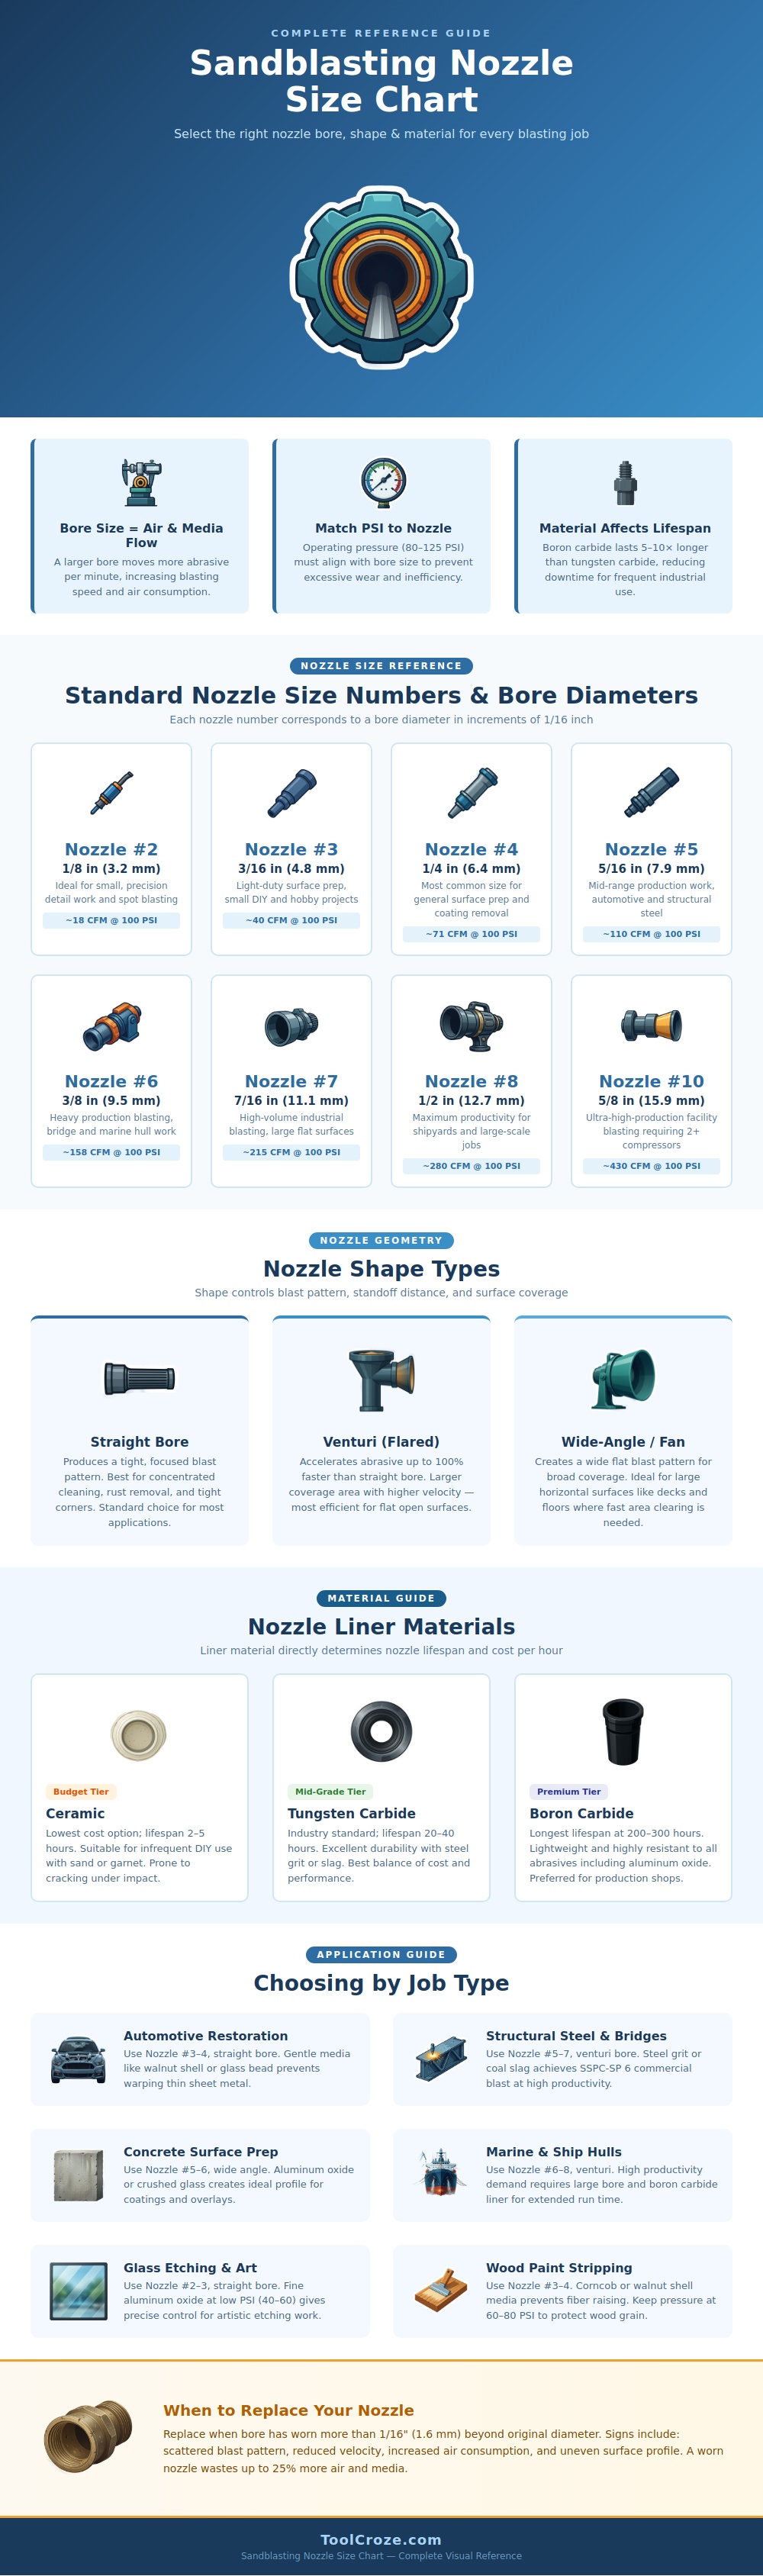
So what’s the first thing you should of learn? Bore size directly affect both media volume and airflow. In other words, you also need to understand that the nozzle act as a bottleneck for your compressor’s power. Choking it by running a large production job at a tiny #2 nozzle is like trying to drive a nail with a toothpick. It simply won’t get the abrasive moving fast enough to remove paint or rust. Using a huge #8 nozzle on a small hobby project is like trying to fill a thimble with a fire hose, you’ll be burning through air and media quicker then you can cover surface area.
The middle ground are most folks’ sweet spot for general restoration work, when standard #4 or #5 nozzles is sufficient to get the paint off but not so much they require industrial grade compressors worth more than your whole project budget.
What kind of hole? Inside that hole matter too. You can choose between a Venturi or a straight bore. This innovative nozzle design illustrates two things: The difference between a beginner and a pro nozzle design A straight bore nozzle is as straight forward as they come. It maintains a tight, focused stream. It is great for delicate tasks and precise cleaning. It is also good for cleaning out a confined area without harming adjacent surfaces.
But if your task involve cleaning off a big flat surface, then the venturi design reigns supreme. By narrowing its throat, it greatly increases the speed at which the abrasive exit the nozzle. Because the media move faster, and further apart, you’re getting increased coverage per second. It’s geometry 101, yet saves us countless hours on the job.
Lastly (and perhaps most importantly), there’s the question of durability, how long will it last before I need to replace it? And how much does each replacement cost per hour? The guide mentions three types of nozzles, boron carbide, tungsten carbide, and ceramic; which fall into different price ranges. Ceramic nozzles are inexpensive, suitable for sporadic at-home use when time is not as important than money; just pitch ‘em when they get all beat up from a couple hours’ work. However, if you’re doing this for a living or large-scale hobbyist project, the relatively low price tag upfront turns into a money pit.
Tungsten carbide hits a good sweet spot in terms of industry standards. It’ll last a whole lot longer than ceramic while still holding up well against steel grit. If you run a busy shop, then boron carbide is for you. Expensive up-front, but it holds up 10x better than ceramic. You’ll save money on replacements, meaning you’ll be making money from customers instead.
Operators are guilty of neglecting wear until it’s painfully obvious. The visual guide suggest a good rule: don’t wait until performance drops noticeably; swap nozzles when the bore erodes as little as a sixteenth of an inch. Sounds small, right? That tiny increase throw off air stream dynamics. This results in wasted media, loss of pressure, and an uneven finish. Caliper-check the nozzle bore prior to each job, thirty seconds saves hours of inefficient blasting later.
Bottom line on all of this is it’s a give and take of time, nozzle size and air supply. Get those three balanced and it goes quick and predictable. You won’t fight the machine anymore, and you will get the job done. Go back to that soft mist we talked about at the top? That vanishes when you find the correct bore for your compressor output. You come away with less stress than when you arrived and a clean surface. That’s what getting set up properly means in real life.
