🏠 Roof Tile Spacing Calculator
Calculate tile gauge, course count, and total tiles needed for any roof section.
| Pitch (x:12) | Degrees | Min Headlap (in) | Min Headlap (mm) | Gauge Range (in) |
|---|---|---|---|---|
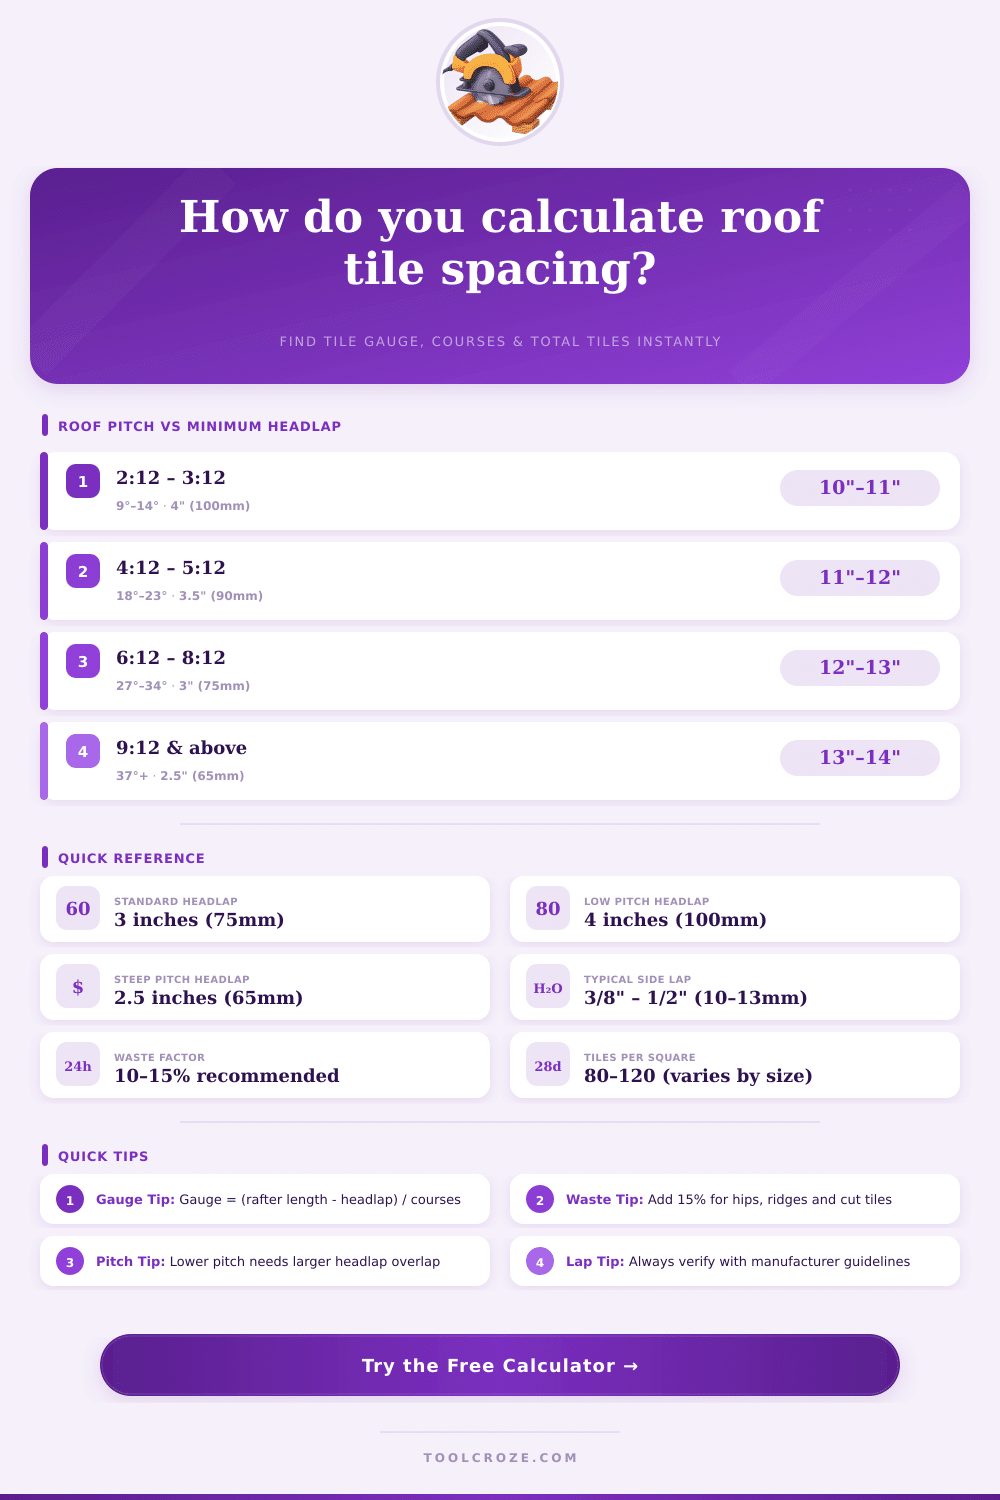
| 2:12 – 3:12 | 9° – 14° | 4" | 100mm | 10" – 11" |
| 4:12 – 5:12 | 18° – 23° | 3.5" | 90mm | 11" – 12" |
| 6:12 – 8:12 | 27° – 34° | 3" | 75mm | 12" – 13" |
| 9:12 – 11:12 | 37° – 43° | 2.5" | 65mm | 13" – 14" |
| 12:12 & above | 45°+ | 2.5" | 65mm | 13.5" – 15" |
| Tile Size (in) | Gauge (in) | Tiles per Row (10ft) | Tiles per Square |
|---|---|---|---|
| 16 x 13 | 13" | 10 | ~90 |
| 17 x 12 | 14" | 11 | ~85 |
| 24 x 12 | 10" | 11 | ~60 |
| 15 x 10 | 12" | 13 | ~115 |
| 420 x 330mm | 345mm | ~9 | ~88 |
| 500 x 300mm | 425mm | ~10 | ~72 |
| Pitch (x:12) | Degrees | Slope Factor | Notes |
|---|---|---|---|
| 2:12 | 9.5° | 1.014 | Very low; large headlap required |
| 3:12 | 14.0° | 1.031 | Low pitch; manufacturer approval needed |
| 4:12 | 18.4° | 1.054 | Low–moderate; 3.5" headlap minimum |
| 5:12 | 22.6° | 1.083 | Moderate pitch |
| 6:12 | 26.6° | 1.118 | Standard; 3" headlap typical |
| 8:12 | 33.7° | 1.202 | Steep; good drainage |
| 12:12 | 45.0° | 1.414 | Very steep; may need special fixings |
The distance between roof tile floors are one of those tasks, that seems easy but genuinely require a bit of attention to reach the right result. It depends on the size of the roof, on the measures of the floors themselves and on the wanted gap between them. Wrong count can cause various problems, for instance water, that flows under the floors, or they raise because of wind.
There is a simple method, that helps to find the right spacing. One takes the total of the floor, removes the length of the spilling overlap, later removes also the length of the ridge. Like this one finds the precise spacing for the roof tile floors.
How to Measure the Space Between Roof Tiles
Everything becomes fairly easy, when one has the right measures available.
Battens play here also an important part. Actually the distance between battens defines, how the floors will be spaced. If the battens are wavy or not well set, then the floors up also will end uneven.
Such flaws hurt the whole look. For start, one measures from the bottom edge of the roof, to find, where the first floor needs to sit. That shows, where the most bottom batten strip is fixde.
The spacing of battens usually falls between 300 mm and 600 mm, but it changes according to the used floors or boards and the local building laws. Battens for floors, that follow the standards, normally have two typical thicknesses: 25×38 mm and 25×50 mm. There is tiny wiggle room of around 3 mm for the beam, so that 38 mm battens can have from 35 mm until 41 mm.
The overlap is very important. Floors should overlap one the other, to not leave spaces. For smooth front floors one requires usually 75 mm of overlap, while rough or sandy front floors require around 100 mm.
Those 75 until 100 mm of overlap between floors also help too protect the nail guides properly. The difficult moment is to ensure, that the last floor at the bottom ends equally, so prior counting of everything is needed.
For double-lapped boards the method is a bit different. One takes the length of the board, removes four inches, later shares the result by two. For instance, 24-inch board minus four inches gives 20 inches, shared by two results in 10-inch space for the battens.
The bottom rows must be spaced like this, that water and moisture can drain. But the openings should not be too big, so that birds cannot nest here. At Spanish floors the edge piece indeed is called a bird barrier especially because of that reason.
A bit of time a bit of broken floor, hidden below, can raise the floors, what looks like a spacing mistake, but genuinely is not such.
The slope matters likewise. If the roof has two different slopes, one must recalculate the spacing for every part separate. And if the whole beam of the roof changes even a little, the spaces between floors could need to adapt.
For instance, building planned for 46 floors with 3 mm spaces, but after thinking about the gable end overlaps, the spaces had to grow to 4 mm, to avoidcutting any floor.