
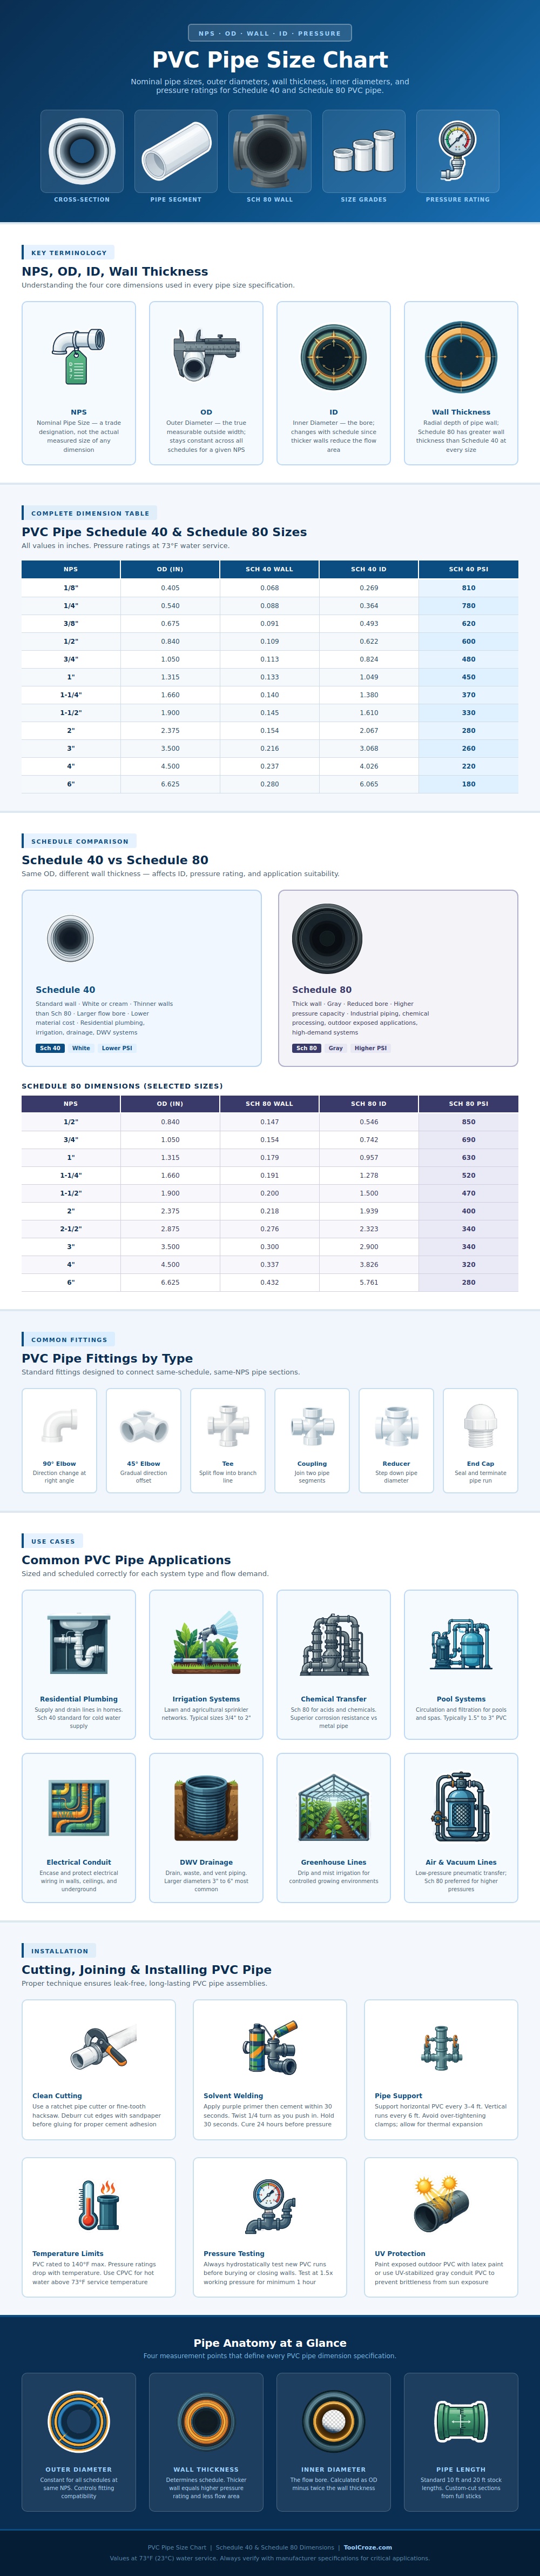
When you enter a hardware store, there’s a wall of similar-looking white pipes. At first glance, they seems identical. But the labels don’t make any sense: you’re used to thinking a one-inch pipe is an inch across; yet it isn’t. People fail to understand: the nominal size is nothing more than a trade name, a handle by which we know the product. It is not an accurat measure. Knowing the difference mean knowing the difference between a successful DIY plumbing job and running back to the store with mismatched parts. These dimensions are broken out nicely in the infographic above.
The inner diameter changes according to the wall thickness; the outer does not. That’s important because when you have two different schedule pipes (like Schedule 40 vs. For Schedule 40 vs. Schedule 80, they will have the same outside width for the same nominal pipe size. They’ll fit together mechanically (no adapters required) but you’re altering your flow capacity. A thicker wall mean there is less room for water inside the pipe. It is a trade-off between strength and volume.
The Difference Between Nominal Size and Actual Size
If you want better resistance to chemicals and higher pressure handling, the price you pay for that thicker wall are a lower flow capacity in Schedule 80. For standard irrigation/drainage applications, Schedule 40 offer you a little more volume for the nominal size. Cost is not everything; it’s also physics. Efficient water movement require adequate space. A pipe with thicker walls and a smaller diameter will save money, but it will cause friction loss, which strains your pump or reduces the drain flow rate. Bigger diameter (oversized) pipe waste money while consuming valuable real estate in narrow wall cavities. The chart allows for seeing these trade-offs by looking at the relative amount of internal space between different schedules.
For instance, compare the interior volume of a Schedule 80 half inch pipe to one with a Schedule 40 wall. The reduced space translates into large area loss over a distance.
The setup can be tricky but takes some care and time. Cutting PVC is straightforward if you use the right tool, like a PVC ratchet cutter. They cut cleanly and eliminate much of the deburring that a hacksaw would require. Turbulence causes problems and rough edges also inhibit a good seal of cement. Use primer between parts being joined. This primes the surfaces and makes them soft enough to allow the solvent weld to bond chemiclly instead of just sticking like glue.
Don’t try to rush the set up or test the pressure until it’s cured. Many people do here and leak when stressed.
Performance depends on temperature as well. As PVC warms up, it loses strength. Seventy three degrees Fahrenheit is what they rate them at. So if your water is hotter then that, go to CPVC for hot lines or derate your pressure rating accordingly. Normal PVC will degrade from exposure to sunlight as well. You can prevent this by painting the outside pipes or using UV stabilized gray conduit, which won’t get brittle like normal white PVC. Seems small stuff until one joint breaks in mid-summer.
When buying fittings, make sure you get the right size and schedule. Although they may appear identical on the outside, a Schedule 40 elbow will not accept a Schedule 80 pipe easy. Heavier wall pipes has a shallower socket. If forced, you’ll end up with a weak joint that leaks when pressure builds. Best advice: Buy the correct component to begin with. The same holds true for reducers and tees. Keep it consistent and avoid headaches down the road.
Use proper support. Use a hanger every few feet on horizontal lines, and on vertical lines, secure runs regularly against vibration. Don’t overtighten clamps, which can crushes the pipe. In areas of extreme temperature swings (outdoors, in an attic), allow for thermal expansion, leave some wiggle room now rather than end up with a crack later.
Before closing walls or burying pipes, test what you’ve done. Weak spots may not be evident during normal operation; hydrostatic testing expose them. Fill the system with water at one and a half times working pressure and let it sit for an hour. A drop in the gauge indicates a leak. Better to fix now than dig it up later. Time invested here pay off in reliability.
It’s cheap, tough and user friendly. No wonder PVC stays so popular. Don’t get careless just because it is easy though. Know its limitations. Measure twice, cut once and don’t expect anything less then a complete cure of your cement. Understand the difference between nominal size and actual size and you have a predictable system. You no longer guess which pipe goes where. You build a system and know it will last.
Those white tubes on the shelf are not magic. They’re engineering tools. Use them as such.
