
Your hammer comes down with a sharp crack that stops you dead in your tracks. You remove the screwdriver and see a split running across your oak board. Many woodworker have made this error. But there’s a way to avoid it.
A tiny bit of detail makes all the difference between a strong joint and a bad day. That detail? It’s called the pilot hole. What is a pilot hole? That’s a little hole, right? Nope. It’s an equation for removing wood fibers.
How to Drill Pilot Holes to Stop Wood from Cracking
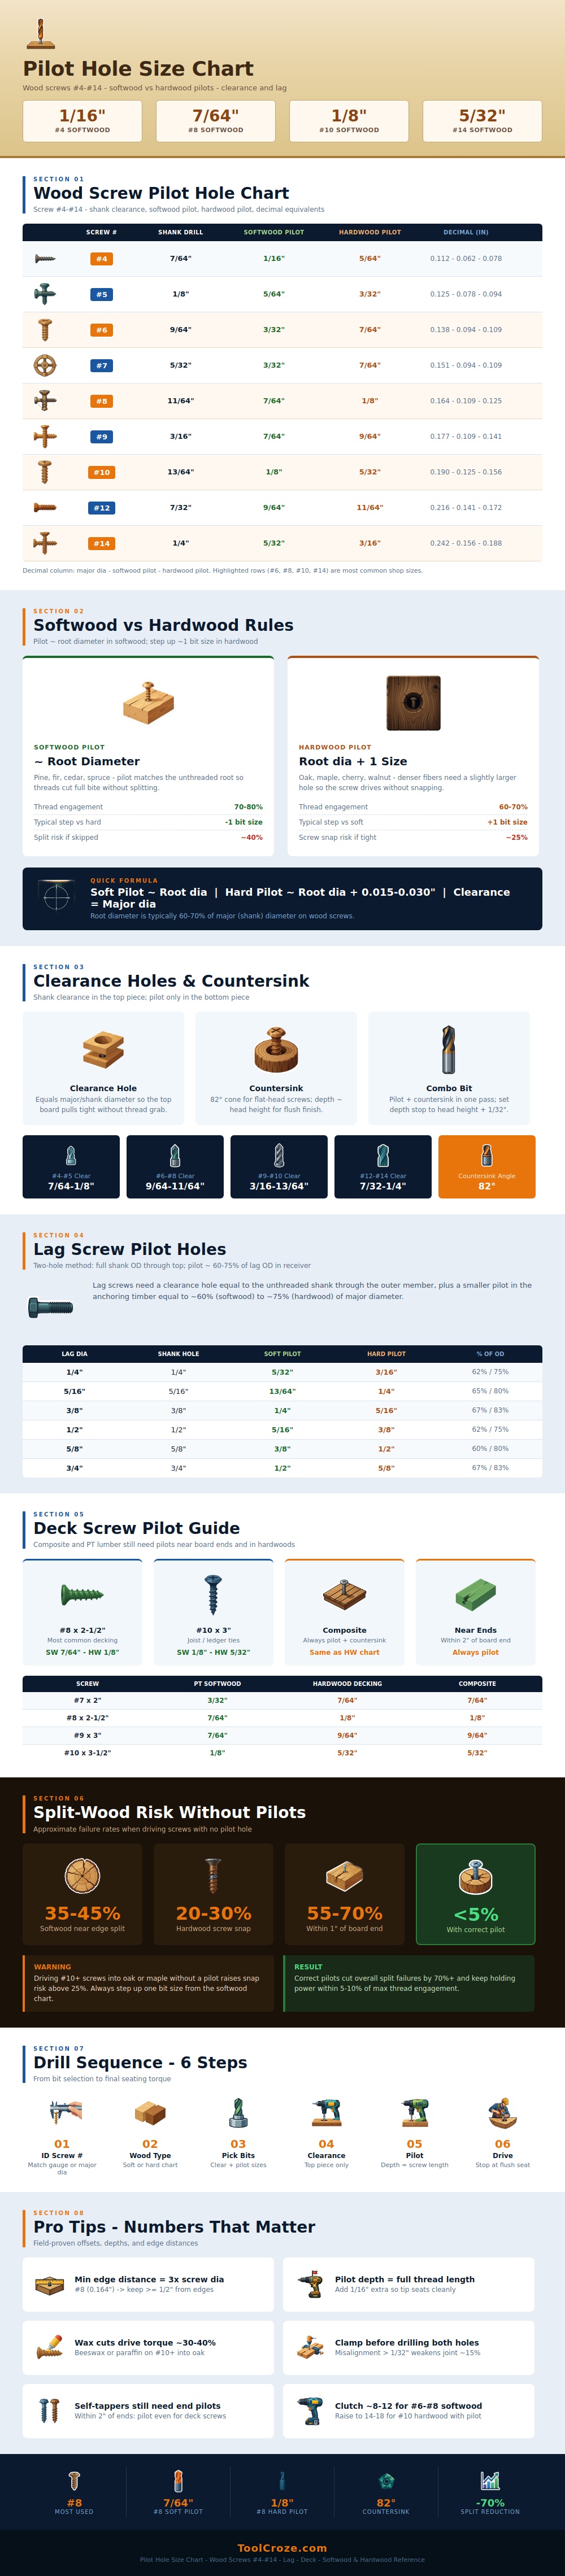
The fibers in pine (or any softwood) compresses as the screw passes down its threads. The fibers compress and expand around the threads; if you don’t remove enough material they tear. To avoid this, the chart matches the size of your drill bit with the root diameter of the screw (the part before the thread begins). You’ll want the pilot to be about the same size as the screw’s root. As it moves past that, the threads bite into new wood but the rest of the shaft glides easy. It creates a back-and-forth feeling of tightening and loosening.
Wood is not always equal. Hardwoods (maple, walnut) has much more brittle fibers with higher density. No compression here. For most wood species, you need a pilot hole about one bit size bigger then your corresponding softwood size. That space is useful. It provides a way for the screw to slip into without creating enough friction to break wood or snap off the screw. Using a softwood pilot size in hard wood will cause problems if you’re working with maple or walnut. Trying to drive a softwood-sized screw at that pilot will greatly increase the chance of screw breakage.
The other level of complication are lag bolts, which have more mass, or girth. Lag bolts require a two-hole approach. For the top piece of lumber, cut a clearance hole that matches the full diameter of the shank. That way the head will pull both pieces together. On the bottom piece, cut a very small pilot hole, maybe only sixty to seventy-five percent as large as the diameter of the bolt. Why? Because if you clear-hole the bottom piece, it won’t hold. If you pilot the top piece there is no clamping action. It’s a matter of correct geometry and good design.
Treat deck screws as if they aren’t self-tapping even though they are labeled that way. They will split wood too. This is especially true at the end of boards. This is particularly true for composite decking. It’s closer to hardwood (i.e., hard maple) than softwood (i.e., soft pine). Driving a #10 screw close to the end of a composite board without a pilot hole damage the material. Regardless of the screw, pilot near the ends. It doesn’t matter what the package says; the material doesn’t care.
It’s easy. You just learn the pattern. Find your bit size, figure out what kind of wood it is and select the correct bit. Drill through the top board for the clearance hole. Next, drill all the way to depth (minus the amount of the pilot) on the bottom board to create the pilot for the full-length threads. Set the tip flush, then go an extra sixteenth of an inch deeper. Wax the threads if you are sinking them into hardwood to reduce friction. The torque drops by almost half and leaves your joints snug as a bug.
If you follow those rules, the split risk goes way down. You get high holding power without risking any structural failures. No one said this has anything to do with applying MORE force. This is a matter of taking off the correct amount of material for the wood to accept the screw. Measuring the drill bit only takes a few seconds; it saves you hours of filling and sanding time. You should of measured first. Respect the grain, keep the bits sharp and let the geometry do the work for you. Your legacy doesn’t need to be a cracked board.
