
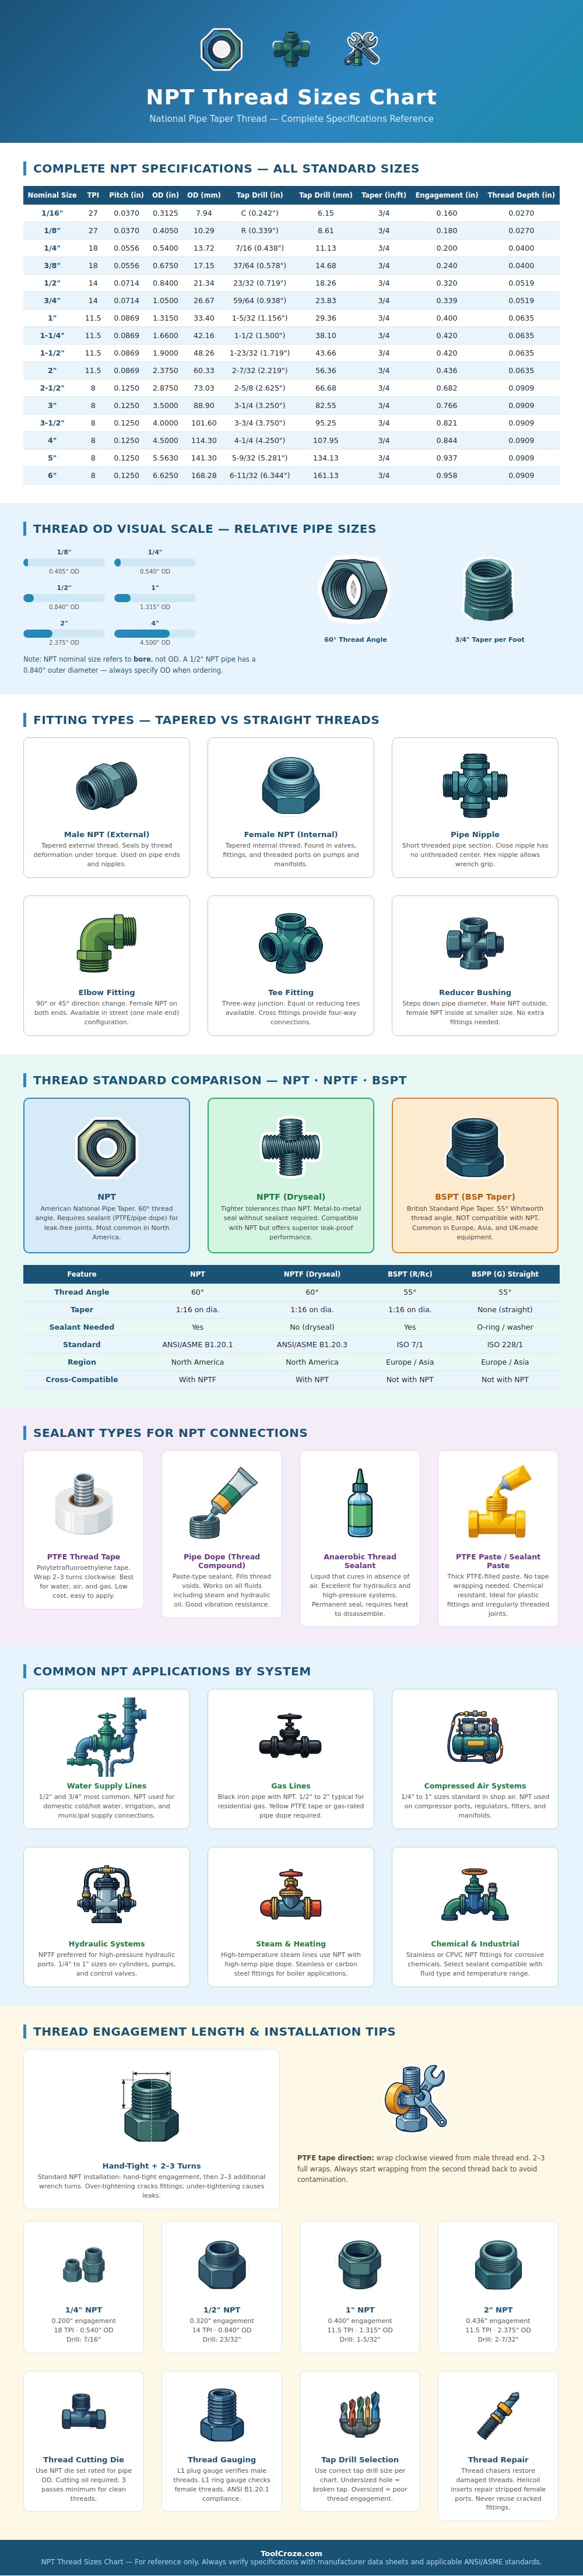
National Pipe Taper or NPT design have the threads increase in size as you move further from end of pipe. In contrast, bolt threads is parallel. Because of the taper, the male and female components becomes wedged together tightly creating what’s called a mechanical seal. It relies on deformation rather than just surface contact.
Respect the physics, there’s no substitute for correct alignment with brute force. As the chart indicates, smaller pipe has a larger number of threads per inch: twenty-seven on a one-eighth and eighteen on a quarter-inch. Two and a half-inch pipes gets down to eight threads per inch. That makes sense based off an engineering standpoint, it’s harder to make something strong enough for big diameters with a lot of threading.
How to Install NPT Pipes Correctly
It also provides the outer diameter of each nominal size pipe. An NPT half-inch pipe isn’t half an inch wide, it’s zero-point-eight-four inches. Nominal pipe size does not refer to actualy width but to the amount of water flowing through it. That will prevent you from purchasing fittings that don’t fit.
These connections need to be sealed with some form of leak prevention, like a filler between flanks of threads. Common options are pipe dope and PTFE (Teflon) tape. With tape, apply it in a clockwise direction so it doesn’t unwind as you turn the fitting into place. Don’t get too near end or else you’ll have sealant inside the connection rather than between the threads. For uneven threads, dope tends to work better since it will fill voids where tape may fail to do so. Dope also tends to be preferred by pros for gas line work, as dope can provide an added measure of safety.
Regular NPT typicaly requires this to maintain pressure over time. It’s not so much what tool, but how it’s installed. For best results, hand tighten first to get the threads lined up. Next, turn an additional 1/4-3/4 turn (using a wrench). Tightening more than that will damage the threads or crush softer fittings like brass. As pipe size goes down, less twist are required for a good seal, as noted in chart below.
Because we assume that tighter = better, rookies tend to overdo it. If you don’t stop at the taper’s natural stop point, you’ll strip threads immediately. Learn to feel when the resistance rise. You should of save money by avoiding replacements.
All that said, once you learn this spec, repairs are easy. What winding direction? What sealant? How many thread to engage? Diameter, pitch, and winding direction makes the difference between a good joint and one where water pours out. Let the taper work for you, don’t fight it too hard. Respect the geometry. Stay dry and keep your tools dry. Avoid floods.
