
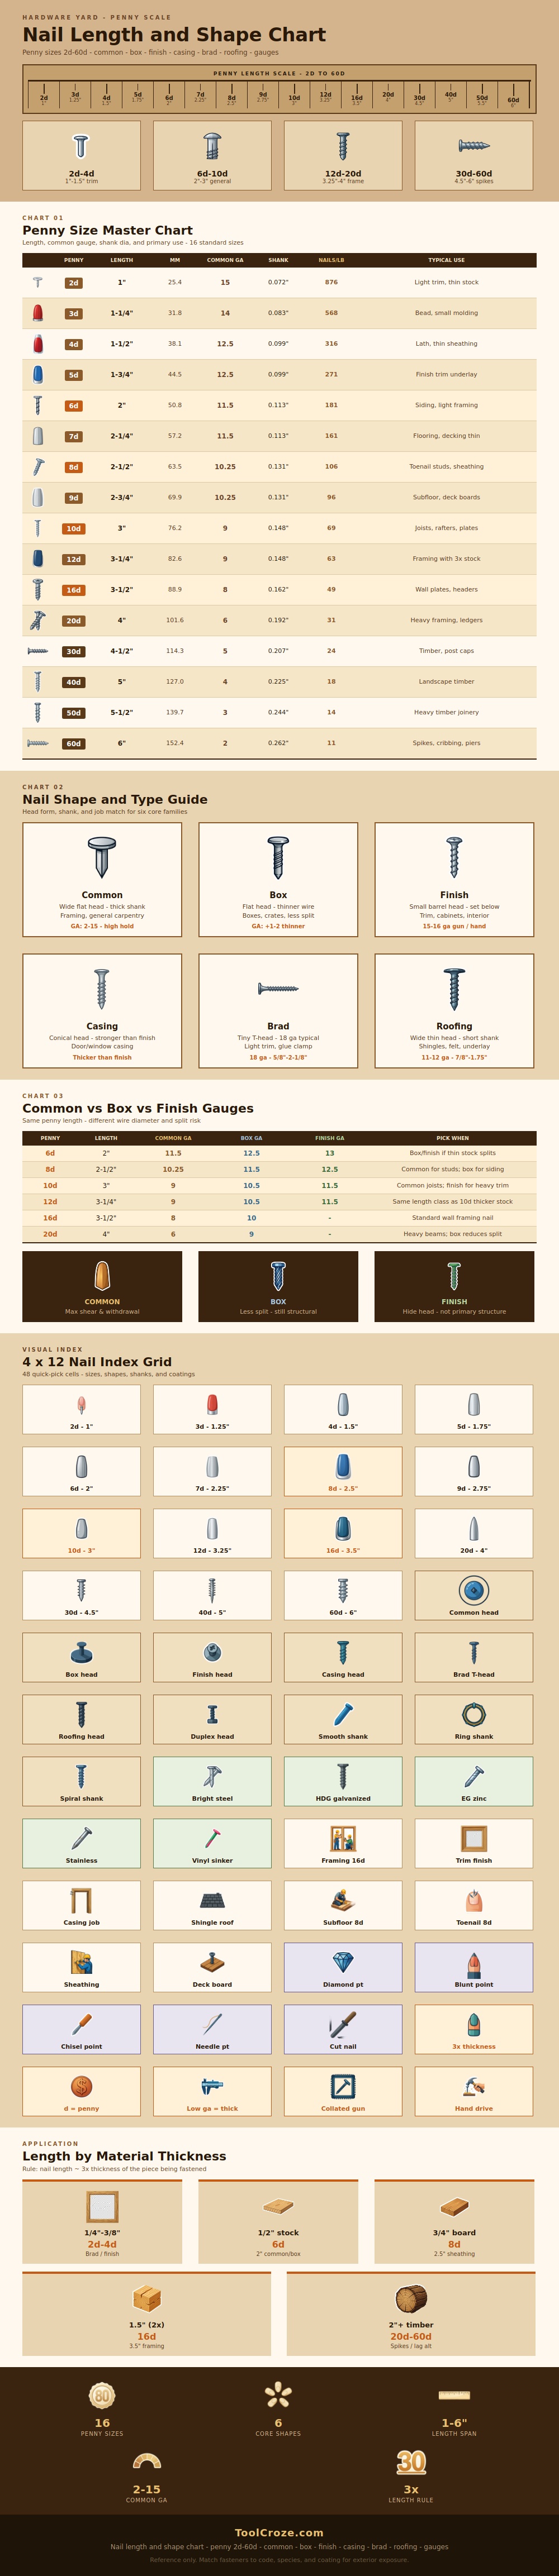
How many times have you been confused at hardware store by the name of the nails you want? Well, with the penny system you can figure out which nail fit your project. Use strong nails for framing the walls and tiny nails hidden from view for attaching trim to wall.
It’s confusing because naming system doesn’t make sense unless you know what it means. A chart will tell you exactly how big each size is. Look at gauge, length and type of head. The chart will help you select proper nail so you don’t have to guess.
How to Choose the Right Nails
An old system called penny scale remains due to its effectiveness. A one-inch nail are called a two-penny nail, and a three-inch nail is a ten-penny nail. It’s mostly logical with random looking jumps here and there, but you don’t have to memorize all the sizes. All you need to know is bigger number = thicker, longer nail.
Wood density matters. Surface area also matter for how well it holds. Thick nails will split thin wood, but thin nails bends in thick wood. The chart matches the nail length to the job, from light trim to heavy framing.
But there is more than just one type of nail. There are box nails with a thin shank to avoid splitting the wood, common nails with a fat shank and head for structural building, casing nails with slightly fatter shank for greater grip in door frames, finish nails with small heads meant to be set below surface and hidden, brads that is tiny and thin for delicate moldings, and roofing nails with short shanks and wide heads to hold shingles and go fast. The form fits the function. A brad nail on something as structurally important as a frame won’t do it justice, and a common nail on trim will ruin finish.
One thing to note on length: You want your nail to penetrate at least half its length into supporting member. And it’s best if the nail penetrates roughly three times thickness of the piece being fastened. For instance, with a half-inch board being nailed to a stud, a two-inch nail is nice (it holds the board down and doesn’t poke through other side). With two-inch lumber being joined together, use a four-inch nail for proper penetration. Good joint penetration are all part of the geometry. Too little penetration in wood causes weak joints; they breaks off when pulled.
The gauge indicates wire thickness. The lower the number, the thicker the wire. For example, a six-penny common nail is much stouter different than a finish nail of the same length. When nailing into hardwoods (such as oak) and softwoods (like pine), this is important: Oak resists penetration while pine split easily. Because thinner gauges penetrate easier, they’re less prone to cracking the wood. Thicker gauges stays in place better and are harder to pull out from the side. Use the chart to select gauge appropriate for your task. Don’t go too thin on fragile surfaces or too thick on heavy duty work.
The last decision you’re going to make is coating. Use bright steel for interior jobs. Use stainless steel or galvanized steel for exterior applications. Why? Because rust creeps in and pushes on the nail heads over time, loosening their hold and ruining how they look. Little things like this could of caused a lot of grief down the road.
Matching tool to task is what choosing the proper fastener comes down to. Once you learn the penny system you have a handy dandy language to guide your way. Start with length, then shape adjustments, then gauge checks. Consistency make it work.
