
You measure twice; you build picture frames. Carefully, you cut. Then you press those two pieces of wood together and notice there’s a big gap. What happened? Your frame resembles a broken puzzle.
Your hands aren’t usually the problem. The issue is geometry. When starting out, most people consider the angle of the corner. Seasoned woodworkers considers the angle of the cut. They’re not the same.
How to Cut Wood Angles Correctly
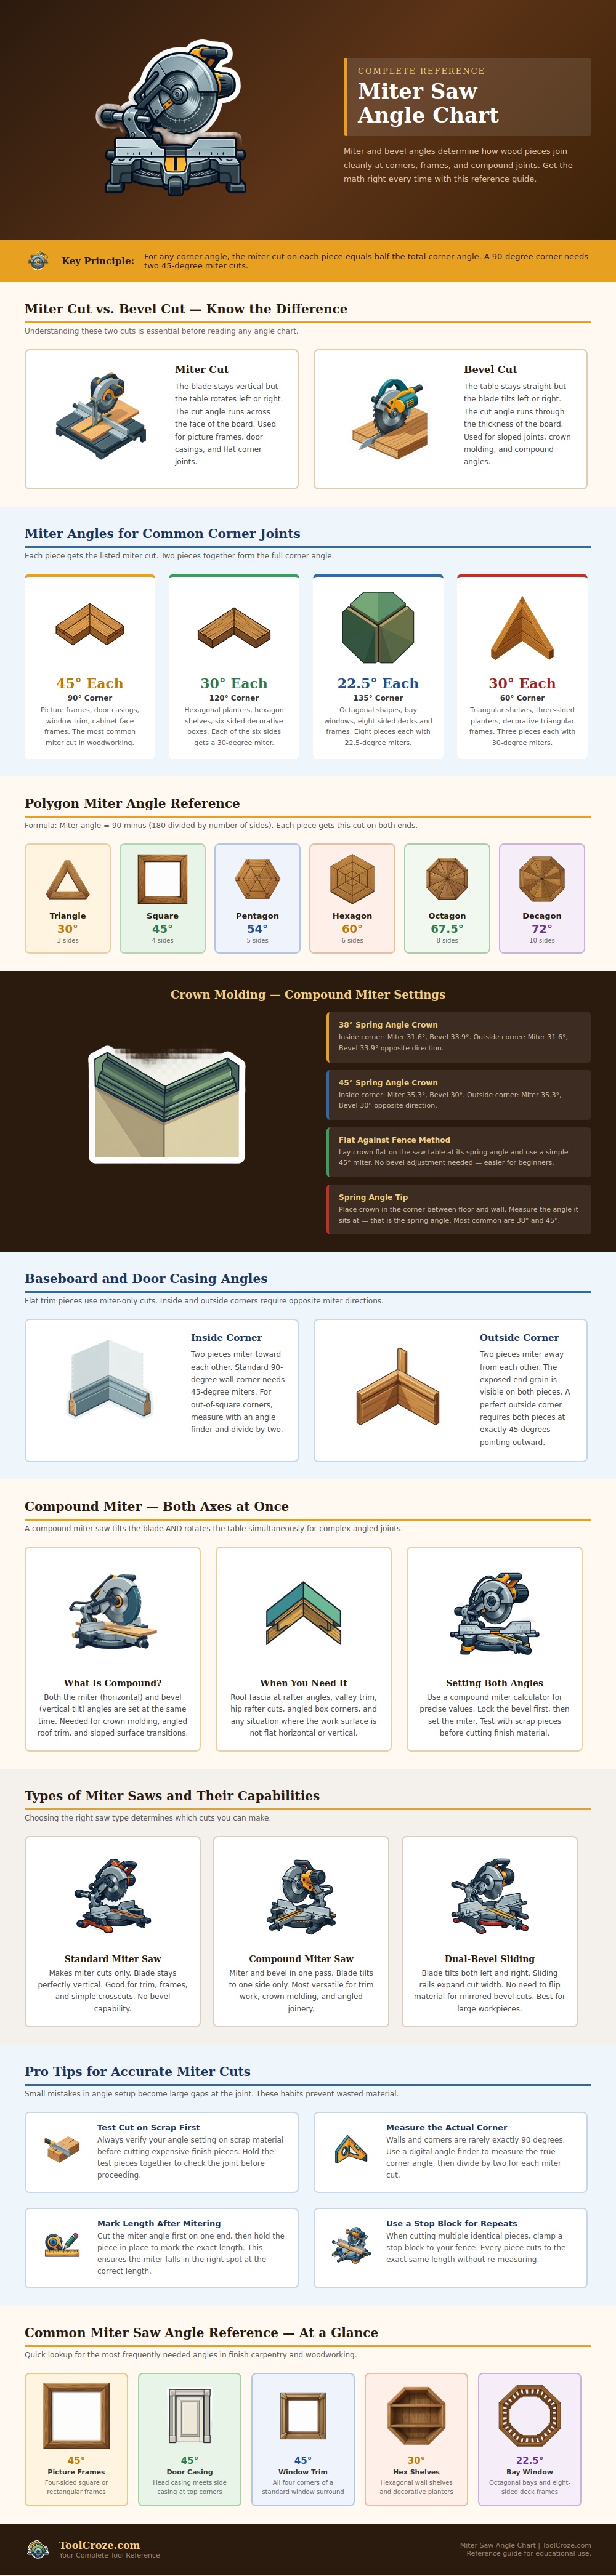
The chart above clearly spells it out. It serves as a reminder that for an ordinary ninety degree corner, you shouldn’t set your saw at ninety. Set it at forty-five. Each piece carry half the load. That’s the root of every clean joint you’ll make.
But in order to rely on those numbers, first you need to know what it is that your saw’s realy doing. Almost everybody who learns this trades gets tripped up by the difference between a bevel cut and a miter cut.
A miter cut occurs when the table swivels left or right while the blade stays vertical. You’re making a cross-cut across the face of the board. That’s what you do when you want to join flat trim on either side of a window or door.
Now a bevel cut is different. In a bevel cut, the blade tilts sideways, while the table remains stationary. You’re cutting at an angle through the thickness of the board. What you create is not a corner but a slant. Knowing which way to move each axis makes all the difference. Otherwise, you’ll end up with two pieces that won’t fit together no matter how hard you try to glue them down.
And once you understand that difference, everything else falls into place. Want to construct a hexagonal shelf? Look at the chart, you’ll be cutting thirty degree angles on each end of those six piece of wood. An octagon? Drop down to twenty-two-point-five. And it looks like math, but it’s more like rhythm. It’s always the same formula. One hundred and eighty over how many sides are there…then minus that number from ninety. That’s the angle of your miters.
The mistake most folks make is forgetting to switch directions when you go onto the following piece. Cut left on one side. Cut right on the other. Otherwise all of your individual cuts will look great, however, your overall project ends up looking jagged and uneven because you didn’t alternate directions.
Crown molding adds another dimension, which turns simple geometry into something very difficult. We refer to it as a spring angle. It’s simply wood meeting both a ceiling and a wall. Since this isn’t a flat surface, you’re not merely rotating the table. You must also adjust the blade’s tilt. This is called compound mitering.
The infographic details the appropriate settings for typical forty-five and thirty-eight-degree crown angles. Why those exact figures? Because if you adjust your bevel just one degree off, your top molding edge will touch the ceiling and the bottom will touch the wall (or vice versa). From across the room, it’ll appear sloppy.
For absolute beginner types, there’s a workaround, what we describe as the flat-against-fence technique. But mastering the real deal compound cut will save you headaches over time.
What’s possible depends on which tools you have. For instance, a regular miter saw turns but doesn’t tilt. That means simple frames and flat trim. Switch to a compound miter saw and now you’re good for some angled box joinery as well as crown. Best of all are dual-bevel sliding models where you can set your blade angle (tilt) left and right and don’t have to flip the wood around. So much more accurate! It is also way faster than moving that heavy piece of lumber back and forth every cut. It will pay for itself in salvaged wood in no time.
You need to be precise but patient. Precision and patience are both required when you need accuracy. Chances are good that walls aren’t plumb, and corners aren’t quite square. Maybe it’s eighty-nine degrees, maybe it’s ninety-one? Cut them both at forty-fives assuming a right angle (ninety), and then try fitting the second one onto the first, you’ll either have an overlap or a gap.
So how do you account for this? Measure the corner using a digital angle finder, and then cut the first at exactly half of whatever angle it is. Hold it up, trace where the next should go against the wall, and cut that last. Do it always on some scrap material first so you can make sure you have your setting dialed-in correctly. Cutting expensive finish wood wrong hurts way more better.
To keep everything consistent, clamp down a stop block on your fence for repeat cuts. And when you get these pieces all cut and they slip right into place without any gaps or overlaps, well, that’s when you realize why the math was important. They didn’t stick together from glue, they stuck together because they respected each other’s angles and built a frame.
