
In any machine shop there is one particular sound that means trouble. It is not the deafening smash of a dropped tool, but rather the telltale screech of chatter as soon as the smell of melted metal begins to start. In most cases, this occur when you wing it on the spindle speed rather than calculate it out. Perhaps it’s just a hunch that if you turn on the lathe and move the feed lever over, away from you, then you’re going to be making parts?
Guessing the correct spindle speed each time you make a cut is like playing Russian Roulette with your tool life and your part quality. Every single time you go too fast or slow, which is guaranteed at least occasionaly… You’re gambling with your results, and that’s costing you money. When you take away the intimidation factor, cutting speed really comes down to some pretty basic math. It’s all about taking the diameter of the piece you’re working on and turning it into revolutions per minute for surface speed you desire.
Why You Should Calculate Spindle Speed
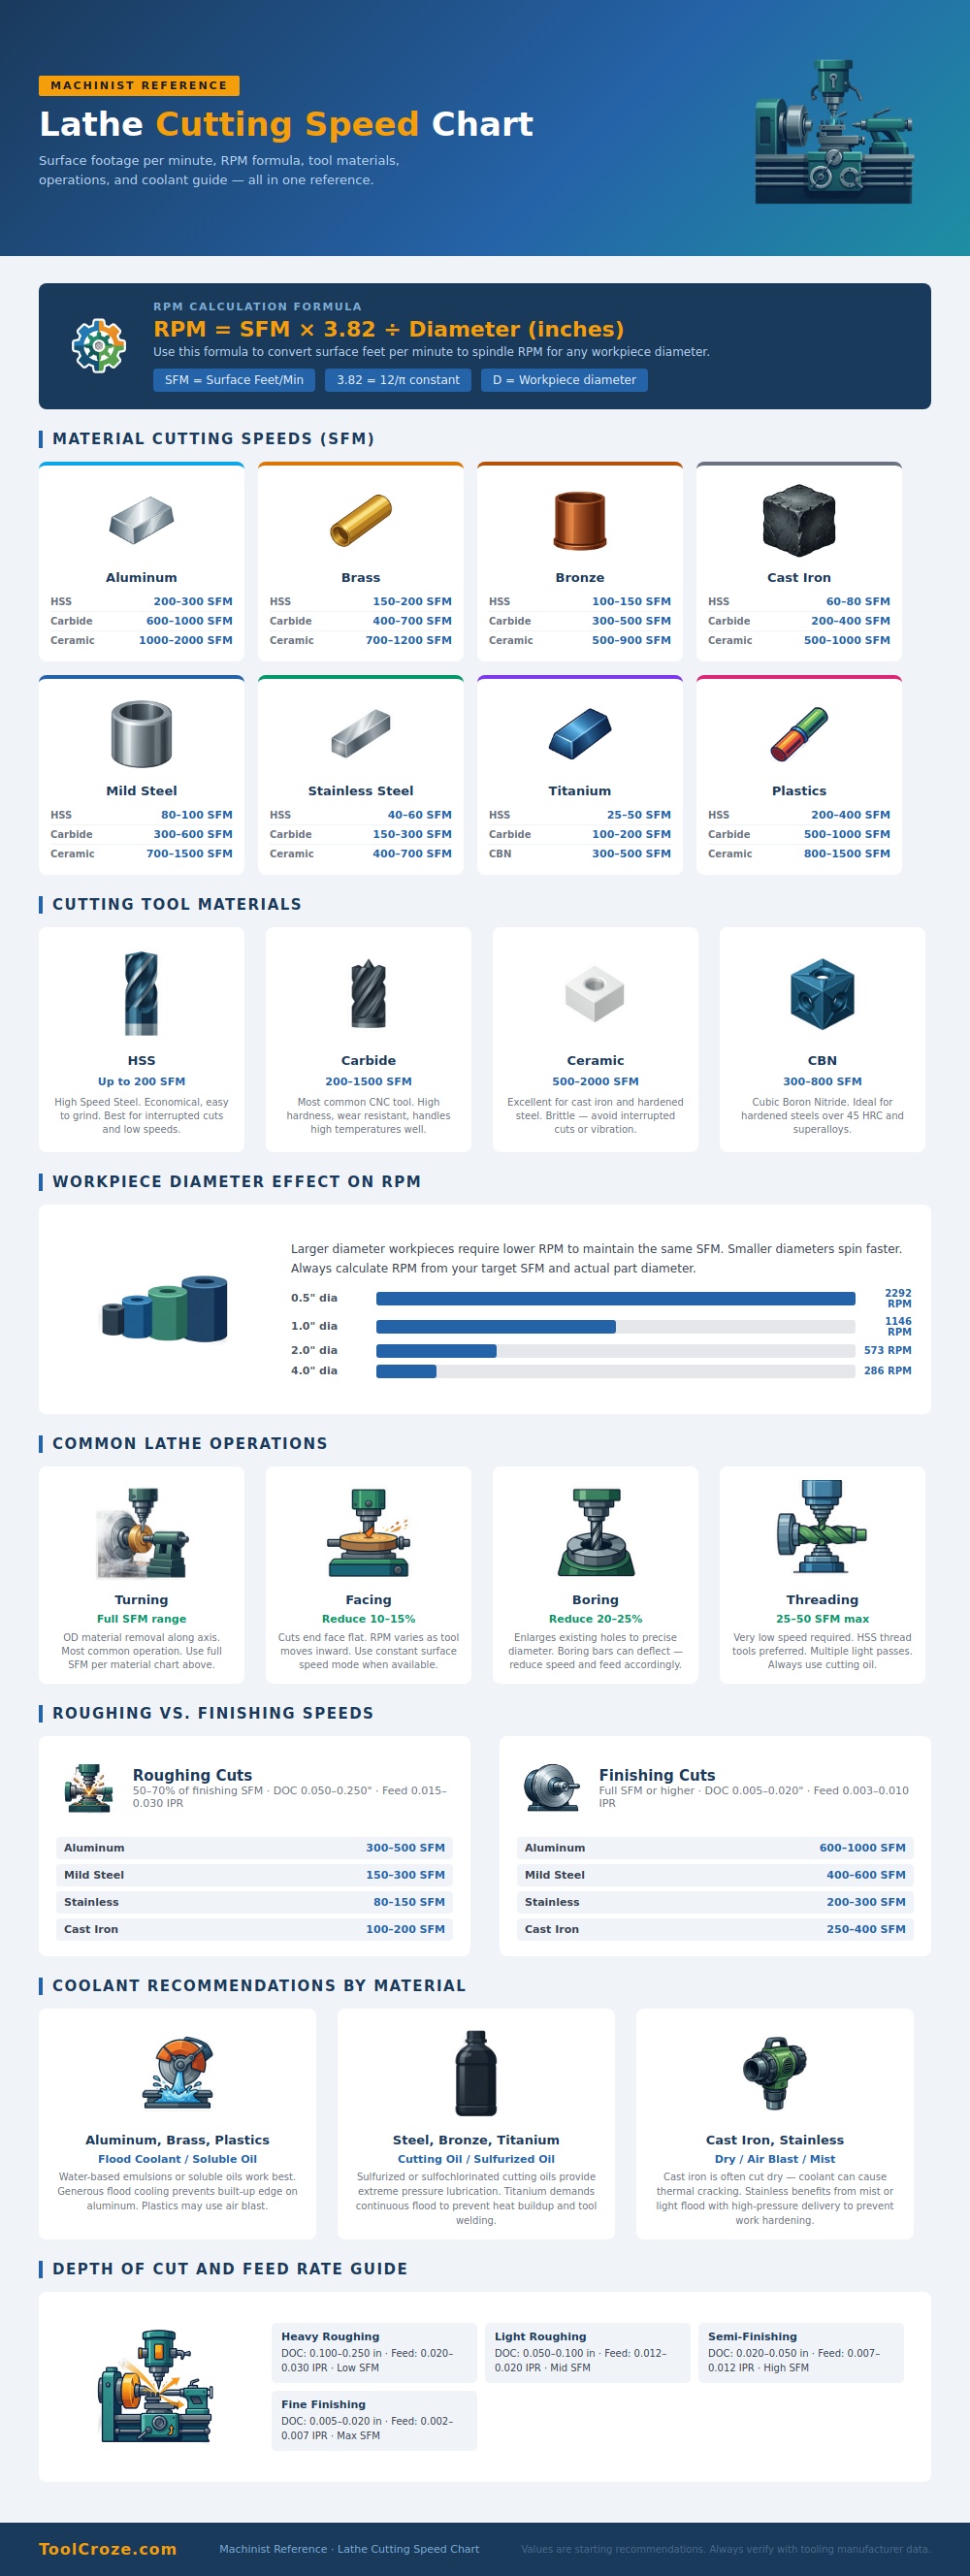
For example, the chart above make it clear that the spindle speed needed decreases a lot with tougher or harder material. You don’t want to spin the part as fast as you can. Because if you go too slow, you’ll end up rubbing the tool against the material rather than cutting which generates heat and work hardens materials such as stainless steel. Or if you go too fast, you’ll destroy your bearings or melt the tip of your tool.
The material of your inserts makes all the difference. Cheap and forgiving, HSS isn’t up to par with today’s temperature requirements needed to run production runs. Carbide is the work horse and remain hard at high temps. For softer materials such as cast iron, the reference guide points out ceramics can double or even triple those speeds. On paper, doubling the speed sounds good but ceramics aren’t forgiving. You want a rigid set-up and any type of vibration will shatter a ceramic tip before you complete the first revolution.
It’s important to match the rigidity of your machine to strength of tool. The other consideration is diameter. If you need the same cutting velocity on surface, then a larger pulley (shaft) will spin slower than a smaller one. The two have an inverse relationship which the graphic shows clearly.
If your diameter is large, perhaps begin by selecting a moderate RPM that makes you feel comfortabley. As the tool travels inward from the outside of the part, you’ll notice the actual surface speed decreasing unless you’re using a lathe that has constant surface speed control. If not, your finished product won’t be as good when you get near the nose of the spindle.
Most operators is guilty of making silent errors regarding their coolant plan. For example, aluminum becomes like glue if heated up. It should of being running with flood coolant to wash away chips and to avoid buildup at the cutting edge. On the other hand, titanium has aggressive heat holding properties and requires constant pressure to avoid tool welding itself to the part. Cast iron typically runs dry due to its naturaly lubricating graphite structure; adding water can lead to thermal shock cracking in a cast iron part. It’s not only about dialing in the correct speed, but also knowing when to engage the pump.
Finishing requires a whole other mindset from roughing. In the rough, you’re taking huge depth of cut with slower speeds to avoid mechanical stress on the tool. It is about endurance, not precision. Then you get close to the final size in thousandths. Really back off on the depth and increase speed while decreasing the feed rate. This polishes the surface instead of tearing it. The transition between those two modes are where great parts become excellent parts.
There are always three variables competing with one another in machining. Speed, feed and depth of cut can never all be maxed out at the same time without hurting either the part or tool life. Those is the starting points for making those choices, as laid out on the chart. But it’s your eyes and ears that confirm the outcome. Look and listen for that even hum that shows efficiency in material removal; don’t hear the squeal that signals lack of stability. Get your speeds right upfront and you’ll get more time shipping product and less time swapping tools.
