
When you’re working on something and a hose leaks, you panic. Why? Because you “guessed” at the size. That is why you guessed, right? The reason we guess is almost always not because we used wrong tool, but rather because the barb (outer diameter) didn’t fit the hose’s inner diameter.
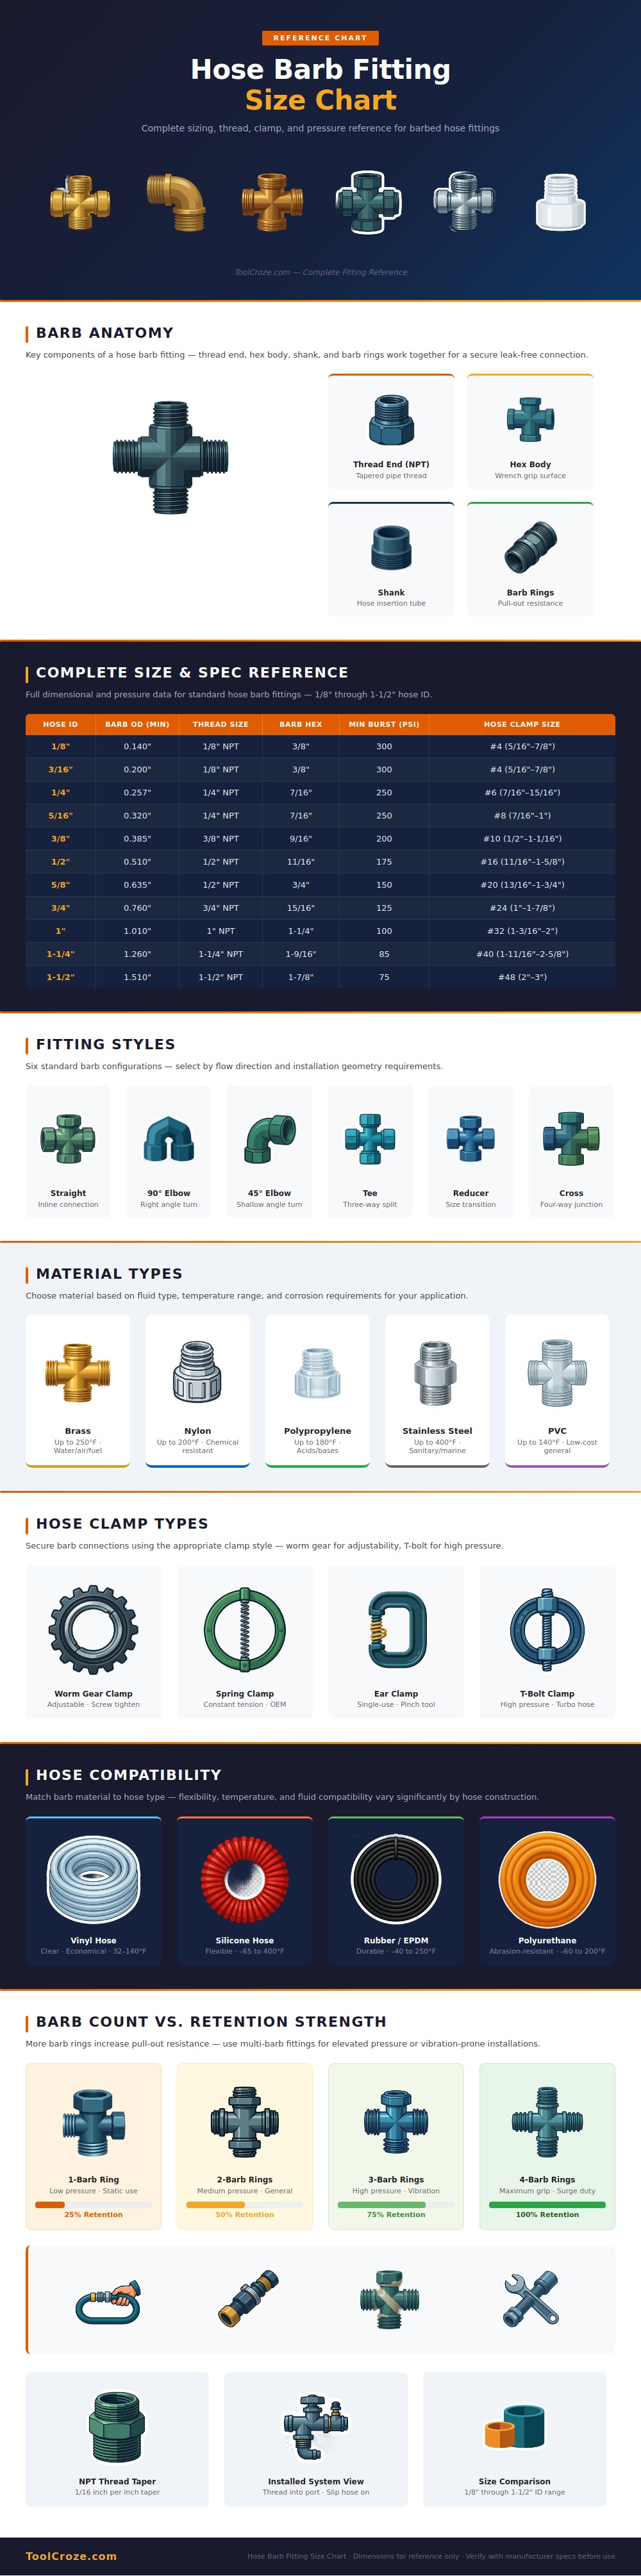
Hose barb fittings seem simple, right? So, who wouldn’t pick the wrong one? It can look like it fits, but it can leak just as easy under pressure. The key here is dimensions doesn’t match. Below is a chart demonstrating how all those sizes matches from small eighths-of-an-inch measurements to large inch-and-a-half connections. That way, you get it right the first time. You will save time and prevent spills.
How to Choose Hose Fittings and Prevent Leaks
So there you have it, the anatomy of a fitting. Once you understand what’re looking at, it’s not complicated: The hex body allows your wrench to grab onto something besides air (and the screw doesn’t get stripped as you tighten), and the threaded end screws on your equipment. When the system becomes pressurized, barbs in the shank digs into the hose’s inner wall. More rings mean stronger resistance against being pulled out. This creates a mechanical lock between them and keeps everything held tight together. In harsher conditions such as agricultural machinery or car-cooling systems where vibration is common, those barbs is even more critical.
Most DIYers will cut a corner when selecting materials. And they don’t get far. For general use like fuel, water, and air lines, I prefer brass as it resists brittleness at moderate temperatures. But brass is no good if you’re using it in marine environment or any type of acidic fluid. In that case, stainless steel is your ticket. If you have an industrial application involving chemicals, nylon and polypropylene are great choices due to their excellent chemical resistance. Just because something looks cool on the shelf doesn’t mean it’s the best material to go with. Make sure to match the material of fitting to the fluid being carried by it.
Clamping is the final piece of the puzzle. There’s a lot wrong with clamping, but here’s one thing to keep in mind: A worm gear clamp works fine for low-pressure static lines, but it can loosen over time due to vibration. That’s fine. But vibration loosens them over time. For flexible hoses that stretch and contract based off heat/cold, T-bolt clamps holds better and equally well. They distribute the force evenly around circumference. When you need constant tension but don’t want to fuss with screwing things tight, spring clamps is solid too. And remember, we’re trying to keep the hose on the barb at peak pressure.
The next thing that requires attention is the thread engagement; folks have a tendency to over tighten this connection. Because they’re NPT threads, they are tapered and will actualy seal as you turn the screw on. There’s no reason to crank it down on them like crazy to get it to hold. A small amount of thread tape will help fill any tiny voids and prevent leaking at the junction of the threads, but the bulk of the seal occur when the hose grips the barb.
Installing one of these systems requires precision rather than brute strength. Make sure your sizes match prior to starting to thread anything. It takes an extra minute to check specs and that peace of mind would of been well worth it. Reliable fluid transport depends on respecting the limits allowed. If everything matches up as designed, from the taper of the threads to the retention of the barbs, it’s all good. No more worrying about leaks and you can concentrate on doing what you came to do.
