
Think: There’s lumber and a hammer in your hand, and you’re standing in an empty room staring at a hole that looks okay… Until you realize it has to support weight someday. This is where most floor projects goes wrong. People don’t factor in the math of wooden beams. Sure, they grab a big hunk of wood. But you have to know how far apart you need it based off the material, the distance, and the weight. You want to avoid a bouncy-trampoline floor.
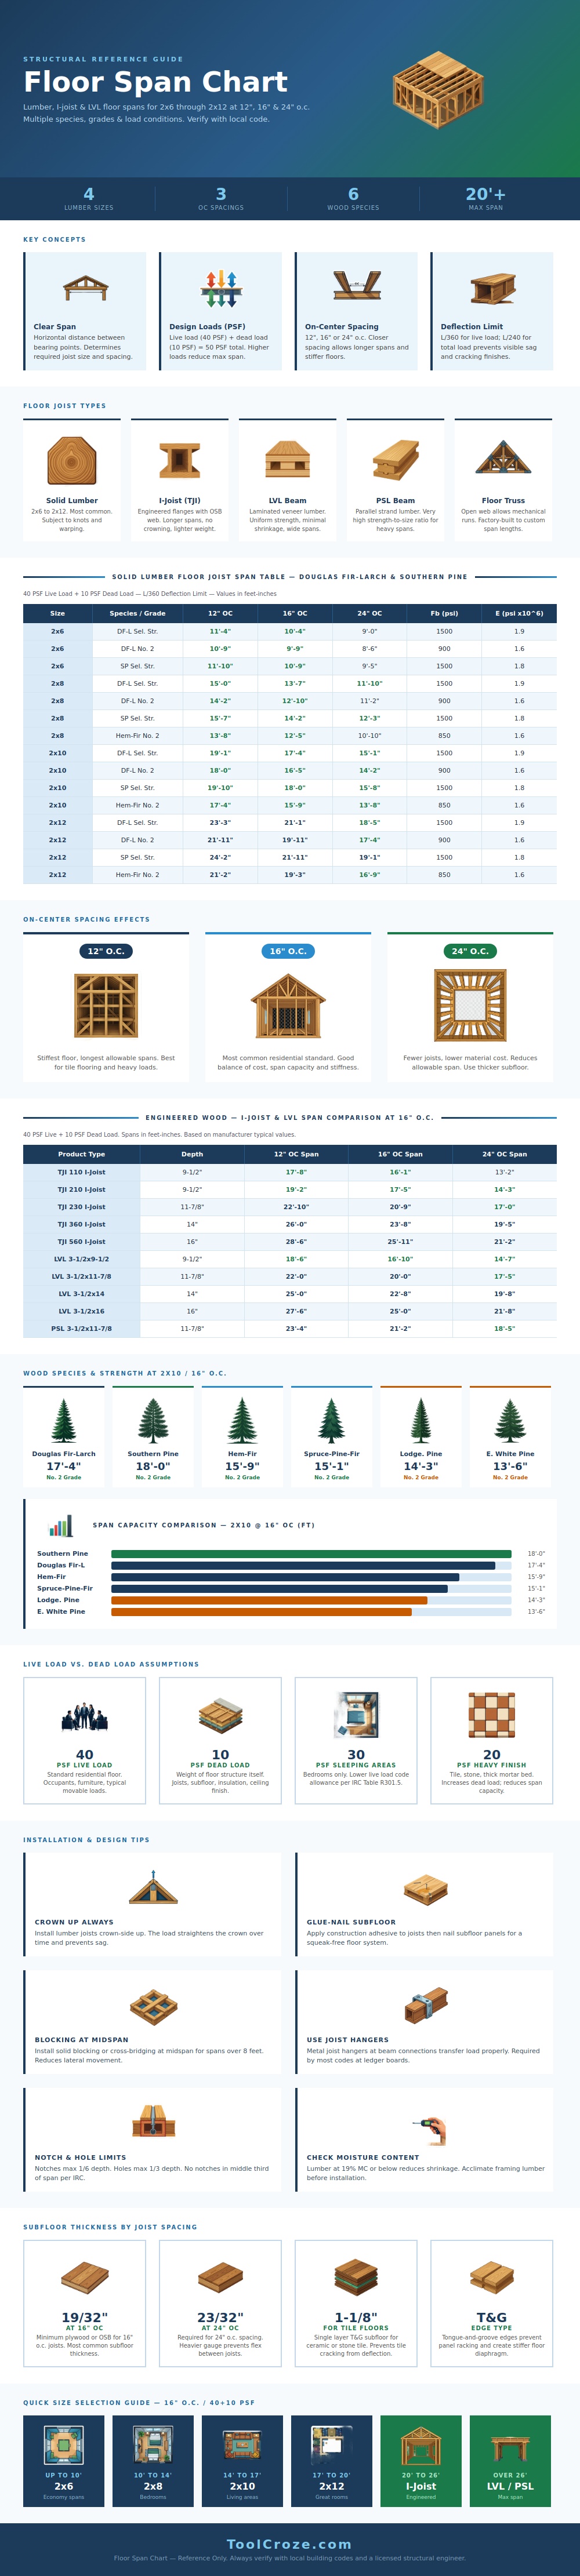
To do that, use this chart below (it’ll tell you the max span according to joist size and spacing; all the different kinds of wood is listed). That way, you won’t guess…which can get very costly (or cause sagging floors).
How to Build a Strong Floor
What are you trying to do? The key idea here is called clear span; the distance from one side of a support point (such as a beam) to another (such as a wall). That’s what matters: Every inch of exposed span creates more leverage on each joist. Design loads includes both dead loads (like the weight of the flooring and other structural elements) as well as live loads (such as people and furniture). Most building codes consider a combined load of up to 50 lbs/sq ft; the higher the load, the smaller the maximum span. If you intend to put massive bookcases in your room or lay down some heavy stone tile, know that you’re going to have to rethink right this second. And that’s where most homeowners fail when planning their project.
Stiffness also depends heavily on span length and spacing: the chart indicates that increasing the allowable span length by moving from sixteen inches on center to twenty-four inches do increase stiffness, but so much as to make sense? The norm in homes is sixteen inches, which strikes a good balance between performance and price. Twelve-inch spacing result in a stiffer floor (essential when using rigid materials like ceramic tile, which will crack if deflected), but adds both material and labor expense. Twenty-four-inch spacing reduces material cost (fewer joists) but requires a thicker subfloor to avoid flexing between supports. It’s a matter of short-term savings versus long-term comfort.
Not all pine is equal. The species of wood also makes a difference. In general Douglas Fir-Larch and Southern Pine perform better then Eastern White Pine or Hem-Fir in terms of bending strength. So the same size joist will support a longer span. And Number Two grade Southern Pine 2×10 is stronger than its equivalent in weaker wood. That’s why we use data to illustrate just how far this type of lumber can go. It matters if you purchase your lumber at a yard that may confuse your tags. Before it hits the truck, you want to know exactly what you’re buying.
The arrival of engineered wood products such as LVL beams, I-joists etc., alter the equation by eliminating inherent variability in a piece of solid timber. The result is that you get consistent strength across the board, capable of spanning distances that are only possible with huge, heavy timbers in traditional construction. They don’t warp, they don’t crown, your floor begins level and remains level. They also cost more at first, but they let you create more types of floor plan openings than is possible with solid lumber.
Good plans go awry on installation detail; tiny steps missed here matter. Use joists crowned up; the little bit of downward curve always corrects itself when loaded. Go down and it sags worse as time passes. Good hangers transfer loads properly to beams. Blocking at midspan makes the system rigid and reduces side-to-side motion. Holes or notching joists must be no deeper than code permits (and no deeper than middle third of span, that’s the high-stress area for bending).
It all ties into subfloor thickness. If you have large spans between joists with just a thin sheet as your subfloor, you’ll see every joist telegraphed up through your finished floor. Tongue-and-groove edges makes the subfloor act like a diaphragm that resists racking. Use thicker panels for larger spans. Apply adhesive before nailing to keep squeaks at bay; the bane of any remodeler’s existence. Check moisture content to make sure the wood doesn’t shrink unexpectidly after installation. This could create gaps or cause fasteners to pop out in the future.
So how do you create a floor? It is a combination of things related to material properties, span, and stiffness. The visual guide is a general rule for typical situations. When in doubt, check critical spans with a structural engineer and local code. The goal is to have a floor that feels solid underfoot…not one that reminds you of every step you take. Start with the proper materials for the required span and keep that house standing for many years after you finish the job. You should of used better wood from the start if you want it to last luxuriosly.
