It’s like a faucet that drips… You don’t really realize how slow it is till late in the night when you hear the drip-drip or spot the growing stain on the counter. In this case, it’s typicaly a tiny little rubber ring. It has been deformed or gone bad sometime after it was installed during its last replacement.
If you get the size wrong, it will fail. Too big means it bunches up and fails fast, and too small mean it leaks under pressure.
How to Fix a Leaky Faucet
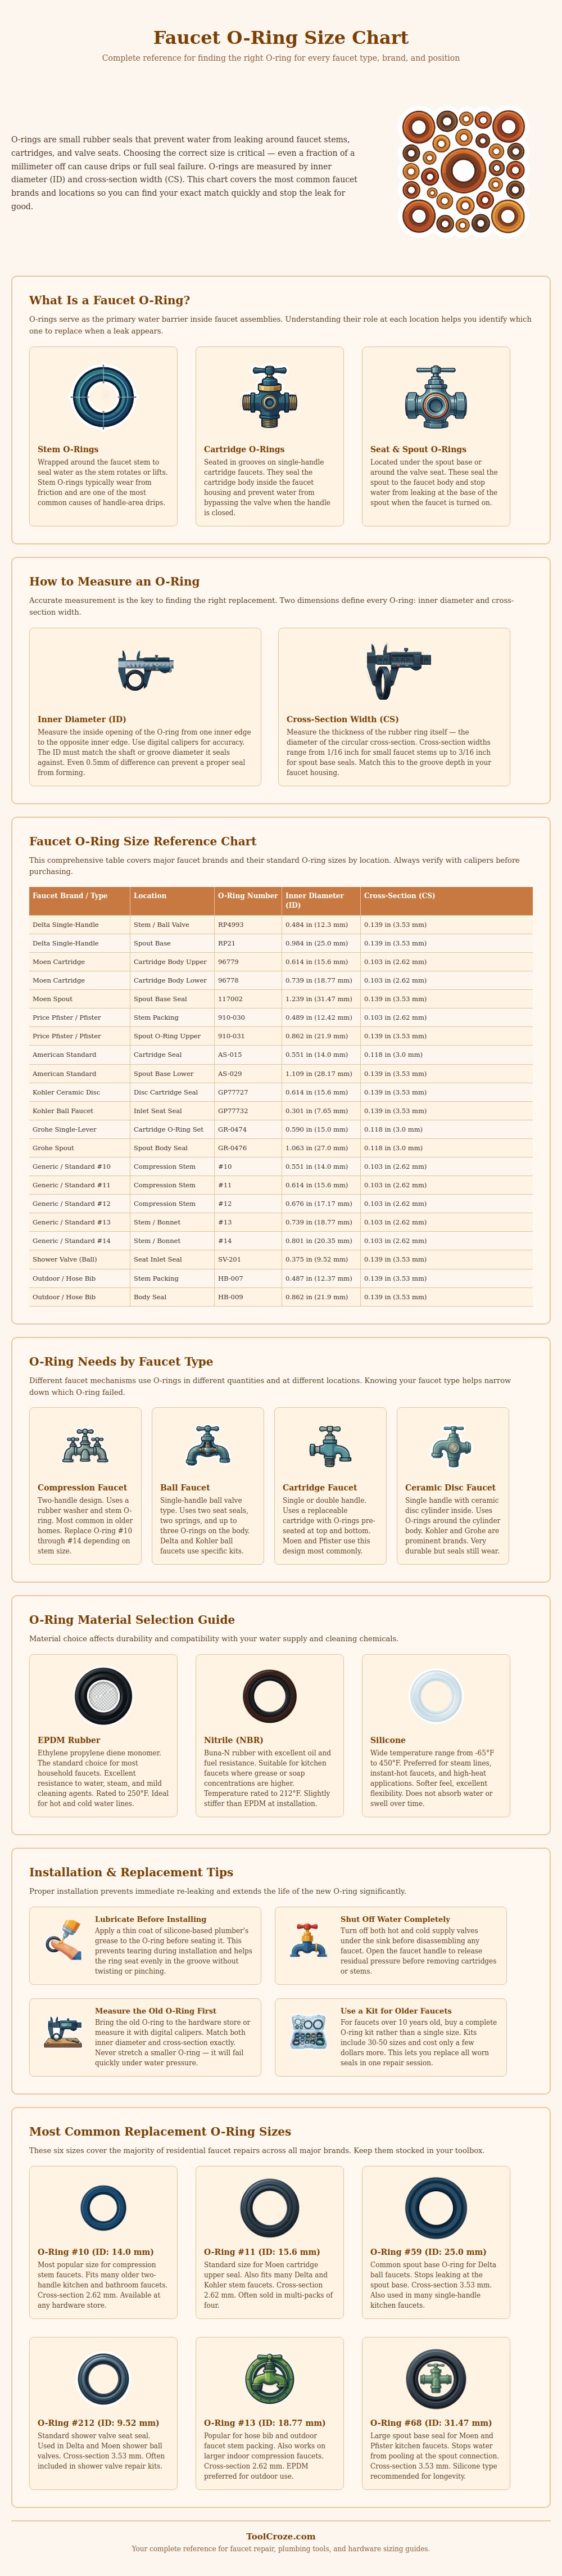
There are just a few common faucet designs, with each putting their seals in slightly different places. Cartridge taps puts their ring on both ends of cylindrical body. Ball types has them wrapped around the turning ball. Compression stem faucets have theirs close to the packing nut. Ceramic disc valves only require a couple of them, but they must be right where water come into the valve. Knowing this helps you choose the right size rather than guesswork, and a chart will illustrate where those correspond to standard sizes.
When you pop open the faucet, chances are that it’s got the old ring still on it, cracked or at least flattened into the groove. So how do you get the new one? Measure the outside diameter, the inner diameter, and the rubber’s thickness. That way you can locate your match without having to schlep the busted part to hardware store yourself. A spec grid (of typical sizes along with their specs) removes much of the hit-or-miss aspect of this task.
Your choice of material will determine the longevity of the repair. Nitrile is less expensive, but it gets gooey when it’s hot. Silicone withstands extreme heat, but it are more prone to tearing as it’s applied. EPDM outlast both of them and performs better with hot water and ozone. If the size is right and most home repairs will face average conditions, then EPDM and nitrile are your best choices for most around-the-house applications.
To save faucet finish and the new ring, do this: turn off the water. Open the faucet to release the pressure. Remove the handle and bonnet nut. Pull out the stem or cartridge. Gently pry out the old ring with a small hook tool without scratching the metal groove. Lubricate the new ring with some plumber’s grease; it will slide into position easy if not twisted. Reinstall all parts in opposite direction. Slowly turn on water and inspect for any lingering drips.
It is a common error to replace just the failed single ring. The rest of seals were exposed to same temperature and the same water. They will fail shortly thereafter. You save yourself another faucet tear down if you replace them all now.
Afterward, the faucet should of been quiet… a sign you got the proper size and material.
