
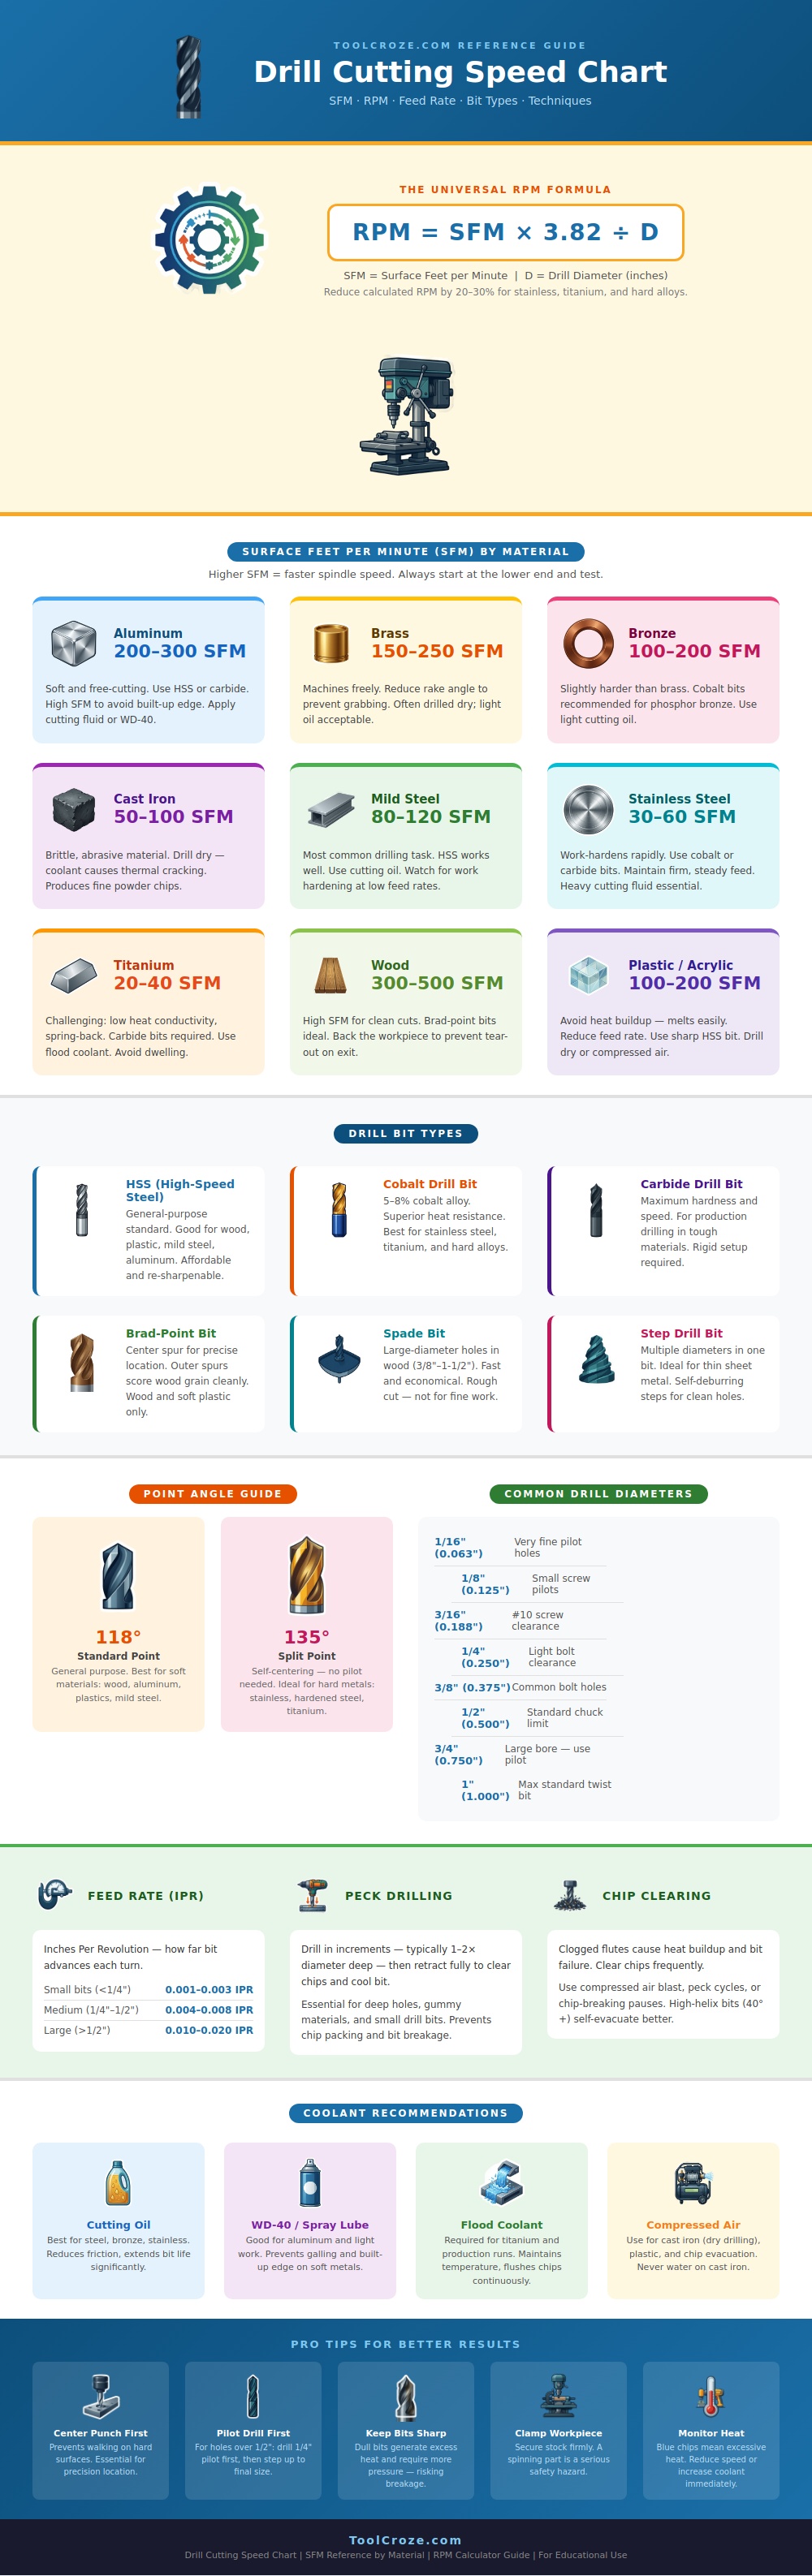
Perhaps you’ve tried to drill into something and the bit never cuts through metal, just spins until it heats up and dulls out? You might think the machine is broken, but more often it’s simply running the speed too high for the material or the feed rate too low for the bit. Wood tears, whereas metals shear in a different way: treating every hole as if it were wood and ignoring those physics are one of the most common mistakes people make. This chart will help you map from surface feet per minute to a particular material, which means no more guesswork and you can go straight to the cut.
This refers to revolutions per minute. It is also known as RPM, but it is not a static value. For one thing, the harder the material, the lower the RPM. The larger the bit, the lower the RPM because larger bits generates a huge amount of heat if they spin too quickly. And then there’s smaller size, which spins faster to keep up with cutting speed at the cut face itself. These are all factors in the equation: Surface feet per minute is used as common basis for every kind of material, linking them together.
How to Drill Metal Correctly
Something like aluminum, which is soft and sheds chips well, can be moved along quickly, even up to three hundred SFM! In contrast, stainless steel pushes back because it can become work-hardened, so you has to slow down. And you better really throttle back your pace when switching from mild steel to stainless; any extra resistance will cause friction to weld your bit onto your workpiece immediately. It’s this balancing act between heat and speed that defines all drill operation.
But spindle speed isn’t all there is to a bit selection. General purpose bits are high-speed steel, which can take abuse and not go splintering. It’s fine for mild steels, aluminum, even brass. But if you hit something more difficult like hardened stainless or titanium, HSS dulls far too fast. You want something that won’t lose its form at higher temps, cobalt tips or carbide will do it. The infographic shows different types of bits and what you should use them for. For example, a brad-point bit doesn’t wander on wood, it works perfectly, while on steel? No way, Jose’. And using an incorrect bit will screw up the material and your patience along the way.
One variable most newbies never consider is feed rate. They focus on speed. But speed isn’t what cuts… It’s how fast you feed the bit. To get a bit to cut cleanly, you have to hold it under even pressure with enough force to make the bit turn and cut a chip. Otherwise, it will just rub off a burr and create heat at the edge, which will ruin the edge. With SS, use a nice firm steady forward pressure to help form clean chips. The goal is always smooth, controlled removal of material rather than brute force.
For deeper holes, pecking can really help. Just back off every so often and allow coolant to wash over the cutting edges and remove chips from your flutes. Flute clogs insulate, trapping heat in the worst places possible. If your chips start turning blue, you’re creating too much friction. Slow down or up your coolant asap when this happen.
Many hobbyists don’t understand the importance of coolant choice. For example, cutting oil removes heat from the cutting area while reducing friction. Titanium’s low thermal conductivity makes flood coolant critical. That material doesn’t conduct heat well; all of the energy concentrate at the cutting edge until something gives. The wet rule has one exception: cast iron. Because cast iron is brittle, coolant can lead to thermal shock cracks when drilling. To help remove the fine powder chips produced by cast iron, use compressed air.
Knowing these things separates a jagged, burnt mess from a professional result. Safety starts with eye protection, which is never negotiable. Next, clamp down your workpiece in a way that won’t allow it to spin when tightened. A spinning chunk of metal is a projectile waiting to happen. Always center punch where you’re going to start your drill hole. This prevents the drill bit from “walking” across the surface. For larger diameter holes, begin by using a pilot hole. This gives the bit something to follow while minimizing the load on the chuck.
Make sure your bits are nice and sharp. More force means more heat, so keep them sharp. Your objective is always to remove material smoothly and with control, not by brute force. When you master these variables, drilling no longer feels like fighting the metal; instead, it’s working with the metal. Your holes will come out clean, your bits will last longer, and you’ll know what made that stubborn chunk of steel difficult yesterday.
