
Starting out, you plan to use the deck for summer’s evening hours, but neglecting the fact that wood will act different when weighted down can put whole thing at risk of collapse. If you don’t know what it can holds up or how far apart to place supports, the structure will not last long. It might hold together just long enough for a few summers before failing. Knowing the span limits beforehand makes all difference between building something that lasts and something that will need to be replaced in five years.
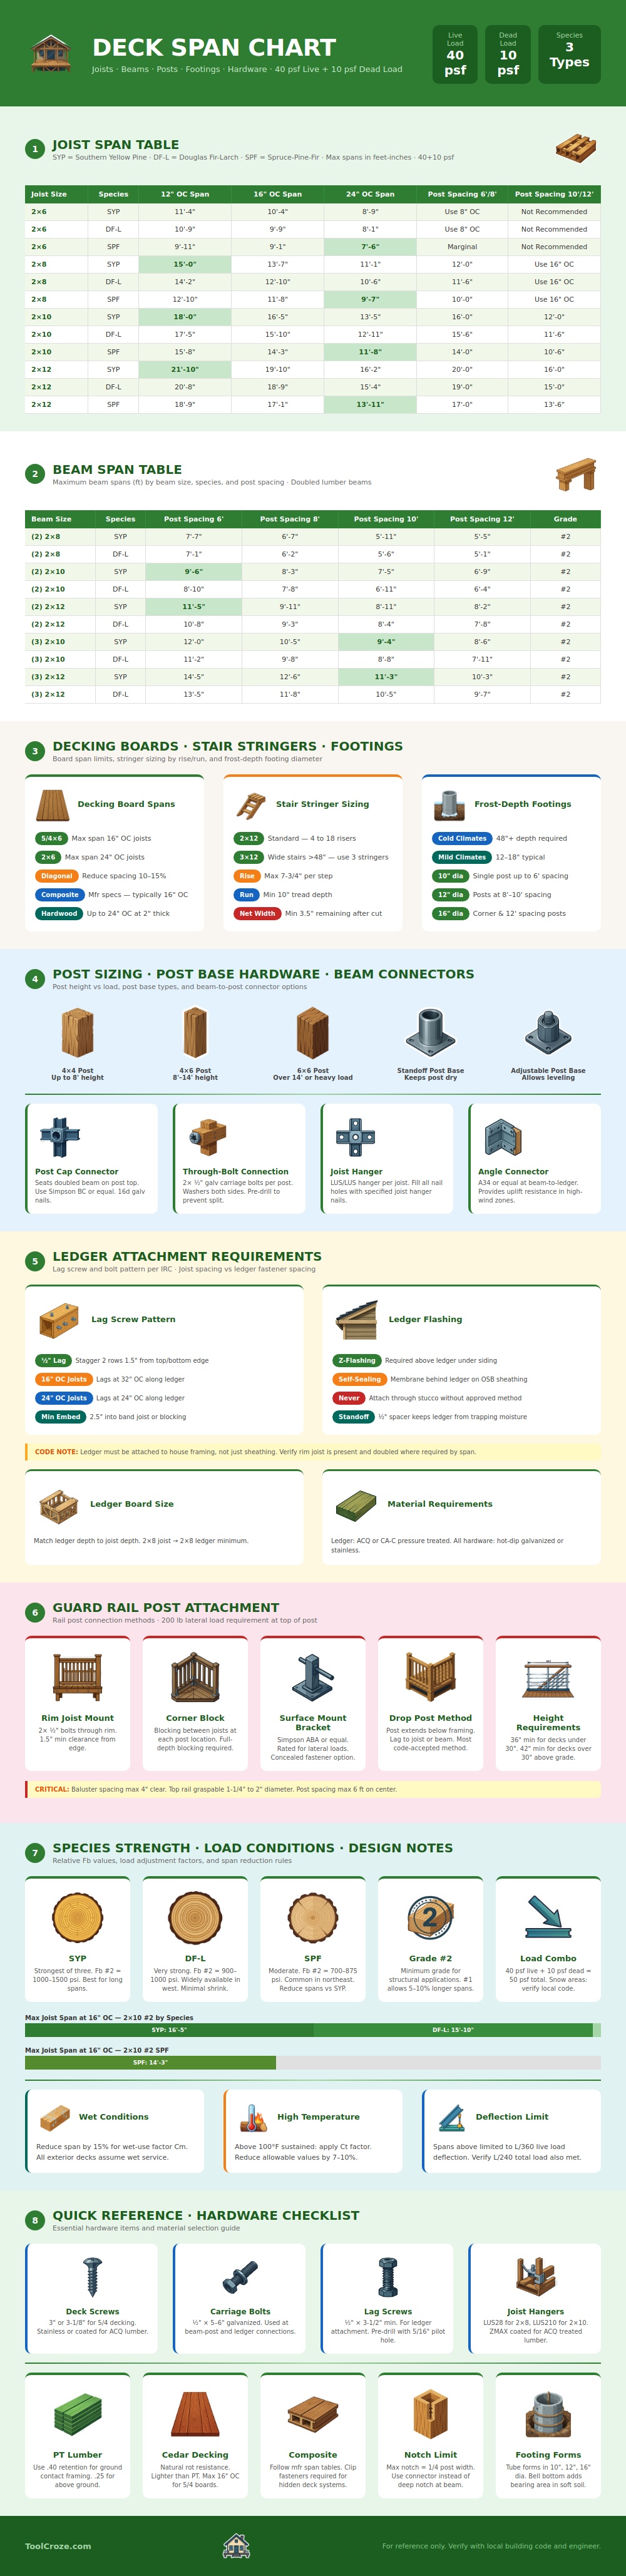
Look at the chart, this illustrates maximum unsupported length of various types of lumber. Keep in mind that not all pine is the same. A Spruce-Pine-Fir behaves differently under stress than does Southern Yellow Pine. That means you can have longer spans between your beam and your joist (fewer posts) with stronger wood. There are fewer obstructions in the outdoor room, which creates clean looking lines. Every other design decision about structure hinges on selecting the correct species; it’s a structural decision.
How to Build a Safe Deck That Lasts
Ledger board attachment is more than a footnote, it’s the main load path that many of us don’t pay much attention to… which is when most failures occur. Check out the infographic above. It outlines various bolt/lag screw fastening pattern and how important staggering them can be to get most holding power. Don’t simply go around driving screws into your siding or sheathing thinking it’ll hold. It has to attach and distribute full load of your whole deck directly into house structure. Corrosion resistant hardware is never optional here either. It will find its way through any cracks and crevices and silently damage the strength of your deck over time.
Another factor is frost depth, which trips up homebuilders who follow general rather than local codes. In colder regions, footings should of go beneath the frostline to avoid heave. As the ground expands and thaws, concrete cracks and posts shifts. A visual guide shows footing sizes based off soil conditions and where posts are placed. Closely spaced posts share load; one post with lots of space around it require greater bearing area. It is simple physics. There’s only so much earth will bear without shifting. You’ll end up with a deck that’s not quite level, feeling bouncy even if your frame was straight-built.
With railings and guard rails, you shift your thinking from vertical load bearing to lateral resistance (stopping a person from falling off). Connections has to resist not only gravity but side forces; hence the callout in the chart for special bolts for rim joist mounts. Also, remember to block between joists fully at post location. A railing post without that solid backing will be like a piece of loose wood, ready to tear out when next time somebody has too much fun at a party. Safety regs are strict here for a reason; going cheap on rail height or spacing between balusters endangers all who use the deck.
All of this leads back to moisture management. Humidity causes wood to expand and contract; if you don’t leave room for air flow and water to drain, early rot can set in. Treated lumber will help, but it won’t fix bad design. To avoid corrosion between the wood chemicals and metal, use coated hardware or stainless steel screws. It is an added expense now, but you will save thousands on repairs later.
Create a structure that looks good, stands up straight, and lasts longer then the nails holding it together. Learn how spans work with species and connections, and you’ll know when to guess and when to engineer. Your deck will then be a place to livig, not a ticking time-bomb of liability. Follow code (look it up!), honor load limits, and cut based on data (not gut).
