
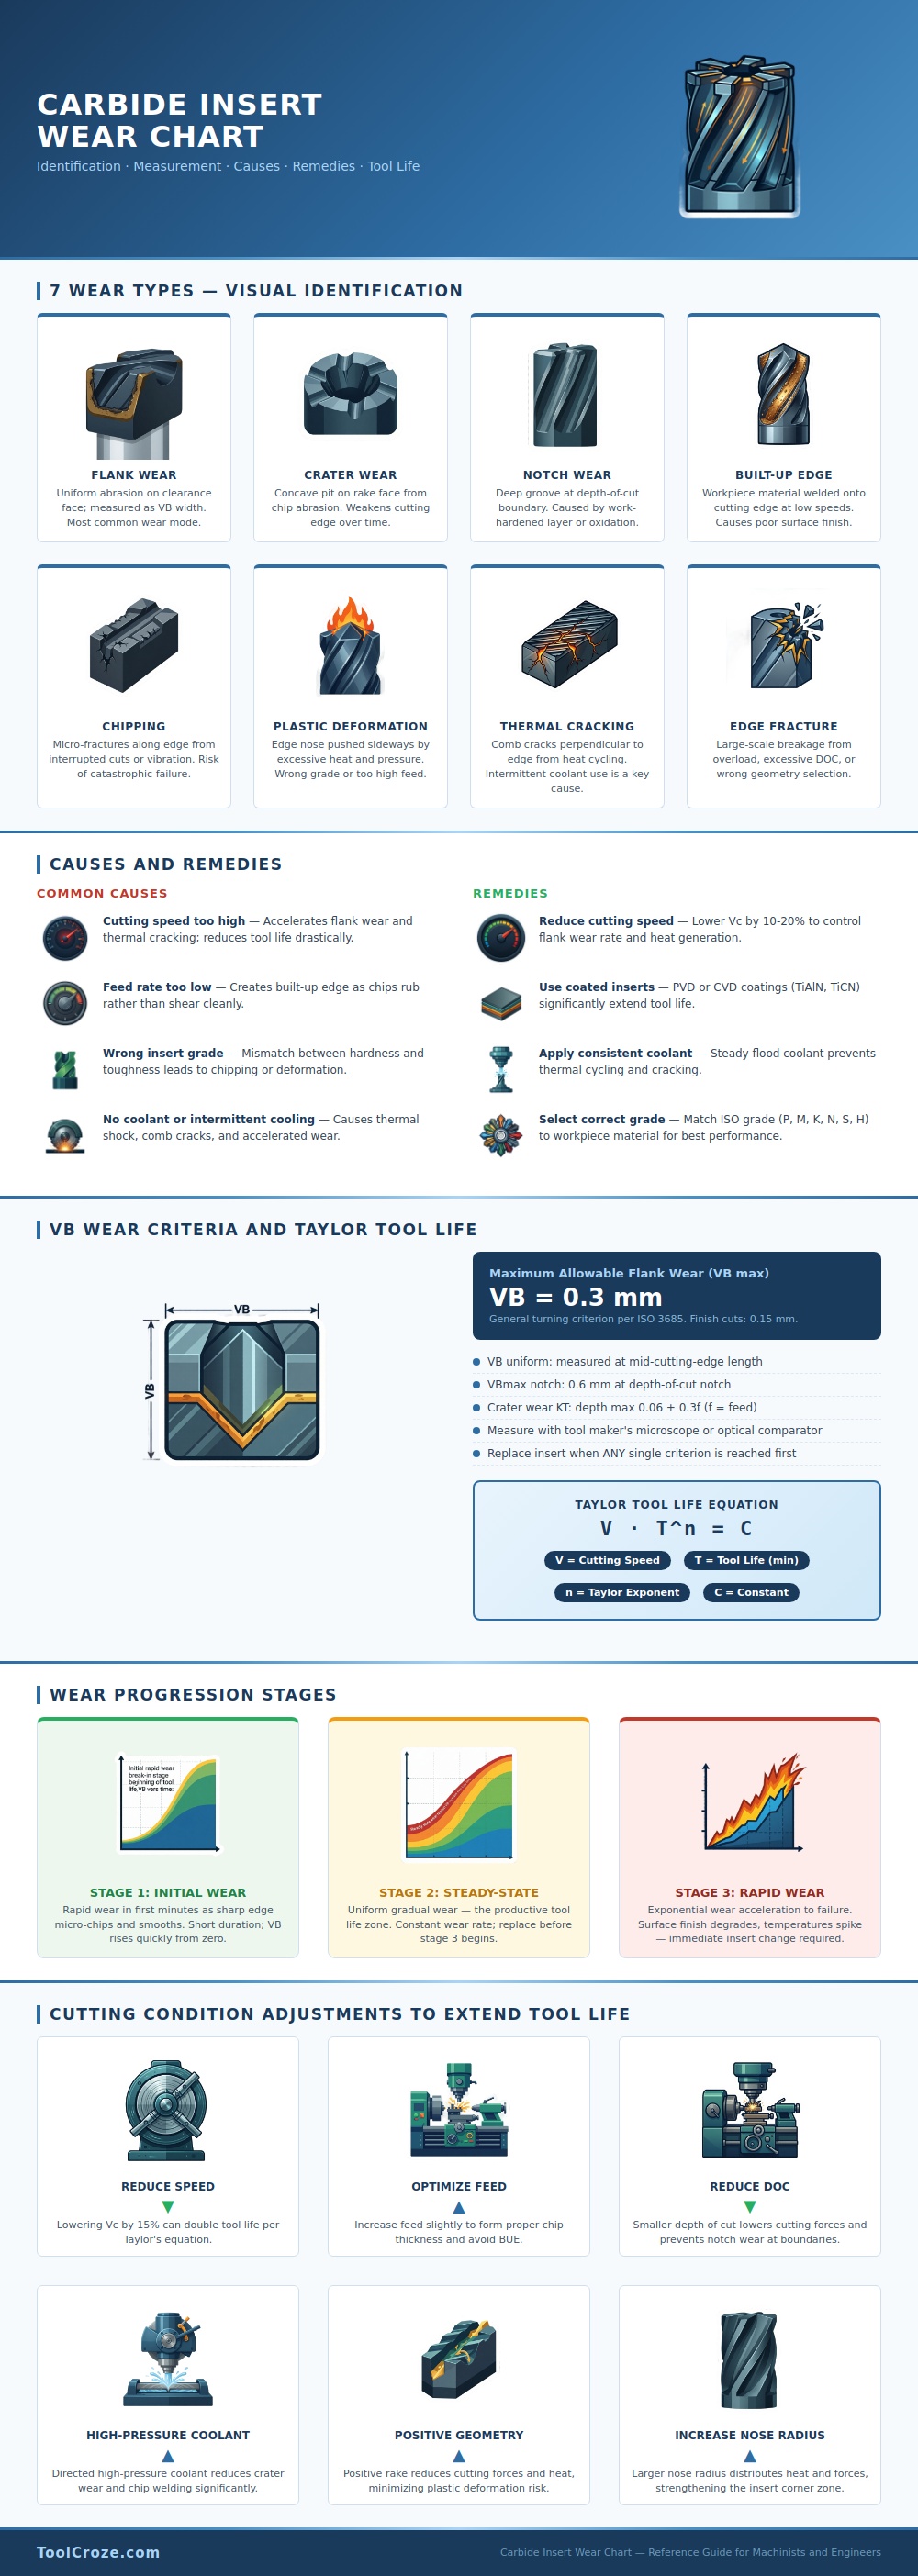
Sometimes, in the middle of a CNC cycle time that just stretched out on shop floor, you might notice the insert failed prematurely. But it’s not always obvious why the tool fails… The wear pattern doesn’t necessarily show age so much as some kind of mechanical or heat story. And understanding this story help save money and lets you know what your inserts are telling you.
This chart breaks out eight different failure modes. From catastrophic fracture to flank wear, it gives you a sort of visual dictionary for these issues.
How to Read Tool Wear Patterns
Crater wear is often the most harmful, yet most machinists is only focused on the flank wear since it’s easy to measure and observe. This continues until crater wear begins appearing on rake face where chips slide across. It looks like a band of even flank wear on the clearance face, and then the crater wear starts weakening the edge from inside out. It becomes difficult to see without some kind of magnification. Many times the tool are ruined before the crater wear is seen. You might measure the flank wear and see it’s okay, but fail to realize that the crater has eaten away at the edge strength.
Then there’s the not-so-subtle assassin called notch wear. This occur when stainless steels and other work-hardening materials are machined; it appears as a deep groove directly in the cut line, usually where the chip load decrease. If left unchecked, the notch will grow deeper and the tip will snap off at the insert. Unlike built-up edge, this typically occurs during higher feed and speed.
Built up edge is created by part material welding onto your cutting edge at slower feed and speed rates. It sounds like it would of help because it makes the insert sharper for a time. But eventually, the welded-on material flakes off unevenly. This destroy surface finishes and shortens the life of the carbide under the insert.
Stability issues is communicated through chipping and micro-fracturing, so look for little jagged breakouts on the edge; it’s probably vibrating, right? Perhaps your workpiece isn’t rigid enough, or maybe your holder are a bit loose.
If it’s plastic deformation, however, it’s from heat overload. You’re running too fast for the grade you chose and the nose of the insert literal flows sideways under pressure.
Thermal cracking appears as comb teeth perpendicular to cutting edge. This is almost always due to intermittent coolant usage that shocks the coated or ceramic carbide with rapid temperature swings.
The rhythm of tool death begins with the normal phase of initial wear: a quick rounding off of that sharp new edge in the first few minutes. Next comes steady-state wear, the productive zone; this is where you want to spend your whole machining budget. This is because wear increase in a steady and predictable way. Rapid acceleration is where the danger happen. Surface finish drops as heat spikes and wear explodes very quickly. You catch it early, you replace on schedule. Miss it? Scrap a part.
You might find that a 15-percent reduction in cut speed will double your tool life; thermal cracks or flank wear indicate this need. Built-up edge? Raise feed a little; thicker chips shear clean without as much friction-heat buildup. Coolant? Continuous flow is better than on/off spray (thermal shock tears up inserts more quickly then abrasive action). Material? Choose proper ISO grade; balance toughness with hardness.
We know from the Taylor equation that speed is a lever with an exponential impact on our lives; that small adjustments to speed cause huge differences in time. That’s half the story, geometry is also relevant because bigger nose radius spreads the tip’s stresses more efficiently while positive rake angles (also) clear heat and force. These are mechanical advantages, plain and simple edge protection devices, but they don’t make good settings unnecessary.
What is the takeaway? Look at the wear. The whole purpose of tool management is observation. When an insert wears out on the machine, look at it. Match the reason to the remedy and see if the inserts is wearing down in a consistent pattern. Then change the grade accordingly. Don’t just assign a different grade randomly, but know what went wrong with the last one. Wear marks are clues, read them carefully. Set your parameters so that you keep the cutting edge working in steady state. That’s where efficiency lives.
