
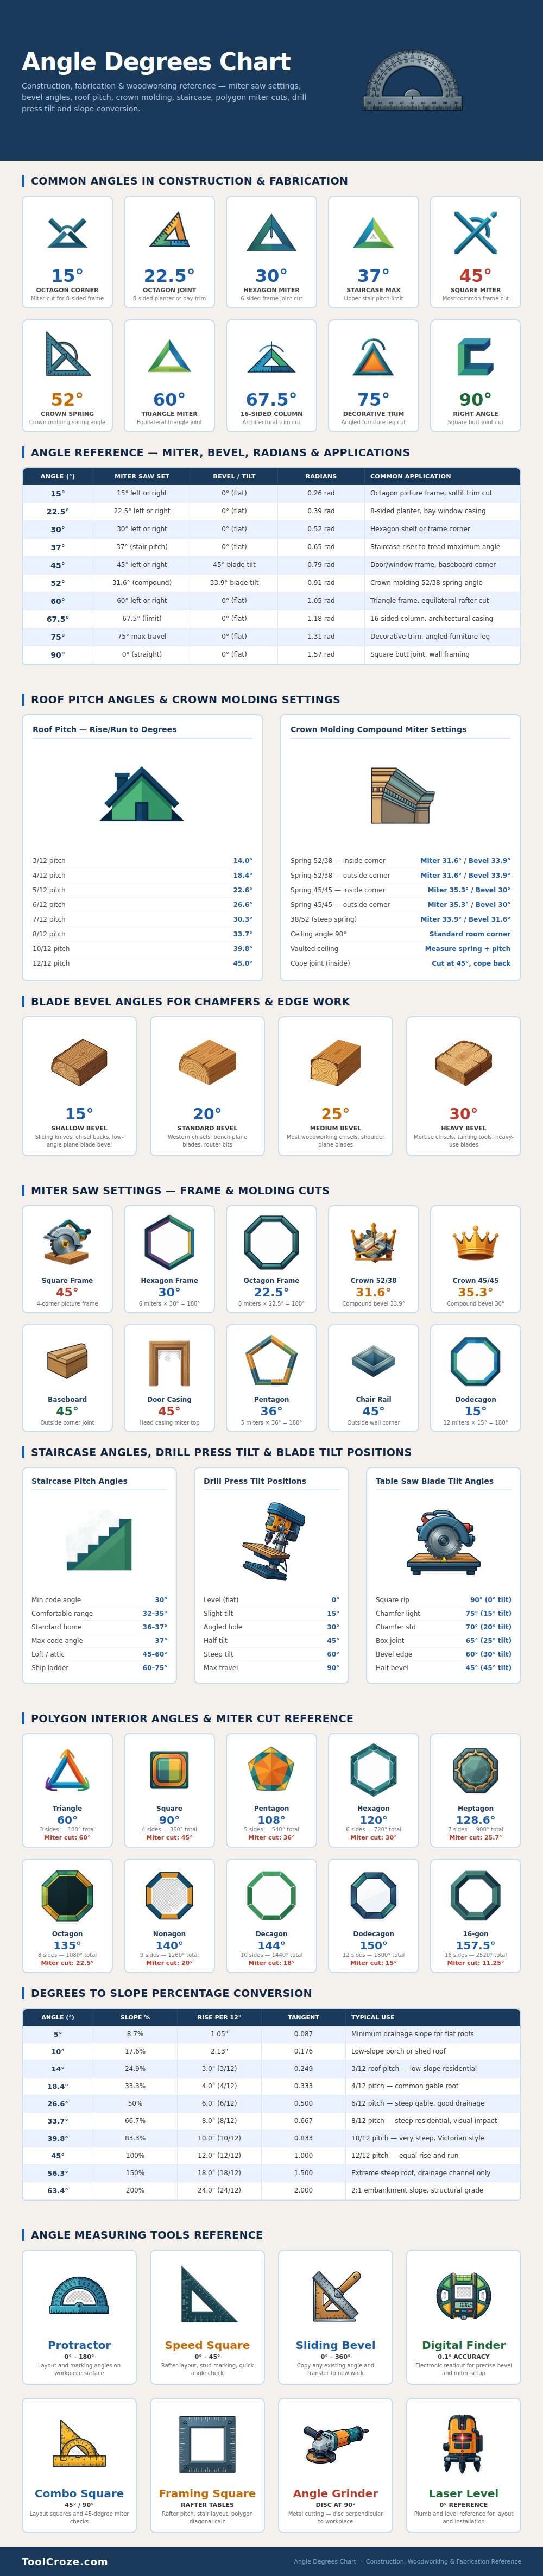
At some point, you’ve stood next to a miter saw with high-dollar hardwood in your hand and had no idea how to make the right cut. The frame has to be square. And yet, when it comes down to it, you can’t always trust your instinct about what something will look like at forty-five degrees. That’s where an accurate angle reference come into play. It preserves your sanity when you figure out that two cuts don’t quite line up and, more importantly, it save on material. The chart, linked to just above, connects those theoretical degree figures to actual use. In other words, it close the gap between woodwork reality and math theory.
When most folks think about framing they think of forty-five degree miters and ninety-degree corners. And sure, a simple picture frame is just that. But in reality, it’s never quite so straightforward. Add some bay window trim, make an octagon planter… none of those involve right angles. The internal math of eight sides require twenty-two-and-a-half degree cuts.
Why Correct Angles Are Important in Woodworking
The angles shift as you make different shaped polygon, as shown in this visual guide. It goes from the severe thirty-degree miter on a hexagon, down to the gentle fifteen-degree cut on a dodecagon. That’s where folks mess up. They attempt to guess their smaller angle. When the truth is, precision is the only thing holding the joint together.
Crown molding often lead to compound angles. Crown molding doesn’t always hug both walls flat. Most often, it’s positioned at some sort of spring angle (fifty-two degrees being most common for stock profiles). So your miter saw not only has to rotate on its axis, it also need to tip up or down. See the reference section for those compound settings. That explains what happens when you combine a thirty-one-point-six-degree miter with a thirty-three-point-nine-degree bevel, the result is a perfectly matched inside corner.
On paper, it all seems like a bunch of hocus pocus. But when dialed-in, everything fit together perfectly. Knowing why the saw want it this way will save you from the frustration of forgetting about spring angle and having an ugly gap along the ceiling line.
Then there’s the question of pitch angle, which gets complicated when it comes to roofs. Roofing pros speak in rise-over-run (or r/a) language instead of degrees. So a common house roof might be a six-twelve pitch, which translates to roughly twenty-six and a half degrees, as this chart explains. The chart connects these familiar carpentry ratios to their degree equivalents. They’re also the degrees of slope that you want to see visually before you cut your first board, because steeper means more material and precise rafters (but also quicker drainage). If you have ever wondered why a Victorian porch roof look so steep compared to a shallow shed roof, here is actual slope.
Beyond roofing and framing, these angles appear in tool setup and fabrication too: setting up your table saw blade to create a chamfered edge or dialing in a drill press for an angled hole. The depth is important, of course. But so is the tilt. Fifteen degrees doesn’t sound like much, but it can make all the difference in how a chisel bites down on wood, or how light will reflect from a piece’s surface. These are the less glamorous angles, but they’re where your project goes from looking amateurish to feeling professional.
Angles aren’t really trigonometric memorization; they’re an exercise in knowing how the material relate to the tool. Don’t expect to be doing radian calculations in real time…but you should of know what setting gets you a nice joint, and what setting will result in an excess of clamp pressure and glue. Get out the reference book at the beginning of each project. It’s no longer guesswork; it’s a plan. Having a plan keep your joints tight and your frustration low.
