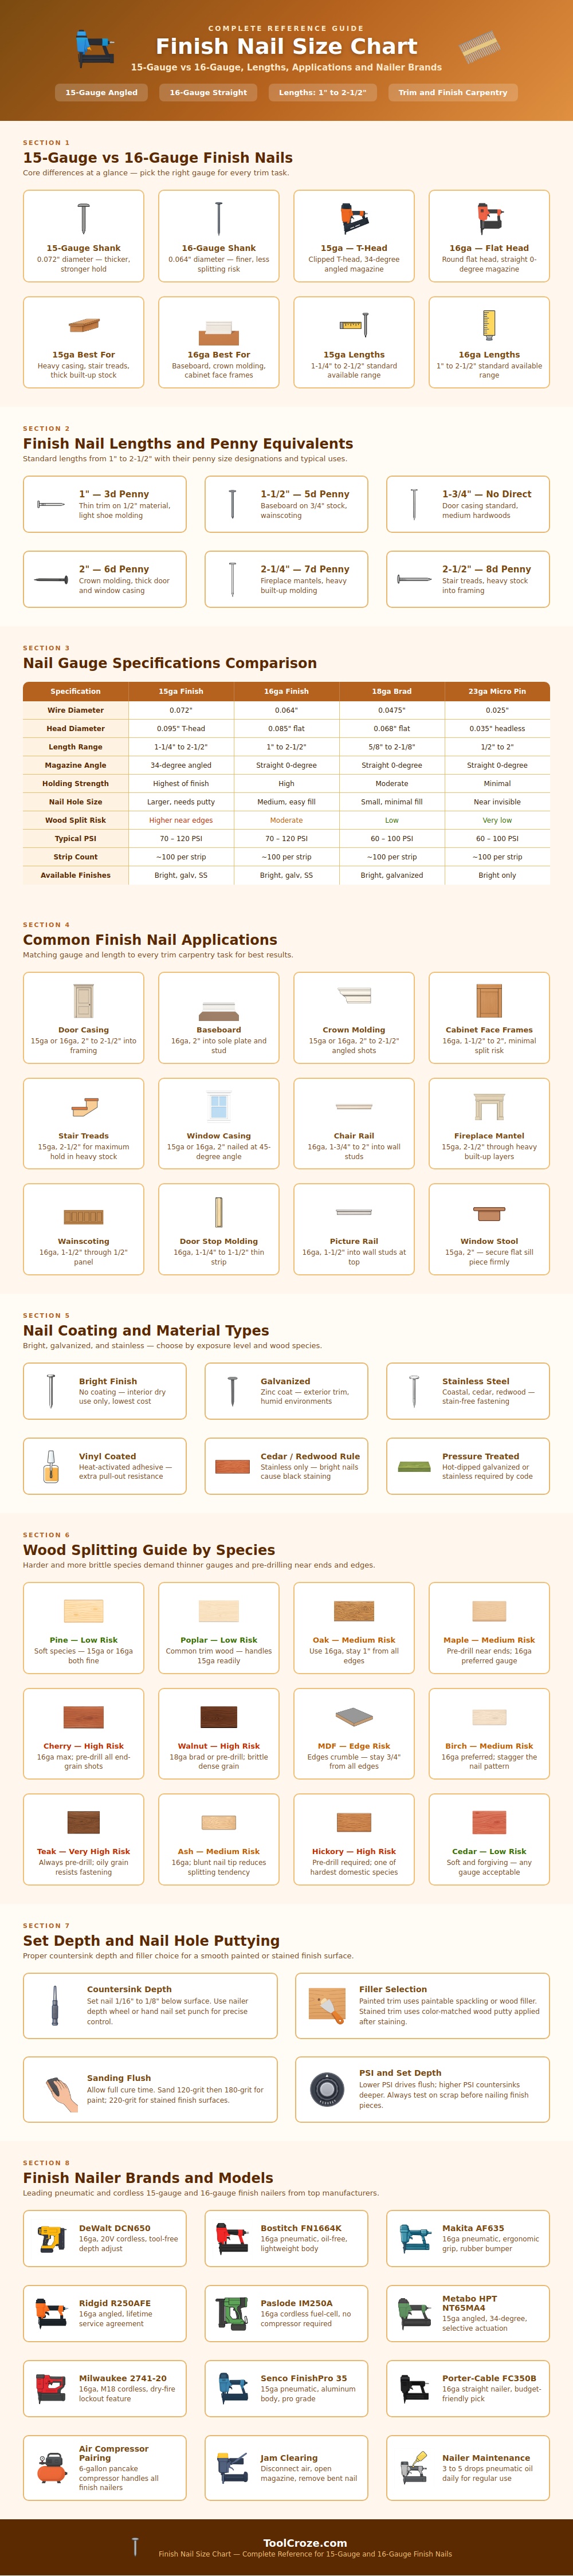
Selecting a correct finish nail for trim carpentry is a necessary task. By selecting the correct finish nail for a trim project, you can prevent the wood from splitting. If you select the wrong type of finish nail, however, you run the risk of the wood splitting or the finish nail protruding through the wood.
To successfuly complete a trim project, you must have an understanding of various finish nail characteristics. Finish nails comes in a variety of thicknesses, which is measured in gauge. The gauge of the nail will impact the finish nail’s interaction with the wood.
How to Pick the Right Finish Nail for Trim
Thick finish nails have a greaterer grip on heavy wood projects, such as stair treads. Thin finish nails are less likely to split the wood, so workers use them for delicate wood moldings. Many woodworkers uses thick finish nails for every trim project, but thin wood moldings may split with the use of thick finish nails.
The length of the finish nail must match the thickness of the wood that is being installed. Short finish nails are used for thin shoe moldings. Long finish nails are used in attaching thick wood pieces to the framing of a building.
Medium length finish nails are used for installing door casings of standard thickness. The type of wood that is to be finished will impact the type of finish nails that you should use. Softwood finishes like pine can take a variety of finish nails without splitting.
For hardwoods like cherry or walnut, thinner finish nails should be used to avoid splitting the wood. For engineered wood products like MDF, thin edges that crumble easy, finish nails must be inset into the MDF. The coating of the finish nail impacts the longevity of the finish nail.
Plain finish nails are used indoors where the humidity are lower and the environment is dry. For humid environments, galvanized finish nails that is coated in zinc will not rust. For coastal builds or builds that contain cedar wood, stainless steel finish nails will not stain the wood.
The technique for finishing nails will impact whether or not the finish nails are installed correctly. Before beginning a project with a pneumatic nailer, it is important to test the nailer on scrap wood to see how it will work on the project wood. Finish nails should be driven into the wood to create an indentation for the finish nails that allows them to be flush with the surface.
After driving the finish nails into the wood, you should fill the indentation with putty or spackle. The putty should dry and cure completely before applying any wood finishes to the project. Not all trim projects uses the same finish nails.
Casings for doors and windows require the thickest finish nails to provide extra security for the casing. Baseboards use slimmer finish nails to prevent splitting of the baseboards. Crown molding finish nails must be long enough to finish the molding between the ceiling and the wall.
The stair treads require the thickest and longest finish nails to endure the weight of the individuals who uses the stairs. Cabinet frames use the most delicate finish nails due to the thinness of the cabinet framing. The tools you use to install finish nails will impact the type of finish nails that is used.
For instance, pneumatic nail guns use straight magazines for straight lines of trim or angled magazines to place finish nails into the corners of the trim project. Pneumatic nailers should of been oiled daily and must be disconnected from the air supply when clearing nails stuck in the tool. By selecting the correct type of finish nail for each trim project, you will ensure that each trim project is solid and that the finish nails dont split the wood.
