🧱 Tile Spacing Calculator
Calculate tiles needed, centered layout, border tile size & grout joints
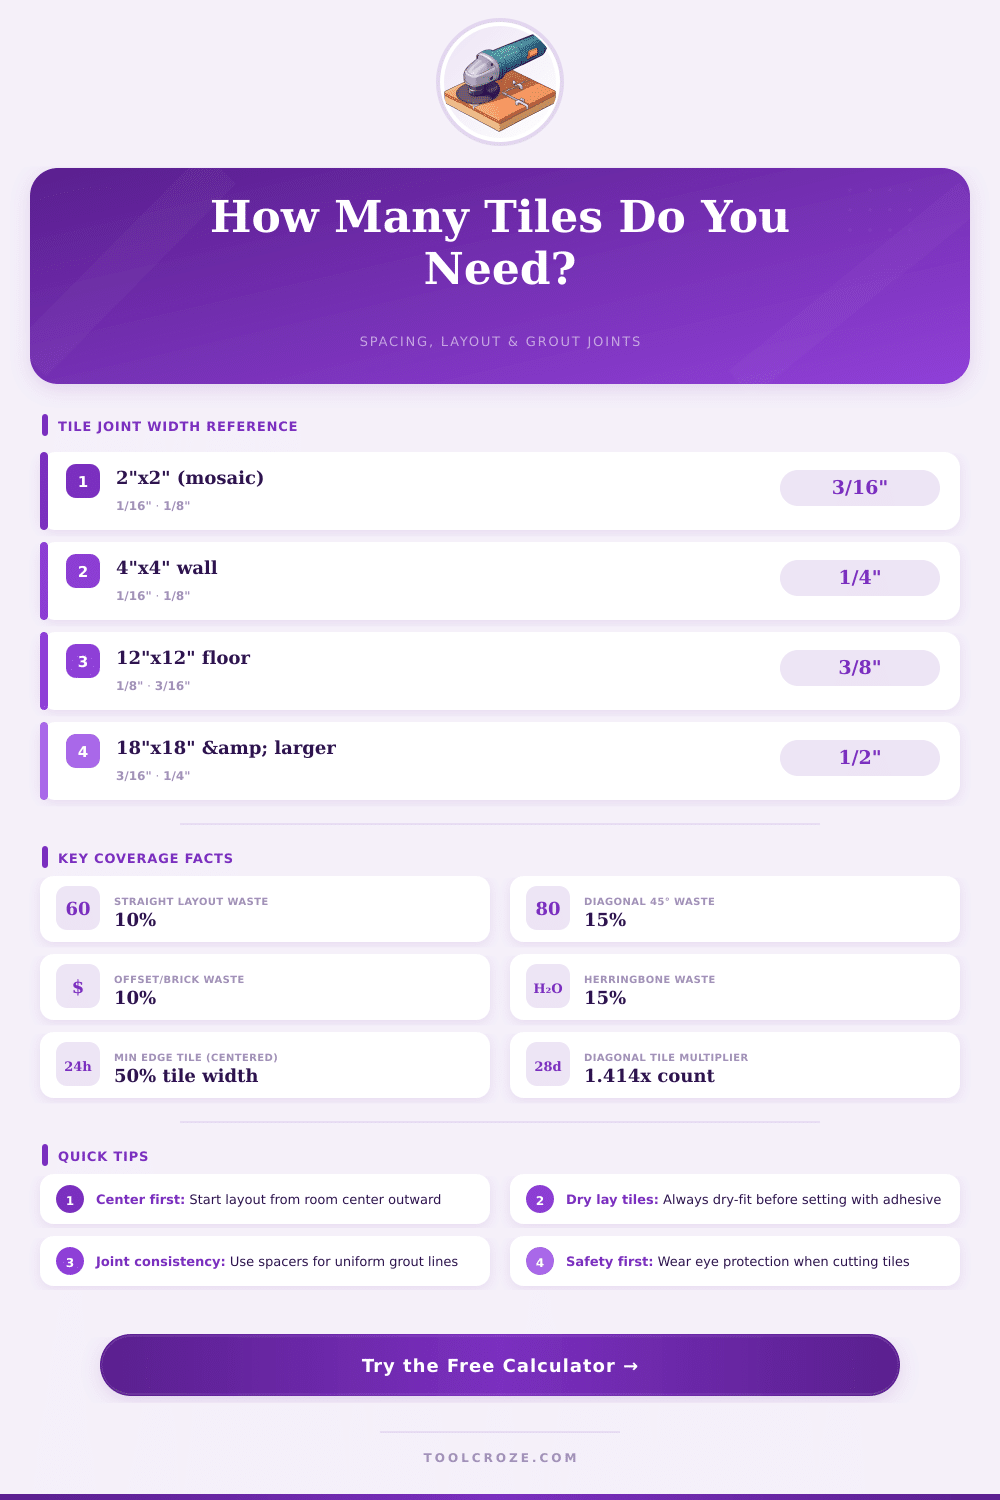
| Tile Size | Min Joint | Recommended | Max Joint | Grout Type |
|---|---|---|---|---|
| 2×2" mosaic | 1/16" | 1/8" | 3/16" | Unsanded |
| 4×4" wall tile | 1/16" | 1/8" | 1/4" | Unsanded |
| 6×6" tile | 1/8" | 3/16" | 1/4" | Sanded |
| 12×12" floor | 1/8" | 3/16" | 3/8" | Sanded |
| 12×24" plank | 1/8" | 3/16" | 3/8" | Sanded |
| 18×18" floor | 3/16" | 1/4" | 1/2" | Sanded |
| 24×24" large | 3/16" | 1/4" | 1/2" | Sanded |
| 3×6" subway | 1/16" | 1/8" | 1/4" | Unsanded |
| Pattern | Waste Factor | Visual Effect | Cut Difficulty |
|---|---|---|---|
| Straight / Grid | 10% | Classic, clean lines | Easy |
| Brick / Offset 1/3 | 10% | Dynamic, elongated | Easy |
| Brick / Offset 1/2 | 10% | Traditional brick look | Easy |
| Diagonal 45° | 15% | Expands space visually | Moderate |
| Herringbone | 15% | Elegant, high-end look | Advanced |
| Room Size (sq ft) | 4×4" Tile | 12×12" Tile | 18×18" Tile | 24×24" Tile |
|---|---|---|---|---|
| 50 sq ft | ≈500 | ≈61 | ≈28 | ≈16 |
| 100 sq ft | ≈990 | ≈121 | ≈55 | ≈31 |
| 150 sq ft | ≈1485 | ≈182 | ≈82 | ≈47 |
| 200 sq ft | ≈1980 | ≈242 | ≈110 | ≈62 |
| 300 sq ft | ≈2970 | ≈363 | ≈165 | ≈93 |
| Room Width | Full Tiles | Border Tile Width | First Tile Start |
|---|---|---|---|
| 96" (8 ft) | 7 | 3-13/16" | 3-13/16" from wall |
| 120" (10 ft) | 9 | 3-11/16" | 3-11/16" from wall |
| 144" (12 ft) | 11 | 3-9/16" | 3-9/16" from wall |
| 168" (14 ft) | 13 | 3-7/16" | 3-7/16" from wall |
| 192" (16 ft) | 15 | 3-5/16" | 3-5/16" from wall |
| 240" (20 ft) | 19 | 3-1/16" | 3-1/16" from wall |
The distance between floors maybe seems simple, but it changes the whole feel of the room. Those spaces between the floors range from 1/16 inch at the narrowest finish to 3/8 inch for bigger bits and the chosen gap sets the whole look. Not only about style is the gap, it also affects how lasting your Tile work will be.
Every floor needs a bit of free space so that the grout can form. The smallest suggested gaps are 1/16 inch, except if your floor needs something bigger. When you do not want to search the specs of the maker, choose 3 mm as a safe choice, that works in most cases.
How Wide Should Tile Gaps Be
Here the key spot: cheaper floors commonly have differences in size compared to the expensive, so broader gaps hide those tiny differences between the single floors.
If you mix two different colored floors, the differences in size show even more clearly. In such a case, I noticed, that 1/4 inch or 3/16 inch spacing, combined with black grout, works well. Light grout can push the brighter floors to seem bigger and show the big differences between them more than needed.
The gaps between floors have their role… They help to keep the spaces equal and even. Every Tile like this can expand and shrink according to temperature, humidity and weight on the floor.
Skip them, and the floors can move, bend or even break. Also, the gaps set the grout lines straight and level, stopping the shifting, that makes the finished work seem messy. Lay them at every crossing, where four floors meet.
To count how many spacers you take, is easy. Take your whole amount of floors and multiply by four. For floors in bigger format?
They will use the spacers more quickly. Good too know: some wall Tile come with little bumps formed on the edges, that serve as built-in spacers.
For bases, the spacing of 3/16 inch is a good starting spot, because too narrow spaces make the install itself more tricky, especially if your subfloor is not fully flat. Very narrow gaps, like 1/16 inch, can surprisingly hardly fill with grout. For broad gaps, the grout works best at around 3 mm or more.
If you go smaller than that, maybe there will lack enough material to fill the spaces and create a firm bond, what finally causes cracks.
Some rather skip spacers entirely and use thin cardboard strips from the Tile packaging, say around 2 mm thick. That helps to keep the spaces small and clean looking, while it still allows the floors to move as needed. Minimal grout commonly gives a more sleek look, although it clearly needs more skill to do it well.
Here is a useful method: lay the floor down, check the spacing with your eyes, then lift it and move to the next area and repeat. Like this every part stays well lined. Floors do not always have exactly the size written on the packaging, what actually helps, because the floor together with thegrout line ends matching to your planned sizes.