
You should pre-drill pilot holes, because splitting wood and stripping out screw heads is no way to start a project. It wastes precious lumber in a heartbeat. Preparing the wood for initial screw holds the joint together.
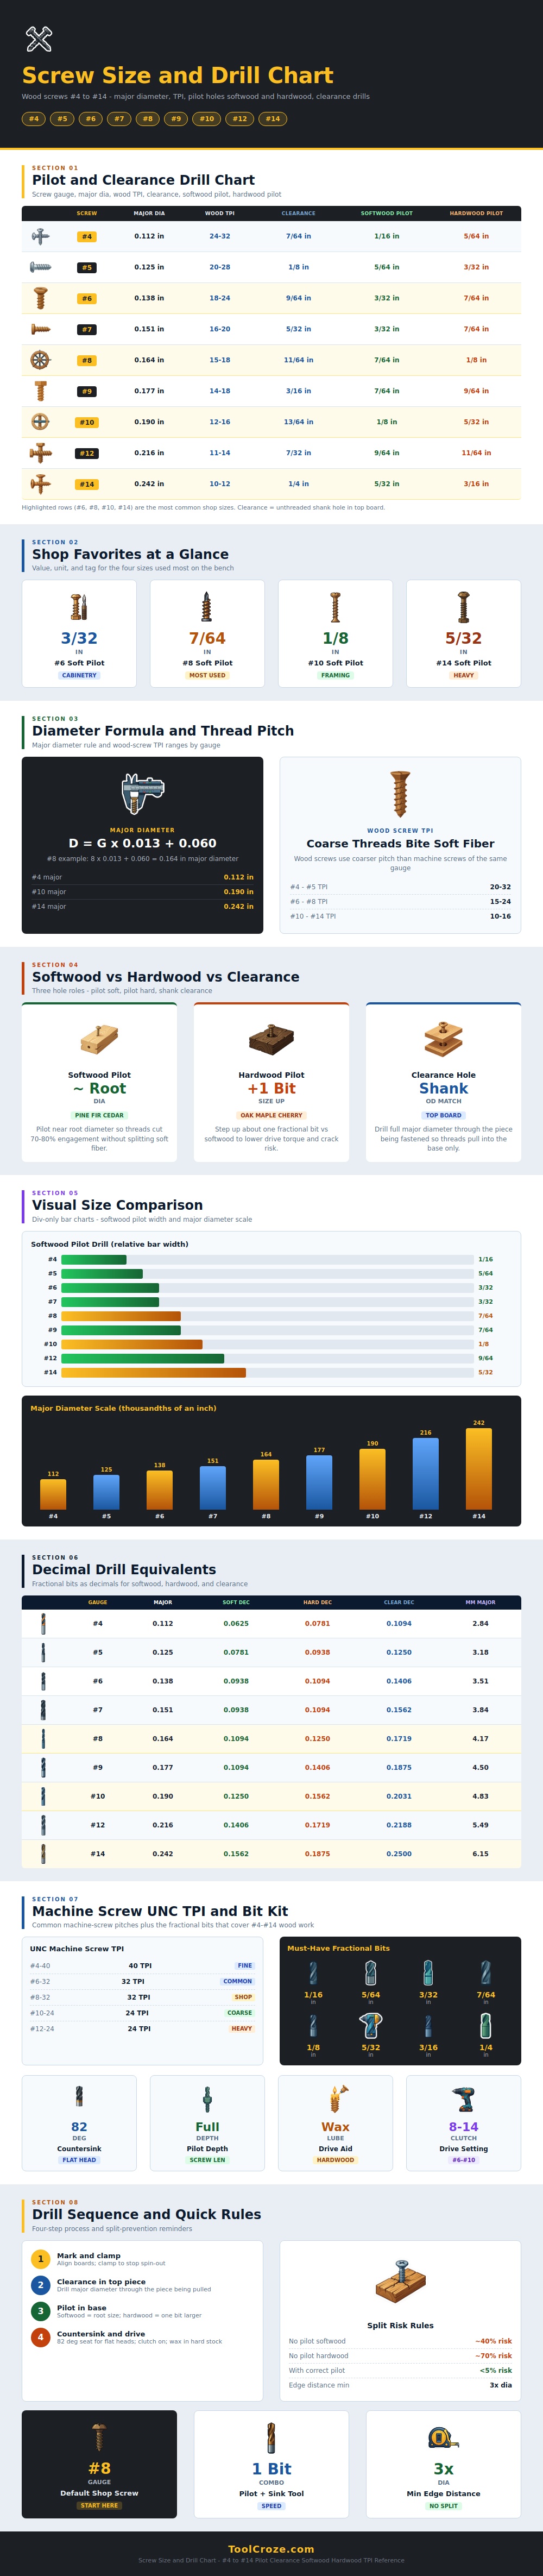
Use a drill bit near the root diameter of your screw: You don’t want to get too close to major diameter, or you’ll risk splitting the wood. Use a slightly larger drill bit then what will hold your screw. Number-four through number-14 are the size range for most common screws used in the shop, and that’s what chart shows for drill bit sizes.
How to Drill Holes for Screws
The trouble comes when you treats all wood equally. Hardwood requires a smaller pilot hole, closer to the screw thread root diameter. This allow roughly seventy percent of the threads to bite into the wood. It’s enough to draw the pieces together but not enough to split the fibers.
Pine, however, is not like hardwoods. Hardwood species such as oak, maple, and cherry is dense. If you make a maple hole the same size as you would with pine the screw will fight you. Either it will try to pull itself out and cause the workpiece to split or its head will be stripped.
Increase the base material pilot hole one size from what you were using on pine. This greatly lower the drive torque. Instead of trying to chew its way through solid fibers, it bites cleanly into the threads. The chart calls out sizes six, eight, ten, and fourteen. This eliminates guesswork and saves time knowing which size to use.
You also need a clearance hole in the top piece of wood. That clearance hole has to accommodates the unthreaded part of the screw easily. Too big and it won’t clamp well. Too small and there’s no way the screw can pull things together. It just sticks or spins.
The chart lists precise fractional size for that clearance hole. It matches those clearance holes to the major diameter of each screw gauge. A lot of woodworkers stock some fractional ones just for this reason.
You do not need a big stack; only a couple of the main ones are needed, and most of your joinery will be covered. Seeing them lined up like this also show how the pilot width compares to the total screw size. Number eight screws is what we use most often in the business. They’re strong enough for framing, yet small enough for cabinet detail work. If you have the right pilot bit then you’ll get best results out of that fastener.
The point is: drilling is insurance. Thirty seconds a joint. An hour if you try to patch split wood. An hour if you would of had to go buy more when something breaks.
Most of the time, it’s never about calculating diameter on the fly. You just need the right sequence with the right bits. Mark your lines. Clamp your work in place (so it doesn’t spin out). Drill the clearance hole first. Drill the pilot hole second. Drive the screw last.
Do that and wood will not break apart. The joint will pull together. Your project look like a pro made it. Plus, nobody has the headache of starting all over again just because you tried to save time upfront.
