
I’m talking about the kind of panic you feel when you cut a pipe only to discover it’s an inch too short and won’t fit fitting. It doesn’t matter whether you’re a weekend warrior or seasoned journeyman, we’ve all made this mistake.
Math, more precisely thread geometry and its relationship to offset, are what typically separates the clean install from the messy one. It doesn’t matter how good your tools is in the shed, because if you can’t do basic math on calculating a simple 45-degree offset then you’re guessing. That’s why a solid reference chart isn’t just an extra; it’s your safety net against both water damage and costly mistakes.
Why Math Matters in Plumbing
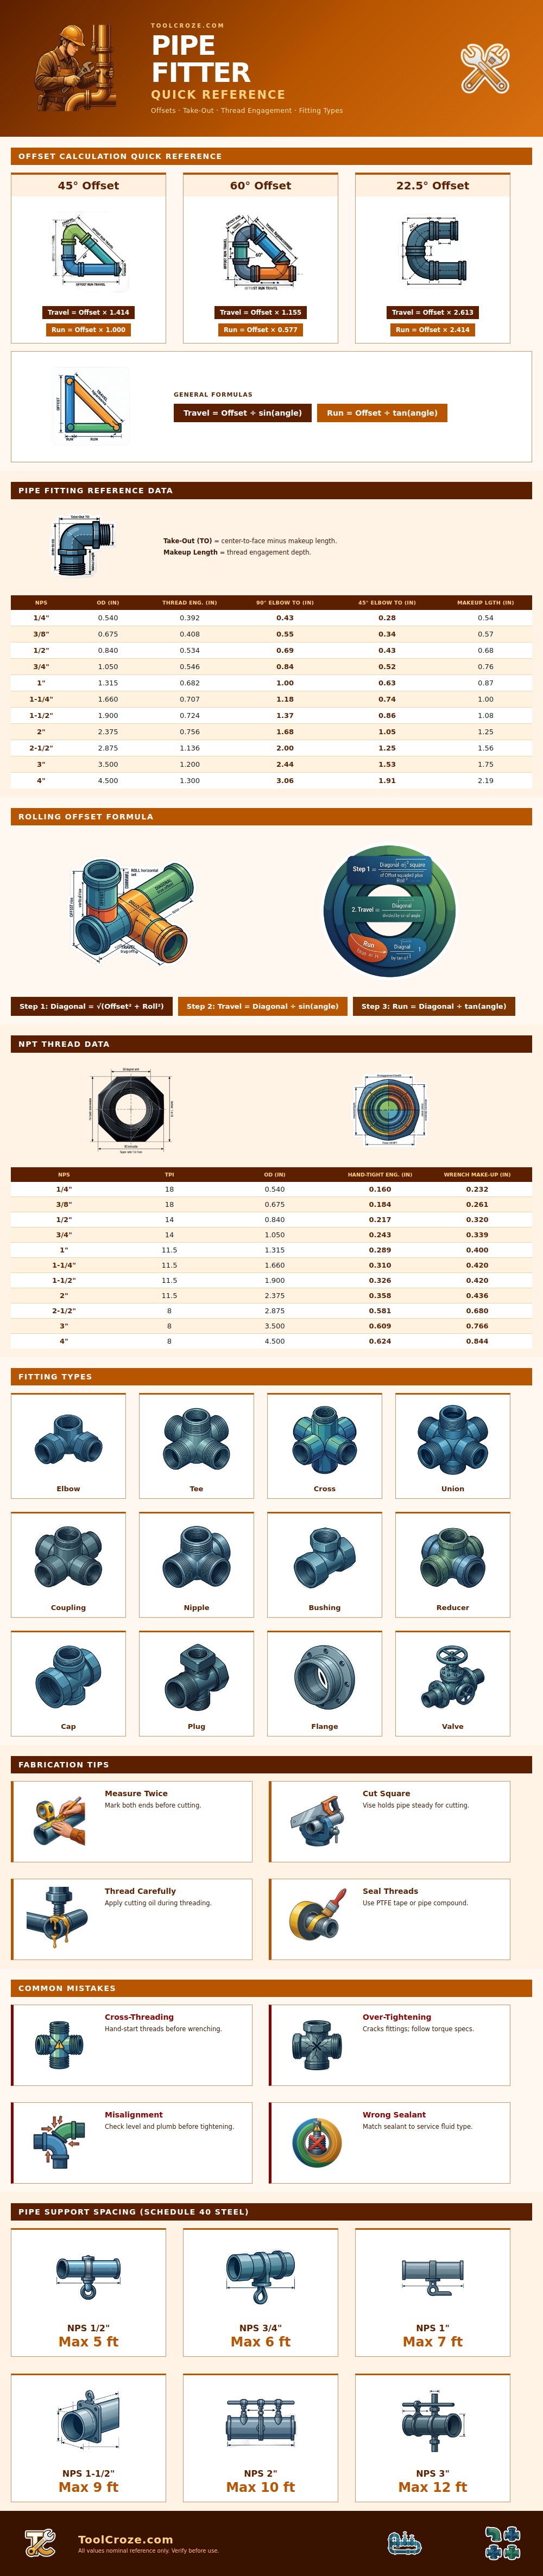
This comes down to a chart that gives you the multipliers for your run and travel distance. If you want to make 45-degree turn, instead of dragging out your trigonometry text book and protractor each time you have to weave around a beam, you just multiply the offset distance by 1.414. On paper it sounds boring as heck but in the real world it’s the difference between cutting a perfect fit and having to sweat in a crawl space because you’re off.
Depending on what angle you turn the multiplier changes. For instance, at 60-degrees the multiplier is 1.155, or if you went really shallow at a 22.5-degree turn, it stretch out to 2.613. Knowing those numbers saves time. They help you get away from eyeballing everything. Eyeballing is notoriously bad for accurate cuts with rigid copper or steel pipe.
So first you figure out how long, then what happens is you gotta deal with the fact that the pipe stops somewhere. That’s when take-out measurements come into play. Take-out is distance from face of the pipe to center of fitting, minus the makeup length of the threads. Don’t skip over that one; otherwise, you’re going to be short on your system. Check the reference data: The take-out values do change based off pipe size, and the makeup length for the threads can vary quite a bit. A two-inch pipe isn’t the same makeup length as a half inch. If you don’t adjust for that variance, your joints is going to be strained or loose. It is not much, but it is important to structural integrity.
Precision also helps when threading. Properly done, National Pipe Tapered threads has an interference fit between their own threads for sealing, rather than just being tightened to create a seal. This requires knowing exactly how many turns will be hand-tight and how many will need wrenches. According to the numbers, a pipe with a small diameter frequently take more turns before it’s properly sealed than you’d guess.
And cross-threading, a silent assassin, is when you turn in just enough but then muscle it into place and trash the thread so it’ll never seal up even with a roll of tape. Start every thread by hand. If you can’t spin it freely by hand, it won’t spin true under pressure.
Another little detail nobody thinks of until they see their pipe vibrating or sagging is support spacing. Steel Schedule 40 requires support at certain spacings depending on size of the pipe. For example, a one-half inch pipe may require support every five feet where a two inch pipe could go ten feet. Ignoring those support limits lead to stress points at the joints, which eventually crack or pull loose. It’s more than just maintaining level; it’s handling weight, heat expansion and time.
Lastly, measure twice and cut once. Yeah, I know, cliche… But for real? Mark both ends first. Make sure the pipe isn’t moving in your vise. Use cutting oil on threads. These things don’t cost anything and could of spared you having to redo something.
Your hands do all of this… Just like the chart gives you the numbers, but your hands carries out the work. Combine thoughtful technique with precise math, and there’s no more panic. No more guesswork. Just build. And what was once a potential disaster becomes a clean, professional install that will last.
