
There’s a piece of steel sitting in the shop. The one next to it look just like it. You stand in the shop holding a welding torch, staring at a piece of steel that looks identical to the one next to it. One is stainless steel and the other is carbon steel. And you jack the amperage up like normal. You anticipate a nice clean puddle forming. But nothing. The metal turns red and won’t melt. Before long, the metal are warped and twisted. You begin trying to lay a bead.
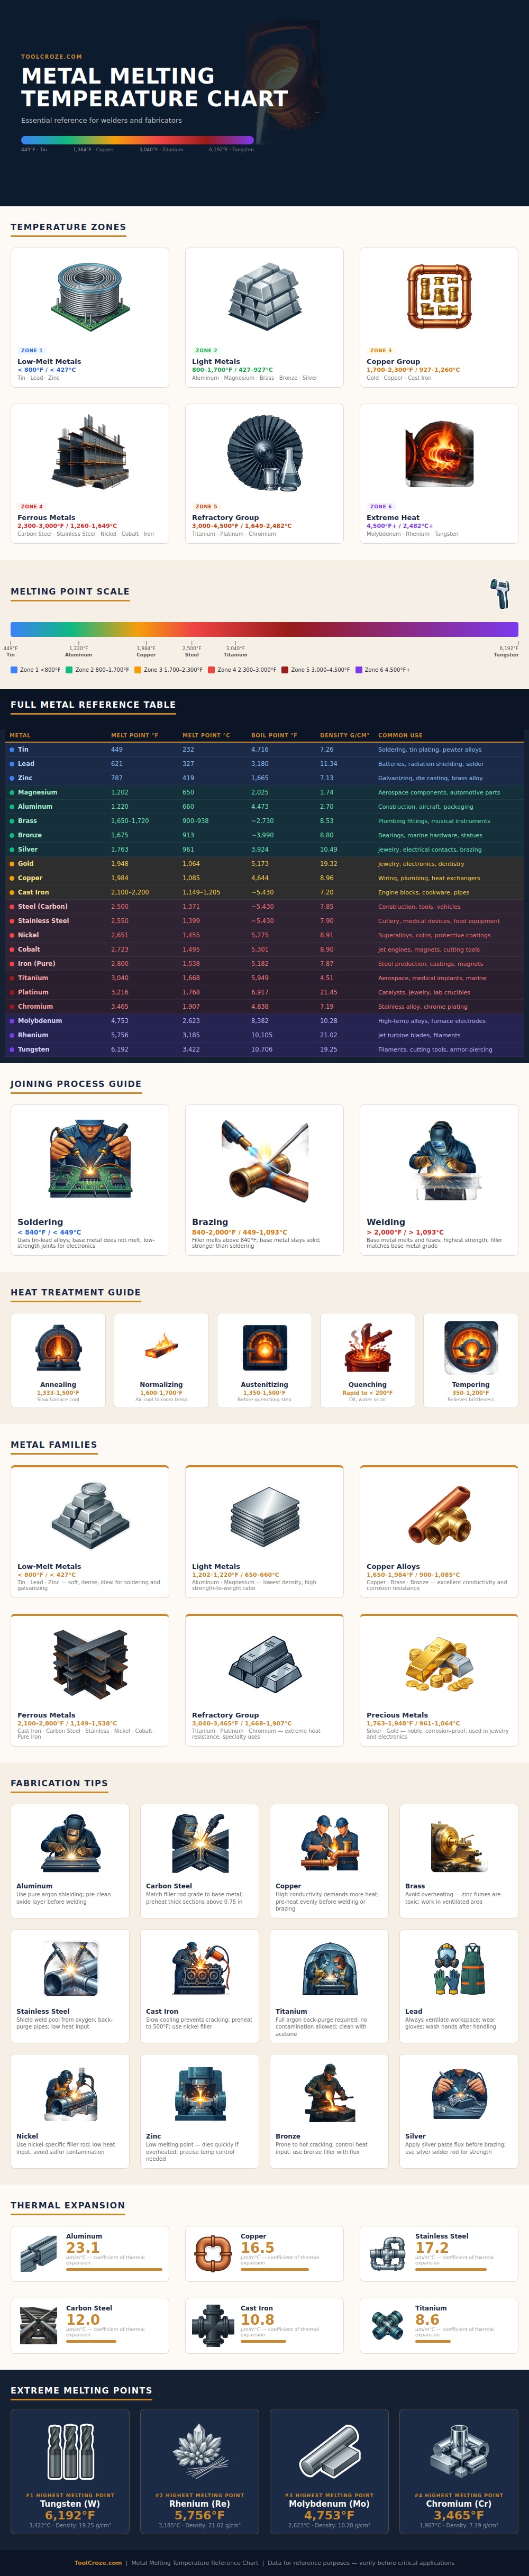
Melting points are more than a bit of academia trivia. It’s the difference between a good joint and a very expensive mistake. Below is a chart that illustrates those melting points in clear zones. Where does each metal fall on the heat spectrum? What should you be expecting going in? How do you change your expectations before striking that arc?
Why Metal Melting Points Matter for Welding
But most novices believe that it’s simply a turn-up-the-dial-increase-heat issue. No. No. Metals is metals for a reason, including how they’re structured on the inside and how well they conduct heat. And it’s not all about the melting point.
Aluminum melts around one-thousand-two-hundred degrees Fahrenheit. That doesn’t sound so bad. But aluminum conducts twice the amount of heat out of weld pool compared to steel. In other words, aluminum need more energy than you would expect. If you treat it like steel, you won’t be able to melt it corectly. High heat conduction often goes along with low melting points. This is where most folks err.
When we look at other metals, specifically ferrous ones such as iron and carbon steel, we find that they will begin to melt between two thousand five-hundred and two-thousand-eight-hundred degrees. That’s where our worry starts more about grain structure and distortion than the melting of the metal itself. Because steel expands quite a bit when heated, it can warp quite a bit. If you put too much heat into a piece of steel, particularly one that is thin, it’s going to curl on you. That is why the infographic lumps these metals all together. Not only do they need a similar set of shielded gasses but usually the same basic filler rod as well. But mostly they want us to treat them with respect in terms of how much heat they hold. Match thickness to the amount of heat you’re putting into it. The setting is not based off only upon the type of metal.
One exception to this rule appears to be titanium. Titanium has an extremely high melting temperature, well above 3 thousand degrees. That’s hot compared to many uses of steel. At these high temperatures, titanium is very reactive. It will absorb nitrogen and oxygen in the surrounding environment. When this happens, the metal turns grey and brittle rather than silvery and strong. To weld titanium, you have to prepare carefully. You can’t simply clean it and fire away. You have to use a purged environment. Argon needs to flow backwards into your work area. Contaminants is not allowed in your workspace. Keeping the atmosphere clean is the true challenge of melting titanium. The real challenge is keeping the atmosphere pure enough to preserve the metal’s properties once it is molten.
At the opposite end of the scale, you’ve got low-melt metals such as lead and tin. Lead melts at temperatures that you could access with your kitchen stove. The same is true for tin. These need to be handled with some degree of caution. Warping isn’t the worry here. Toxicity is the worry. Zinc and lead fumes is no good. Because their melting points are low, accidents happen fast. Drop a soldering iron and it will melt right through your workbench. Perhaps you won’t even feel how hot it was. The chart breaks these out in its own category. It emphasizes that low temperature doesn’t equate to low risk.
These is the metals we can get our hands on. And we are prone to handling them casually. Knowing those boundaries gives you insight into which process is appropriate. For example, copper and brass join nicely with brazing. The base metal don’t melt. The filler does but at a lower temp than the base metal. When welding steel, you fuse both metals together. That tells you something about your method of joining for each area in the chart. It isn’t so much that you’re adding heat as it is controlling a phase change. Once you understand what amount of energy converts a solid to a liquid, you aren’t guessing any longer. You’re calculating.
That’s where a hobbyist differs from a fabricator. You begin to decipher the metal. You don’t read the gauge so much as you read the metal. And then you discover that it wasn’t the temperature that has been difficult to control all this time. What has been difficult was understanding your own expectations.
