
So here’s the deal: There’s a piece of material in front of you, a tap and a drill bit in your hand. Now what? Which one should you use? If you’re like an experienced machinist, sometimes you don’t have any clue. And that can be frustrating.
“Well, shouldn’t the hole size be the same as the thread?” Nope. That’s incorrect when you machine part. More often than not, it leads to ruined holes, snapped taps, and wasted time. How do you learn how to properly calculate the right-sized pilot hole? Well, it’s more than learning from a chart.
How to Choose the Right Drill Size for Tapping
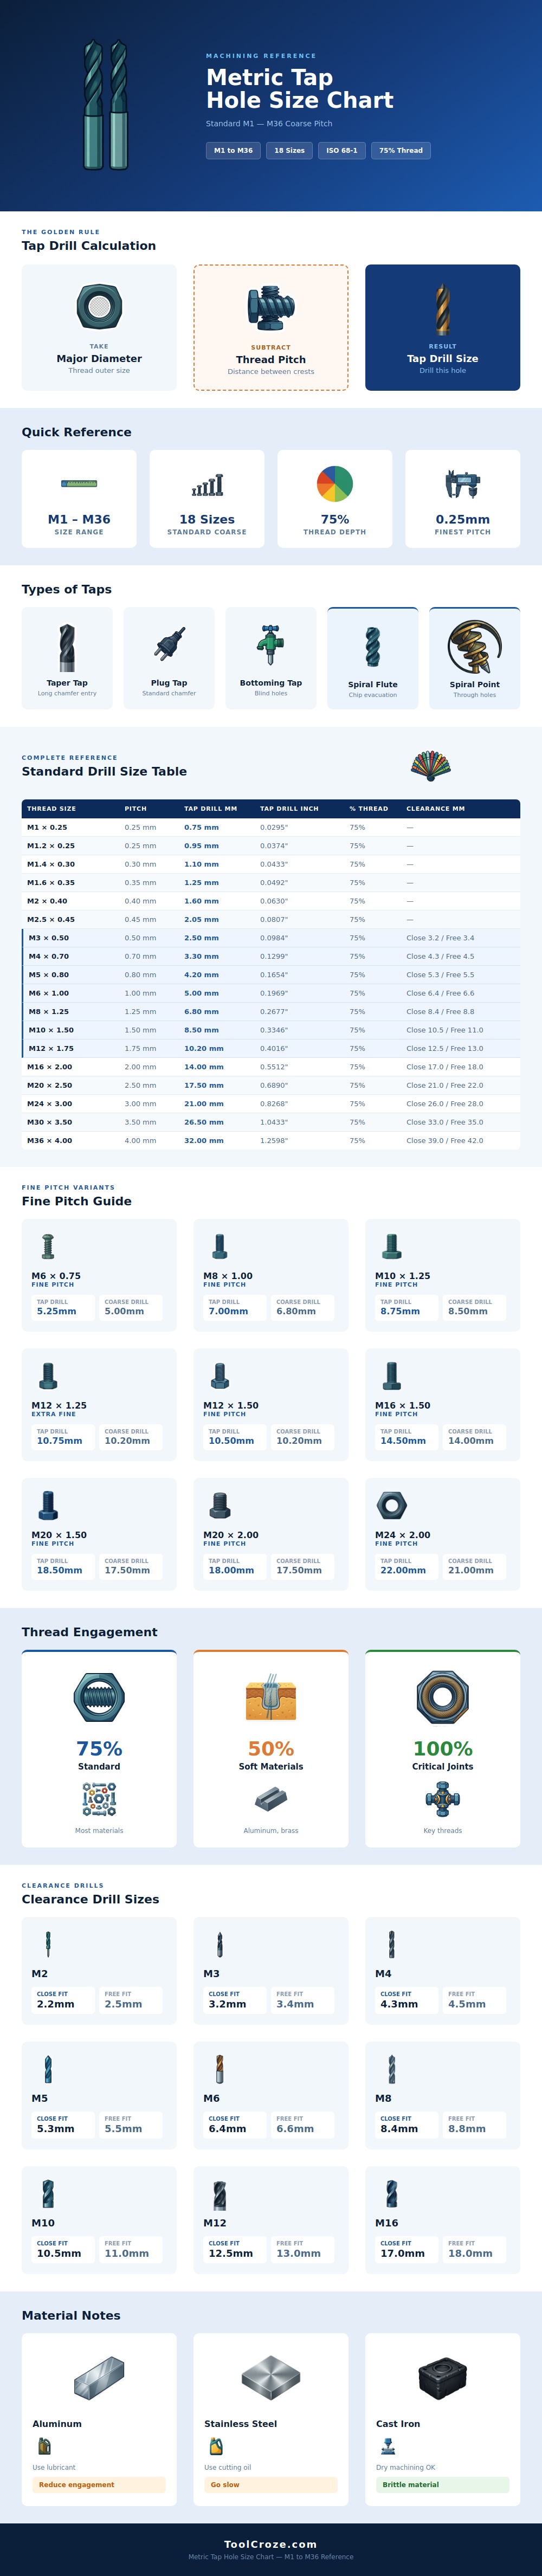
In fact, it has everything to do with respecting the thread’s own geometry. It’s a basic piece of math, just subtraction; but even novices can gets tripped up by it. To figure out what size drill bit to use, you simply subtract the pitch from the major diameter of the thread. The chart lays it out for any size from tiny M1 threads to huge bolts as large as M36. So next time, you won’t need to work out the math. It normalizes things in your head and makes it so you won’t have to work out the math each time.
If we’re dealing with a common M6 bolt (which has a pitch of one millimeter), you’d subtract that one millimeter from the six millimeter diameter. Five millimeters is the answer. It seems backwards because you end up with a much smaller hole than the ultimate size of the bolt, but it allows room for tap to bite into something.
And as for the 75% rule, most reference materials assume you’re looking for seventy-five percent thread engagement. There’s a reason that number is the norm and that reason is: it makes assembly easy while providing good strength. If you drill the hole too small, your tap won’t seat well because of high resistance, which could cause the tap to break. Too big, and the threads aren’t deep enough and won’t stand up to torque… Stripping them right out.
The infographic lists drill sizes for each metric standard to achieve this sweet spot. They covers the coarse pitch variants that is most common in general fabrication. And you’ll see that it makes note of differences among different types of tap. A taper tap has a long chamfer that helps it easily seat; a bottoming tap has a shorter lead and goes all the way to the end of a blind hole. Knowing which type you have changes how hard you push.
Not only does the drill size matter, but so does the material you are drilling into. The chart lists the engagement percentage by metal. Aluminum and other soft materials typically only need half of the thread engaged to hold well. This is typically 50 percent. That means trying to cut all the way through with aluminum is a waste of energy and time. More critical structural joints or harder materials may require all-engagement which will take a bit more caution and a smaller drill.
Then there’s cast iron. It’s not only hard but brittle. It doesn’t throw out stringy chips but instead chip dust. Go slow, and it can be machined dry. The finer the pitch, the smaller the size difference and all of the above applies but the numbers change. So if we’re using a fine pitch M6 thread, the pitch is going to be smaller than the coarse one and therefore you’ll subtract less off the diameter. This results in a slightly bigger hole then it would for a coarse thread. All of this is laid out clearly on the reference guide so you don’t end up selecting the incorrect drill for your specialty bolt.
One other term we forget about is clearance drilling. A clearance hole is bigger than the size of the tap drill so that a bolt can be inserted freely without binding. Sometimes you don’t care if there is a thread in a hole; you simply require a hole big enough for a bolt to go through. These are marked on the chart as well, noting whether they are for free or close fit (loose or tight fitting clearance). Little things like this help keep parts from binding.
There’s no rushing machining. Speed is a key factor as well as tool size and type. The same principles apply whether you’re tapping a big structural part or a tiny box for electronics. Double check your drill size before committing, be respectful to the material and its pitch. It’s not worth risking a snapped tap. Use the guide, take your time, and let the geometry do the work for you. That extra minute of planning would of been worth the satisfaction of having a strong and clean thread.
