
While no one wants to think about making errors in woodworking, drilling holes incorrectly is actualy more likely to cause a bad joint to not pull together. You drive a screw into a hole you drilled through two boards, only to find that opposite side of the board blows out. That’s because with pocket hole joinery you’re relying on geometry rather then brute force. The joint fails if it’s off by as little as a few millimeters.
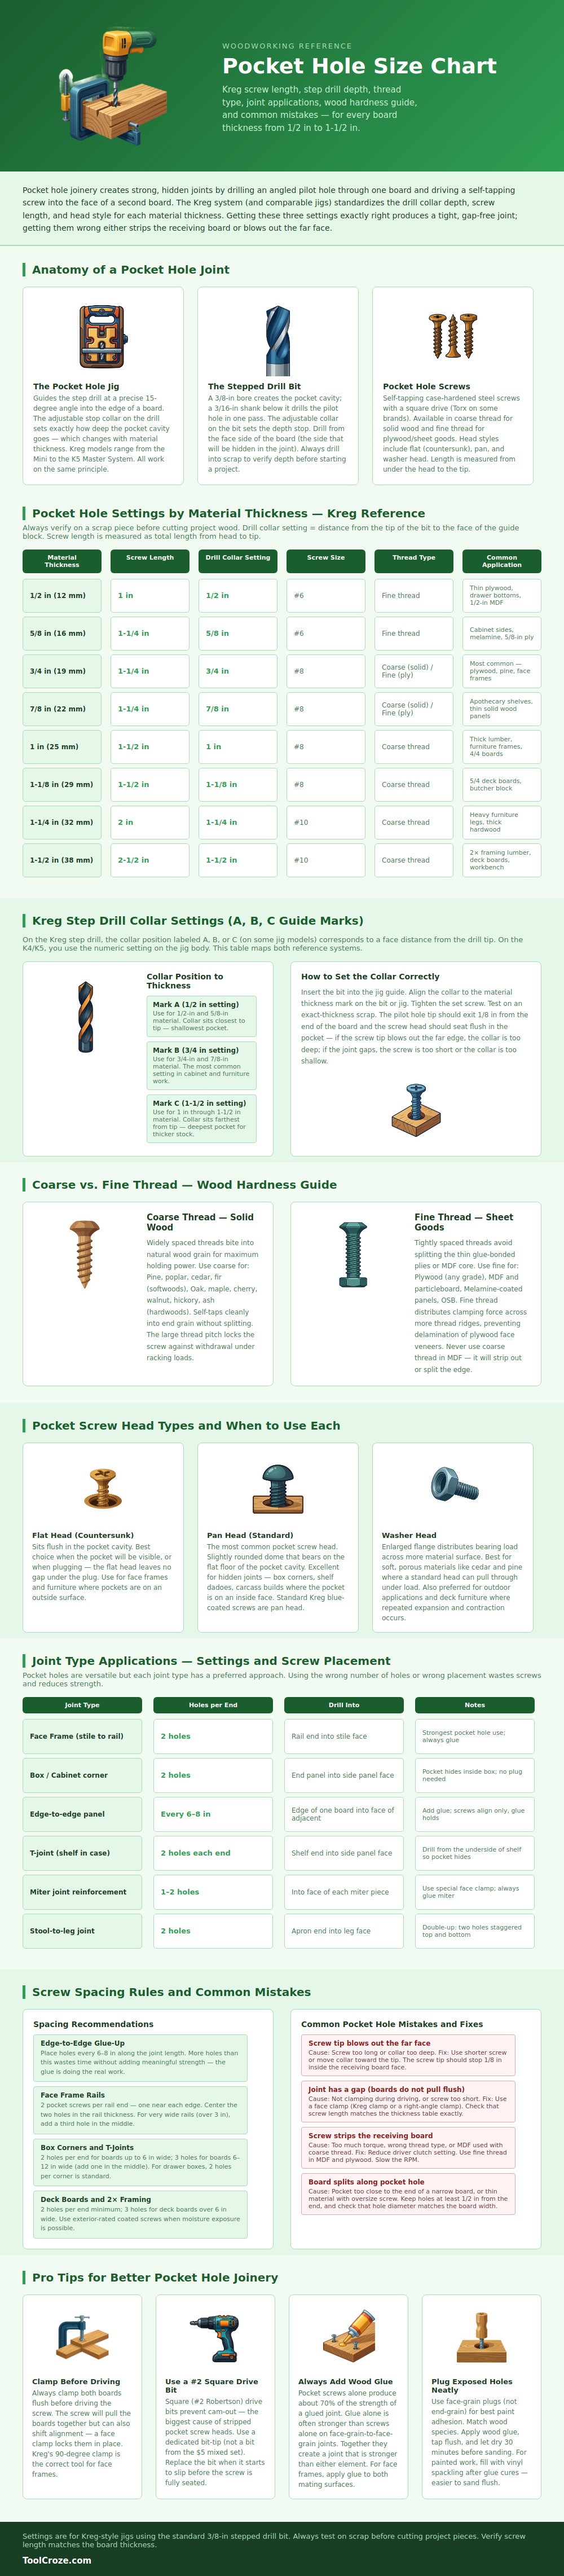
So it’s important to have an accurate point of reference when working out drill depth and length of screws. This is a chart I made that explains how the drill size relates to the screw size: Basically, it tells you what size screw goes with each board thickness (from 1/2″ to 1 1/2″) and which screw length to order with which drill collar position. You don’t have to remember all the rows but knowing how the pattern works will keep you out of the trial-and-error phase on expensive lumber.
How to Use Glue and Screws Correctly
Selecting an appropriate screw thread are equally critical. Coarse threads is used for solid woods as they grab onto fibers of the grain very well with their widely spaced ridges. This allows them to clamp down on racking loads and keep your joint secure without coming loose over time.
Conversely, fine threads should of be used for sheet goods such as thin plywood or MDF. Because these teeth are so close together, they spread the clamping force over a larger surface area while minimizing the risk of tearing out the soft composite material inside. A very common error, using a coarse screw in MDF, will result in stripped hole and a frustrated shop owner.
This section covers hardware. As important as any other piece of hardware is where it’s placed. Don’t overdo the screw count. Glue does most of the work at the joint. Typically, you only need two holes per end of the join: one in the front frame and one in the back for box corners and face frames. Beyond this any additional holes will be a waste of time and won’t add significant strength to the join.
If you follow this rule of thumb: Glue is a bond, and screws are clamps. Then you’ll have a joint that lasts longer than the piece of furnitures itself if you use proper drill depth, appropriate screw threads, and enough glue to provide the bond. For precision, always test your settings on scrap wood prior to cutting into actual project pieces. Collar your screw and then drill a test hole in scrap material of equal thickness and drive a screw through it. Is the screwhead flush? Does the screwdriver bit exit cleanly without blowout at the other end? This takes thirty seconds and prevents hours of regret.
Remember to keep your driver clutch loose; another common mistake with pocket hole systems is stripping out square drive head. That’s ugly even if the joint holds like a champ inside. Hidden strength supports the structure without being seen. These holes and screws is there to hold it all together. No one should see them once the thing is assembled.
If we did our work correctly, they’ll hold everything in place and you can concentrate on the jointery that shows itself. Get those depths correct and you’ll have shelves that feel solid for decades, not wobbly. A little bit of mechanical detail makes the whole build succeed. Learn your collars, honor your thread types and let the glue do its thing. Stand ’em up and your joints will be right where you left ’em.
