
So you’re standing on a ladder, staring up at skeleton of your new roof. Those rafters soar to the ridge in parallel lines. What you see visually, symmetry, is deceiving; more important is whether all that wood can holds weight without sagging. Your roof has to bear the load of shingles, snow and even itself without drooping above your kitchen island.
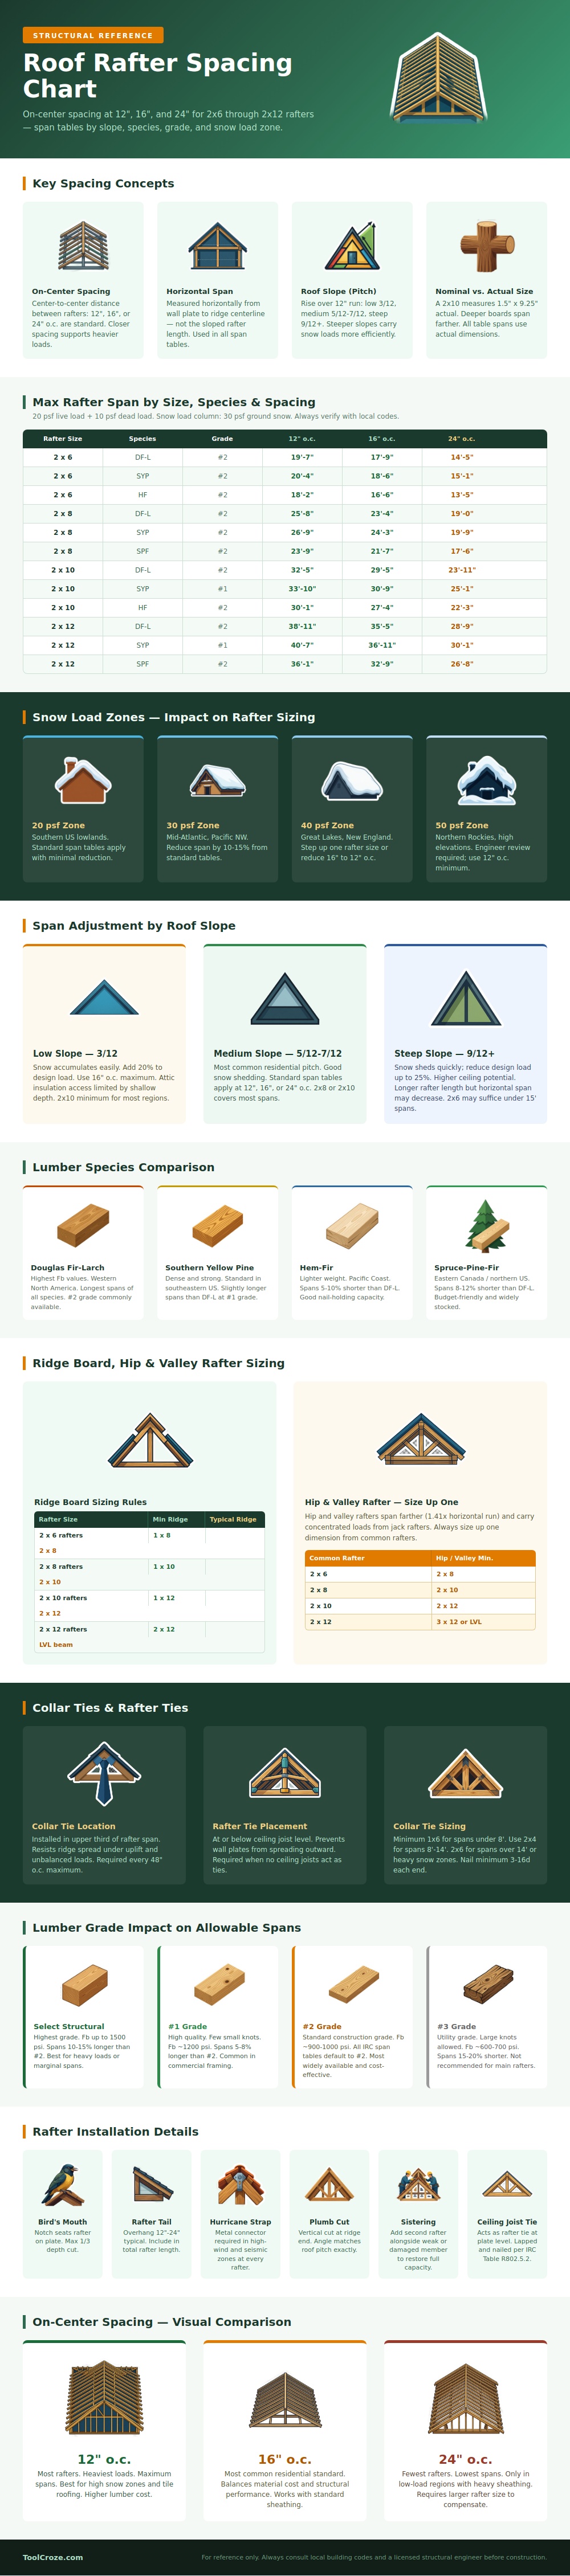
This chart translates the laws of structural physics into real-world spans for specific pieces of lumber. It saves you from guesswork about whether that two-by-eight will buckle under winter loads or support a steep pitch.
How to Choose Roof Rafters
In residential construction, the sixteen-inch on-center distance are the norm (and what most builders would use). Sixteen inches strikes a good balance between performance and price of materials, and it fits nicely with standard plywood sheathing. But spacing isn’t something you should of treat as set in stone. As the chart illustrates, switching to twelve-inch spacing let you go down a size on your rafters to achieve the same spans. In contrast, increasing spacing to twenty-four inches require deeper lumber to make up for the greater distance between support. It’s an economy of buying thicker versus more boards.
These figures are heavily influenced by wood species but many homeowners examine the stamp on their bundle of lumber after it’s already been purchased. On span tables for the west, Douglas Fir-Larch accounts for most of the span due to its high bending strength value that lets it span further between supports. Similarly, in the southeast, Southern Yellow Pine performs comparably. In certain situations, Spruce-Pine-Fir may be a rafter size down from what’s needed to get same reach. If you use the incorrect species at the assumed grade, then your performance will be less than expected.
But all that changes with the roof’s geometry: Snow accumulates as if in a tray on a low-slope roof (say three-in-twelve) and it must be designed accordingly to handle maximum loads. On steeper roofs (nine-in-twelve or better), gravity will work fast to shed its weight, mostly lowering the dead load on your rafters. That’s what makes a two-by-six possible on a steep roof but not one with a shallow pitch.
It is not how long the rafter board runs diagonally upward along the wall; it is the horizontal distance that matters for the tables. If you confuse run with rise, you’ll undersize your members which will deflect under load.
Valley and hip rafters: Although these resemble ordinary rafters, and are sometimes called that, don’t treat them that way when sizing them to handle their diagonal orientation and concentrated loads. Because of their diagonal position, they bridge further distances, and also take heavy loads where several jack rafters converges on a single spot. Sizing up one dimension is the rule here: if your common rafters are two-by-eights, your hips need to be two-by-tens. Not skipping this step will encourage deflection that shows up as cracked drywall indoors or uneven seams in siding.
Beyond being highest point in the roof, ridge boards needs to be substantial enough to serve as a firm nailing surface for the end of opposing rafters. Compressive forces from a big snow event can crush or split a thin board. According to the guides, there are minimums based off rafter size to ensure that the ridge is a stable anchor and not a weak link.
In the end, roofing is just a game of reducing risk with proper sizing and redundancy. Skimping on the species or the spacing saves you money now, but costs you down the road in upkeep and maybe even structural integraty. If you’re at the edge of what those tables indicate, double check your local snow load area and call an engineer. A good roof is one you don’t notice, and that’s where good engineering begins.
