
So what does it sound like? When mechanical failure happens you’ll know by the sharp snap and then you’ll know you’ve broken a shank or stripped a bolt. That’s right, this doesn’t happen cause you didn’t try hard enough. Usually it’s because you tried either to hard, or maybe not hard enough on a fastener that required just so much tension to do its job.
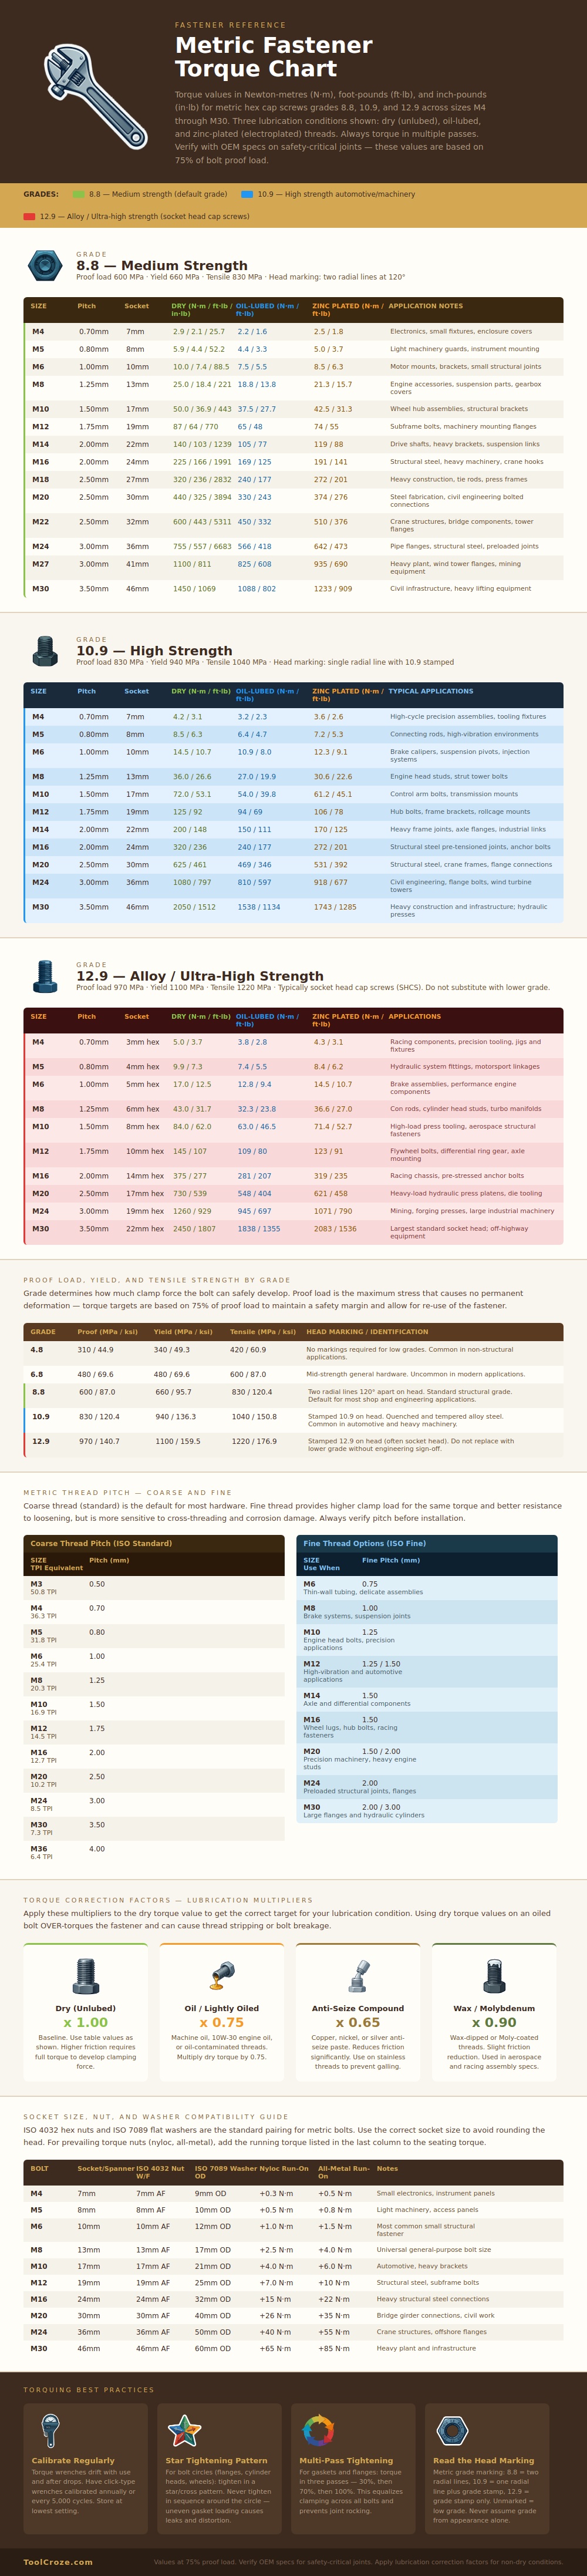
As the chart above shows, the condition of thread and grade of steel being used also dictates the amount of torque required. Are they slick from oil? Dry? Maybe they are coated in some zinc? Here’s a more detailed explanation of why material strength and friction determine ultimate clamp load.
Understanding Torque and Bolt Strength
Torque is frequently misunderstood as merely a measure of how tight things are; it’s not. Torque is a substitute for clamp force (the force holding two parts, like an engine head gasket or some other structural bracket, together). Does the fastener feel “tight” between your fingers? That doesn’t matter to it. What matters is tension (tensile stress) within the body of the fastener itself.
You want to hit target without going too far. Too far means stretching the fastener beyond its elastic limit and inviting fatigue failure over time. Going too far also means you miss the sweet spot where vibration from operation will loosen the joint. The sweet spot isn’t very big at all. Understanding what that number on bolt head means is much more important than most shop manuals let on.
2 radial lines and Grade 8.8, a good compromise between durability/strength for general auto and machine applications
1 line and stamped # = Grade 10.9 bolt, Higher grade for items like engine studs and other suspension component
These are usually seen in socket head cap screws used in high end tooling or racing application. With this grade you’re nearer to your breaking point with even moderate amounts of torque so they requires precise installation and handling.
There’s no sense trying to swap a lower grade into a high-stress application and crossing your fingers. But then there’s the whole lubrication equation. Sometimes a quarter, or even more, of required torque comes from lubrication. The problem with dry threads is they has high friction, and much of what you’re doing when tightening with a wrench is overcoming this resistance instead of actualy stretching the bolt. Oil drastically cuts down on this friction. So if you grab an oiled bolt and snug it down to spec listed as “dry”, you’ve essentially over-tightened it and run the risk of failure immediately. It’s a tiny little detail but one with huge consequences. Always make sure your lube state matches your target value.
But it’s not just the number; how you tighten it is equally important. Never tighten a multi-bolt flange in a straight line around the circumference, warping the mating surface and applying inconsistent pressure will result in leaks or stress fractures. Go with a star pattern. Then apply torque in stages, first at 30 percent then again at 70 percent before finishing with a full 100 percent. This helps the joint set up even and prevents rocking.
And keep your wrench calibrated. A click-type tool loses its “click” from heavy use or dropping; any serious work require regular calibration. If you think of torque as a measure of controlled tension rather than raw brute force, the entire assembly process will feel more calculated different than just guessing. And that mental shift makes sure your projects are held together securely long after wrench is tucked away.
