
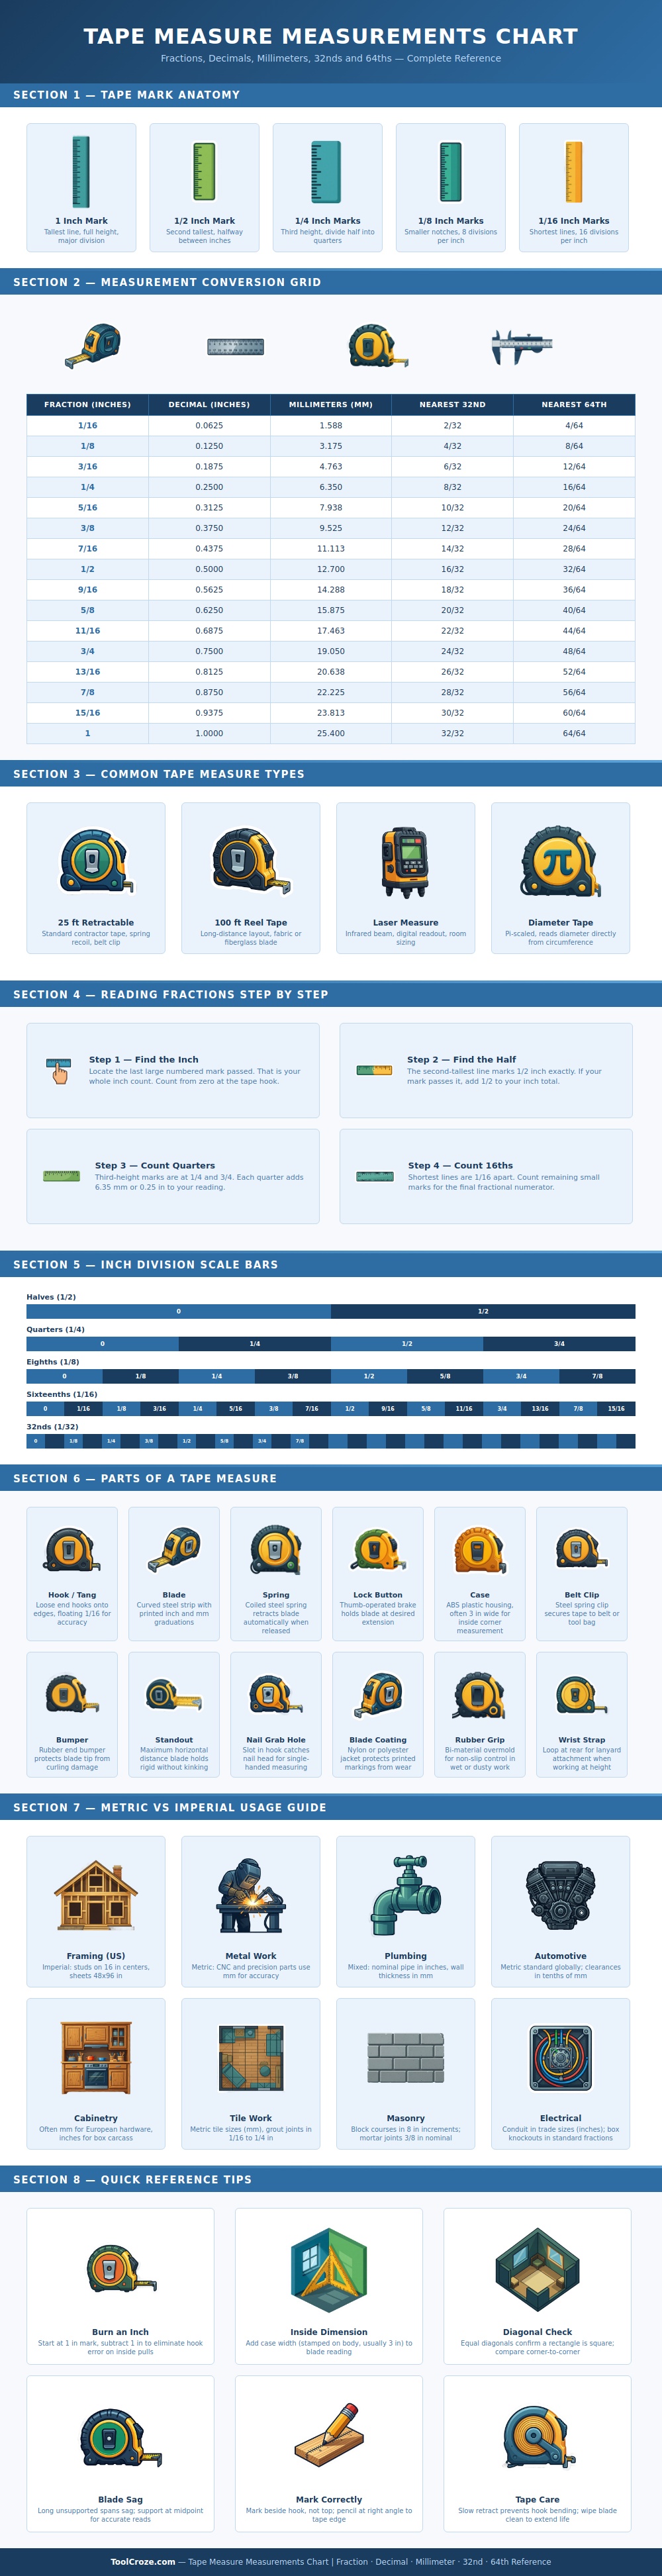
Two tapes aren’t the same just because they look identical on the outside. You’ll have one rigid-thick blade for heavy framing projects and another slim enough for your pocket. Why? Knowing how to use a tape is more about how you handle it then the markings on it. The chart explains how the spring, blade and hook combine to give you accurate measurements. Until something malfunctions most folks forget about them. Understand their role and you’ll read measurements faster and trust your results more.
Sometimes I am confused about the lines in inches. If you don’t know what to look for they appear static. But once you see it laid out in this infographic you understand how it works. Each of those lines is a measurement. Full inches are always marked with the tallest line and half inches with the second longest. As measurements become smaller, the size of the line will also become smaller. That visual rhythm helps you through it. You won’t have to count each little tick off of zero. Rather, since our brains understand changes in height more rapidely than counting small increments, we’ll find the biggest one we’ve just gone past and count up from there. So once you get to know fractions it makes them easier to convert.
How to Use a Tape Measure Correctly
The chart has a conversion grid that lays out fractions, decimals, and millimeters side by side. As you can read, 1/16th of an inch = around 1.6 millimeters or approximately 0.0625 in decimal. This is really thin, only slightly thicker than a piece of printer paper. It’s enough to mess up joinery fit or cause a gap in your trim work. You might not notice at first that something doesn’t line up perfectly, but it can make the whole project feel off. This happens when there is not enough room for error.
The right kind of tape makes all the difference. Here’s where the chart shows the difference between specialized diameter tapes (surveying), long reel tapes (for surveying), and regular old retractable tapes (standard). For most home jobs, a basic twenty-five-foot tape is your workhorse. It comes with a belt clip for easy access, and a lock button so that blade stays out while you use it.
But if you’re measuring large spaces, like when laying out a foundation, that same blade may sag in the middle. That’s what’s noted in the visual guide as “blade standout”, how far the blade actualy stands out from the main part of the tape before it starts to droop under its own weight. Keeping the midpoint supported will ensure that your readings remains true, something many beginners don’t notice till they find themselves off by a few inches over a longer span.
The design incorporates some neat little features that most people overlook. For example, when measuring between inside edges, the metal hook on the end of the tape is meant to be loose. It can slide around a bit to make up for its own thickness when you switch between inside and outside measurements. By pressing the hook in and then releasing it, you’ll see it slides maybe a sixteenth of an inch, which accounts for being inside the corner or up against the edge. You can try it yourself if you like.
Also, if you do manage to break off the hook, don’t panic; just start with the one-inch mark and take one away from whatever number you get when you finish measuring. That’s called burning an inch, and will remove any measurement variance due to a broken or missing hook.
Maintaining your tape will make it last longer. The blade is made of hardened steel. It can be damaged by hard objects and can also corrode. To keep this from happening, wipe it off with a cloth after each use to remove any rust before it eats at the ink on the numbers. Also, when you close the case, let it close slowly to avoid stressing the inner spring mechanism. If it breaks, you’re looking at a jumbled pile of metal parts that are a pain to disentangle. In addition, keep the tool clean so you can read markings more easily in low light. Dirt and debris can hide those small, sixteenth-inch lines and cause you to make errors.
With a little practice and patience, it measures really well. It’s going to take some mistakes along the way…that’s normal. The idea isn’t to nail it each time but to create a solid process you could of do over again. With some practice you’ll learn to rely on the inbuilt features correctly, understand how the marks are laid out and respect the physical limitations of the blade. Get good at knowing which mark is the biggest (work backwards from there) and always double check yourself before cutting…those are the habits that save frustration and material down the road.
There will come a point where you look at all those blurry lines on the piece of steel and immediately see exactly what the measurement is. That’s when you’ve earned it. Confidence transforms a DIY project into a real finished thing. It stops being a puzzle you are trying to figure out with a tool as an extension of your hand.
