
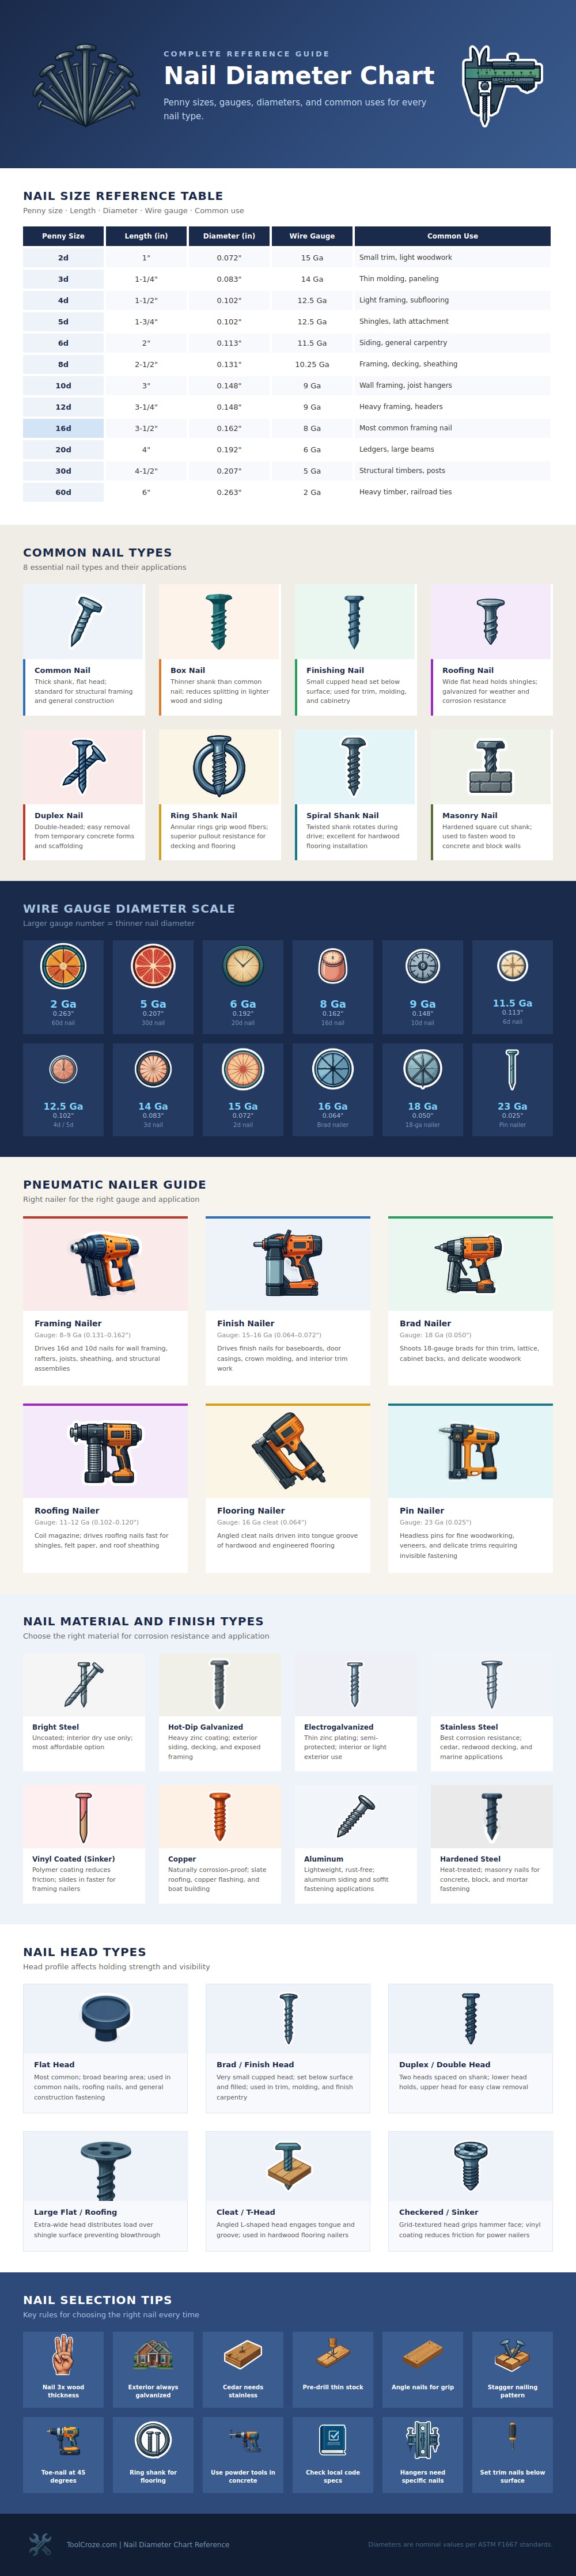
Next time you find yourself holding up a pack of nails in the hardware store, contemplating whether you’re about to select the right one for the job; or if it’s going to buckle when pushed against something, you’re not alone: most people assume longer equals stronger. But diameter also plays an important role; that’s why even though it may appear massive end-on-end, a long and narrow nail snap like kindling when faced with shear force. To get your head around this, check out the nail chart (above). It compares penny lengths to their corresponding gauge (wire diameter) and shows what they will be used for, from thick-shanked structural framing to precise hairlines for trim work.
This old method of measuring nails is referred to as the “penny” system and has endured for hundreds of years simply because carpenters have spoke this lingo so well. Two penny are super small and reserved for things like very small trim applications where you don’t want a lot of exposed nail. Moving up the scale into 4, 6, 8, and even 10 penny nails you’re moving more into the real world of building. These sizes is the perfect balance of being thin enough yet long enough to be used in light framing and siding applications.
How to Choose the Right Nails
Where they catch people off guard is figuring out that the larger the gauge the thinner the actualy nail is. That’s backwards and takes some time to wrap your head around. It is like comparing bowling pins to bowling balls; the higher the number, the smaller the object.
The majority of failures happen before you start: material selection. Regular steel nails work great inside on drywall; buy them cheap and use ’em. But outdoors, they’ll oxidize and leave orange stains in your wood (not good). Stainless steel is a must wherever it comes near redwood or cedar, which produce tannins that eat through regular iron and leave black streaks that mess up the grain. Electro- and hot-dip galvanized nails has thicker zinc coatings that resist water and decking better than standard nails. You don’t want any corroded-looking nail later. Get it right now, avoid rework and ugly spots later.
The same goes for nail shank design. Some shanks has rings around them that grab hold of wood fibers; others (smooth shanks) slip right in and are pulled right back out when pushed on. Because they resist withdrawal forces better than any other type of nail, ring-shank nails is the norm for decking and subflooring applications. For hardwood flooring, spiral-shank nails feature a twisting action as they’re driven that physically grips the plank in place, something a smooth nail can’t do at all. It is a little thing. But it makes for no-squeak floor down the road.
The pneumatic tools are all well and good but don’t get us started on how they’ve altered our perceptions of fastening. Eight or nine gauge nails can be sunk into rafters and joists in mere seconds by a framing nailer. Fifteen or sixteen gauge finishes is pushed below the surface and then filled back in so you can sand out any trace. Brad nailers goes down to the finest detail for cabinet backs and other delicate lattice work when every millimeter matters. Don’t try to hang your picture frames with a framing nailer. It’s just asking for trouble and it’ll leave damage you never asked for.
Lastly, know your local building code: Many codes has strict requirements regarding size of nails used for structural applications. You can’t guess. Certain types of nails (like joist hangers) need to be a certain length and gauge to be safe. Also consider pre-drilling thin stock before hammering; it won’t split or tear out. Stagger your nailing patterns, which will spread stress on the lumber better. Sinker nails have checkered heads that allow them to slip right into your power tool magazine without jamming. This is useful, but it’s also just because somebody was frustrated on jobsites enough times to make ’em work this way. You should of used a different approach if they wouldnt work.
There’s no chart to memorize. It’s more about having respect for the material you’re dealing with. Match the fastener to the load and the wood will behave as you desire.
