
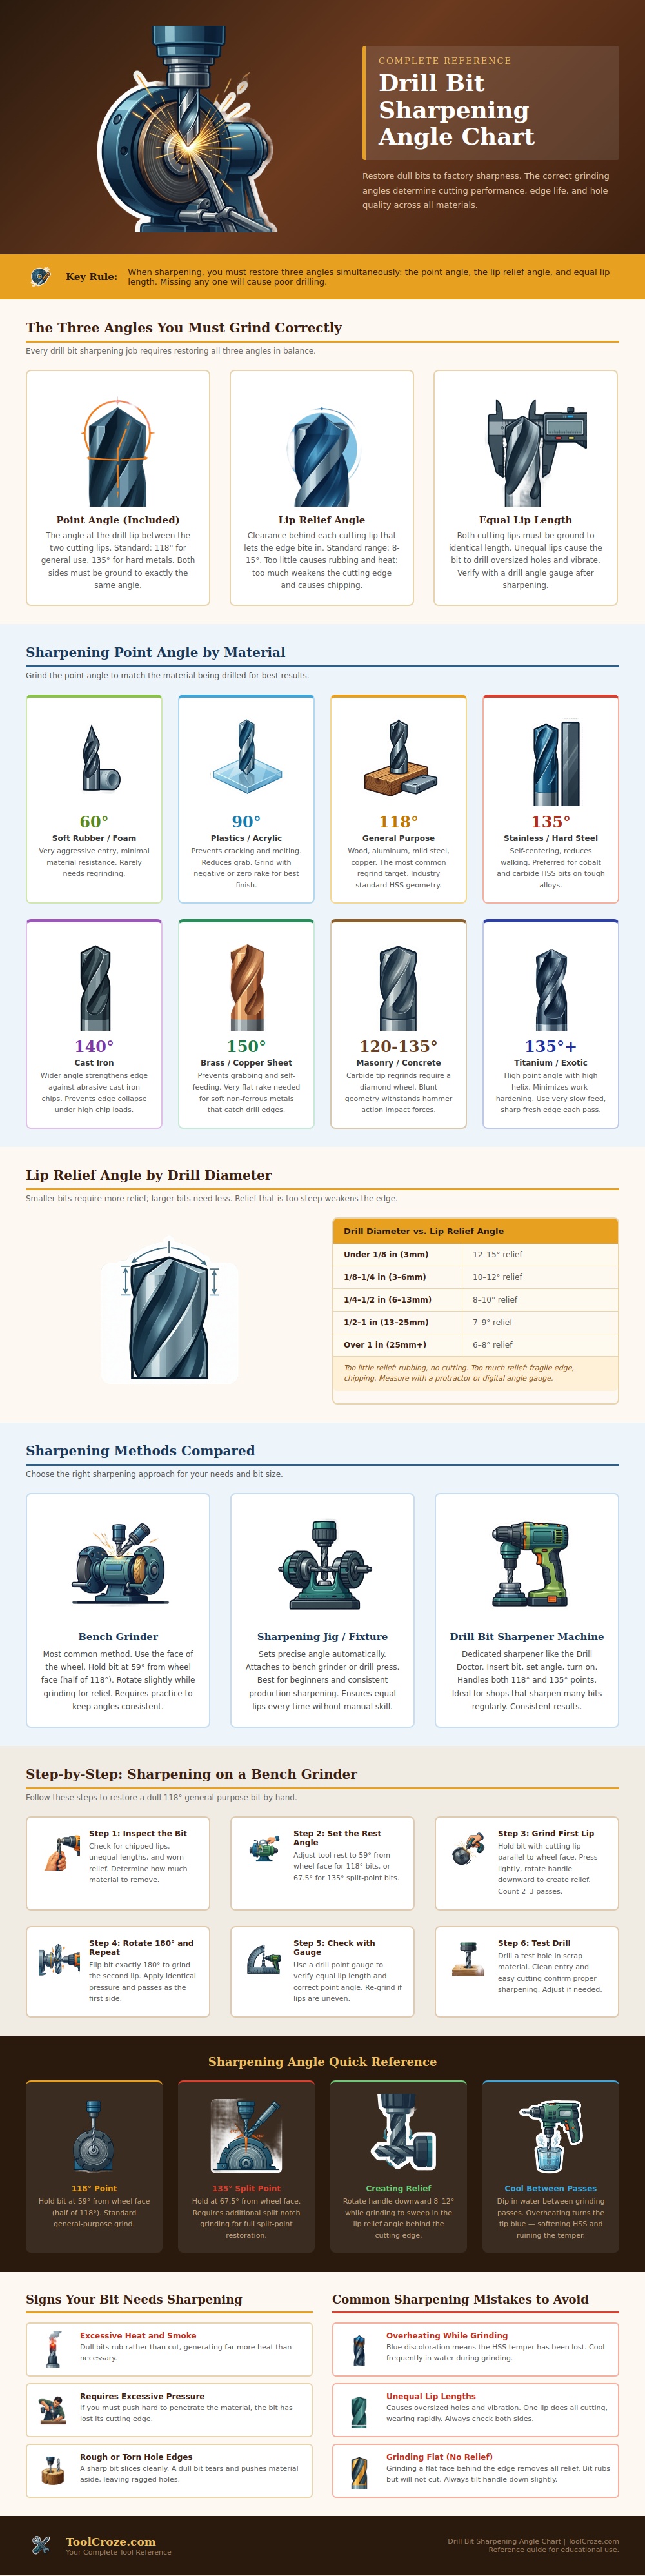
With a new drill bit, you should of be able to cut cleanly with little effort; one that’s dull will heat up and grind. To make it good again, you don’t need just a pointy tip, you have to return those geometric angles. As the chart shows, missing any of them will ruin your cut.
First is angle from the two cutting lips called the point angle. For most applications a good starting point would be approximately one hundred eighteen degrees as it provides both good speed and strength. If you are working with harder metals such as titanium or stainless steel, you can increases that angle to something more like one hundred thirty-five degrees.
How To Sharpen A Drill Bit
But altering just that will not make the drill bit sharp. The other variable is what’s called lip relief angle or the clearance behind the actual cutting edge. If back of the cutters aren’t relieved correctly, then they rub on the material being drilled. This causes heat and leads to rapid dulling of the bit.
The size of your drill bit determine how much relief you’ll need. Finer bits with a smaller diameter have tighter edges and will bind; therefore, they require more relief. Because larger bits is stronger, they don’t necessarily need as much clearance. According to the infographic, a bit less than 1/8 inch requires up to fifteen degrees of relief while anything over an inch doesn’t even really need more than six or eight.
Additionally, make sure both lips is the same length. Symmetry ensures vibration-free operation and keeps the bit running straight down the middle of your drill.
Angles are everything, but so is how you sharpen. Using a bench grinder allows you to control angles, but you need some practice to maintain them. With the bit held halfway between the tip and the point angle on the grinding wheel, rotate your wrist down. It’s awkward until you get used to it but that will come in time.
If you don’t like learning curves and need things to be consistent all of the time, there is dedicated machine sharpeners (or even sharpening jigs) that take care of geometry for you. Clamp the bit and follow the exact edges to make sure both lips are the same length. It will extend the life of your furnitures.
When grinding drills, heat is their enemy. It gets really hot quickly from friction and you’ll burn them right out if they’re not dunked in cold water between each pass. You’ll know when you’ve done it when the color of the metal changes to purple or blue. At that point you can’t save it because it’s lost its temper and now the bit is soft and no matter how good it looks, it won’t hold an edge. This process take a little longer, but saves the bit in the end.
And lastly be on the lookout for warning signs that a bit may need some work before total failure. Too much smoke, ragged cut at the sides of the holes and having to push too hard is all clues that it’s time to sharpen again. Get those three angles dialed back in properly and what was a painful grind is now a clean slice through your project. Your tools will live longer and your projects will go by more quicker.
