
You have to stop and look for your chuck key, because it’s been lost in the bottom of box with everything else. Your drill won’t grip the bit. Then you can’t finish drilling hole until you go looking again for the key. It’s not an unlucky occurrence; it’s organizational failure, wasting time.
Knowing what key goes on what tool help make this easier. It turns a frantic scavenger hunt into a simple grab-and-go routine. Match the chuck capacity to its corresponding key requirement. Most home workshops rely on standard keyed chucks that uses Jacobs K-series keys. Those K-series keys do not interchange randomley. There’s a strict engineering standard for them.
How to Choose and Organize Your Chuck Keys
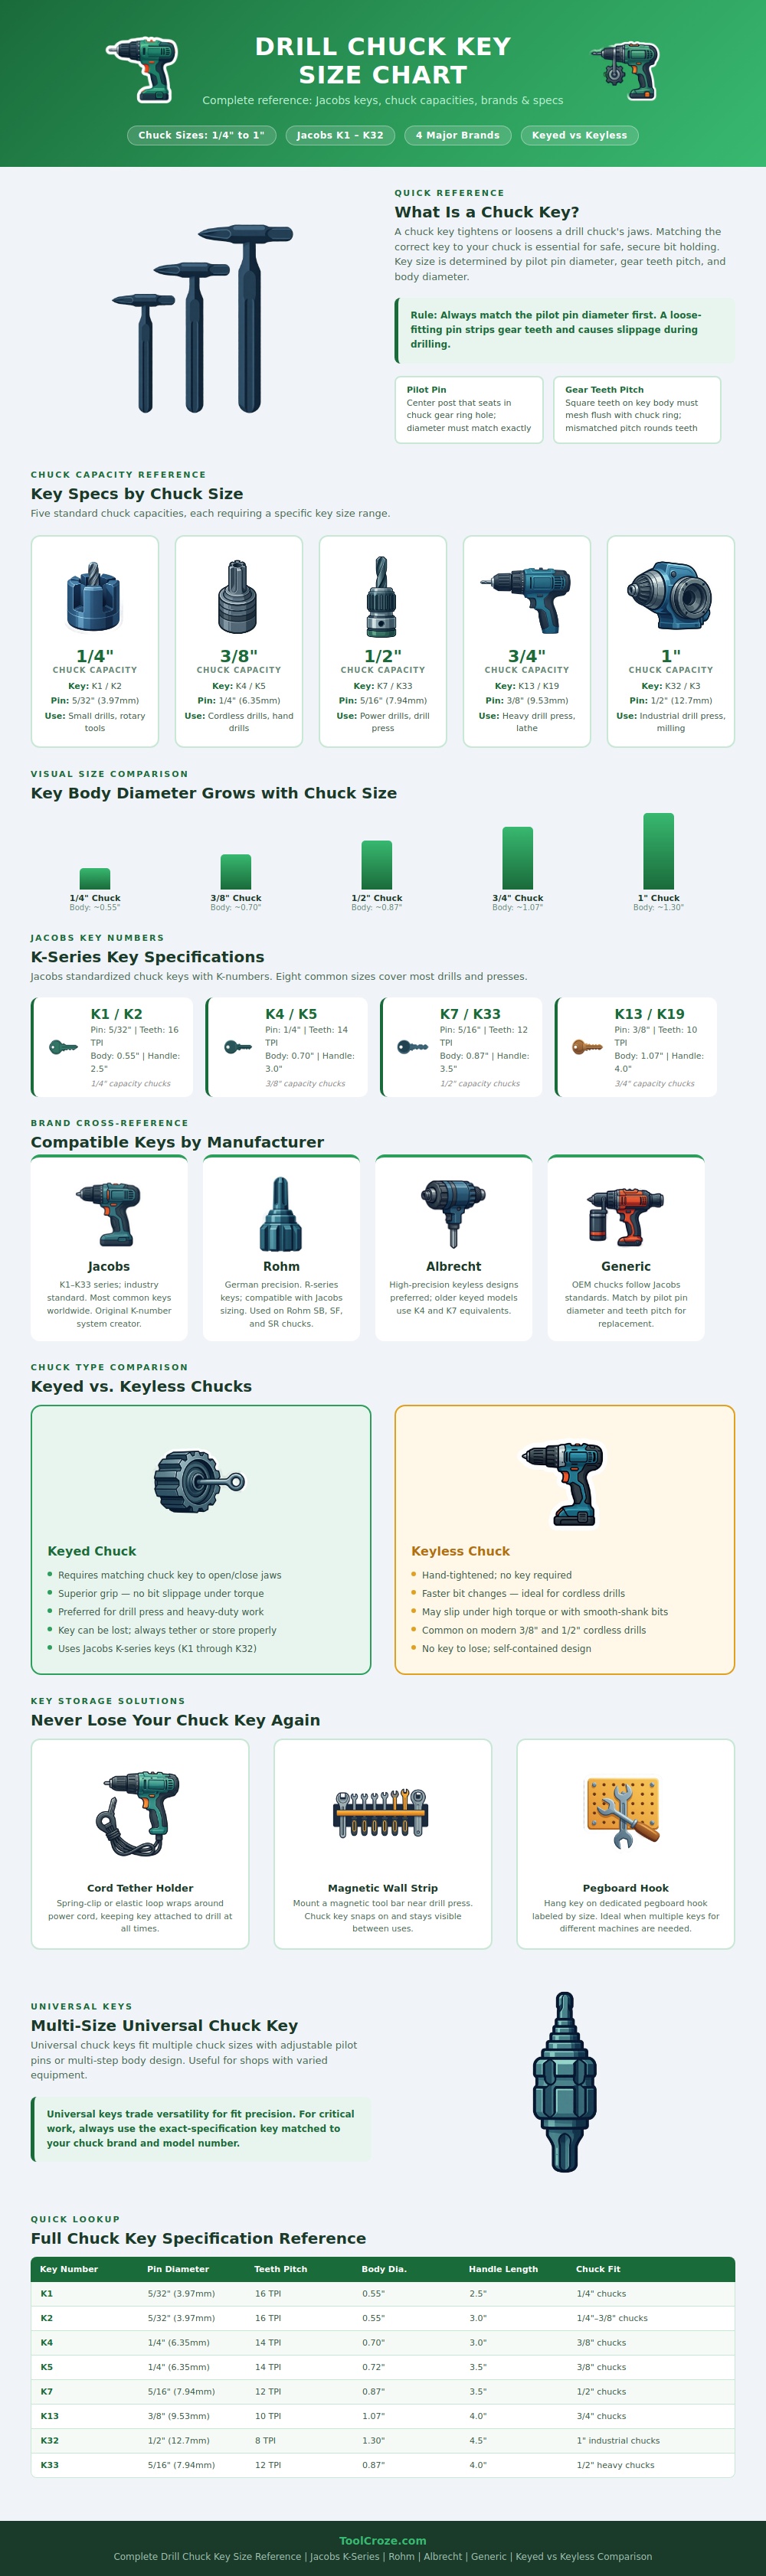
Most important is the key’s pilot pin diameter. This fit snugly into the chuck’s gear ring hole. Too large and it’ll strip the inner gears in no time. That’s bad and costly to repair. Always make your key diameter match first, everything flows from there.
As the chuck capacity increase so does the diameter of the key that goes in it, according to the guide. A tiny K1 or K2 key has a narrow profile that fits a small one-quarter inch chuck. Meanwhile a huge K32 key is almost a half inch thick at the shaft and fit a heavy-duty three-quarter inch industrial press. As the keys increase so do their teeth pitch. Because you can’t force a small key into a big chuck simply because it appears to fit, the square teeth has to mate exactly with gear ring. The mismatched pitch will round off those teeth in no time making both the chuck and key useless. It’s one of those little mechanical details that makes a difference to the life of your tools.
For ease of use, many users today prefer the keyless chuck. These are great when changing bits on the fly with a cordless drill. But the keyed chuck does retain one clear benefit: bite force. Using a T-handle key exert more clamping pressure into the jaws than we can by hand alone because it uses mechanical force. That means no slip of the bit during high torque applications. For those of us who do a lot of woodwork (hard woods) or masonry, that added assurance is well worth any slight irritation caused by keying up and down. It ensures accuracy and safety in your project.
A second aspect of the puzzle are brand compatibility. As the infographic details, most of the big players (Albrecht, Rohm and Jacobs) adhere to similar standards. Jacobs came up with the original numbering scheme, but other makers has released equivalent models that are compatible. Nearly any generic OEM chuck will be made to the same spec. If you can find a quality replacement key that’s identical in both tooth pitch and pilot pin diameter, there’s no need to purchase from the branded line. It’ll save you some cash and won’t impact performance in any way. These dimensions have become standard for a reason. They allow you to switch out pieces between various machines and not worry about tracking down special, custom items.
There has to be some sort of intentional organization if you have several sets of keys. If you hang them on the bench, you know where they’ll go: missing. Use an elastic cord with one end attached to your drill’s power line to keep the key secure at all times. Near fixed drill presses, magnetic strips on the wall holds the key in plain sight while being handy. Peg board hooks reserved for just the keys to each machine keep one from getting the wrong ones mixed up. The time spent organizing takes minutes but saves hours of lost search time over the course of a year.
Multi-step body or adjustable pin type keys can be used in many machines, which means they’re universal. Great if you need to quickly repair something on the fly, but generally less precise than fitting exactly right because that’s what you has on hand. It could of been better. If it’s a critical application and you need accuracy and torque, get the key to the right spec for your particular chuck make/moddel. It’s tempting, but it’ll pay you back in spades.
Now that you’ve found the hard-to-find key, don’t throw it in the drawer again. Know what it’s for. Know how big it is. Put it away. When the clock is ticking toward your project due date, an organized workbench reduces your stress level. Treating your tools well begins by putting their important parts within easy reach.
