
It’s happened to all of us: You pick up a new power tool, don’t read instructions, stand in hardware aisle holding cordless drill with a new, bigger bit, and stare at the chuck thinking, “Why won’t this damn thing keep my new bit?!”
The problem is never the drill. Instead, it’s nearly always a mismatch between what you thought the jaws was capable of gripping and what your task require. Knowing its limitations will save you some time. It will also keep your threads from being stripped out and your holes from getting wobbly.
How to Choose the Right Drill Chuck
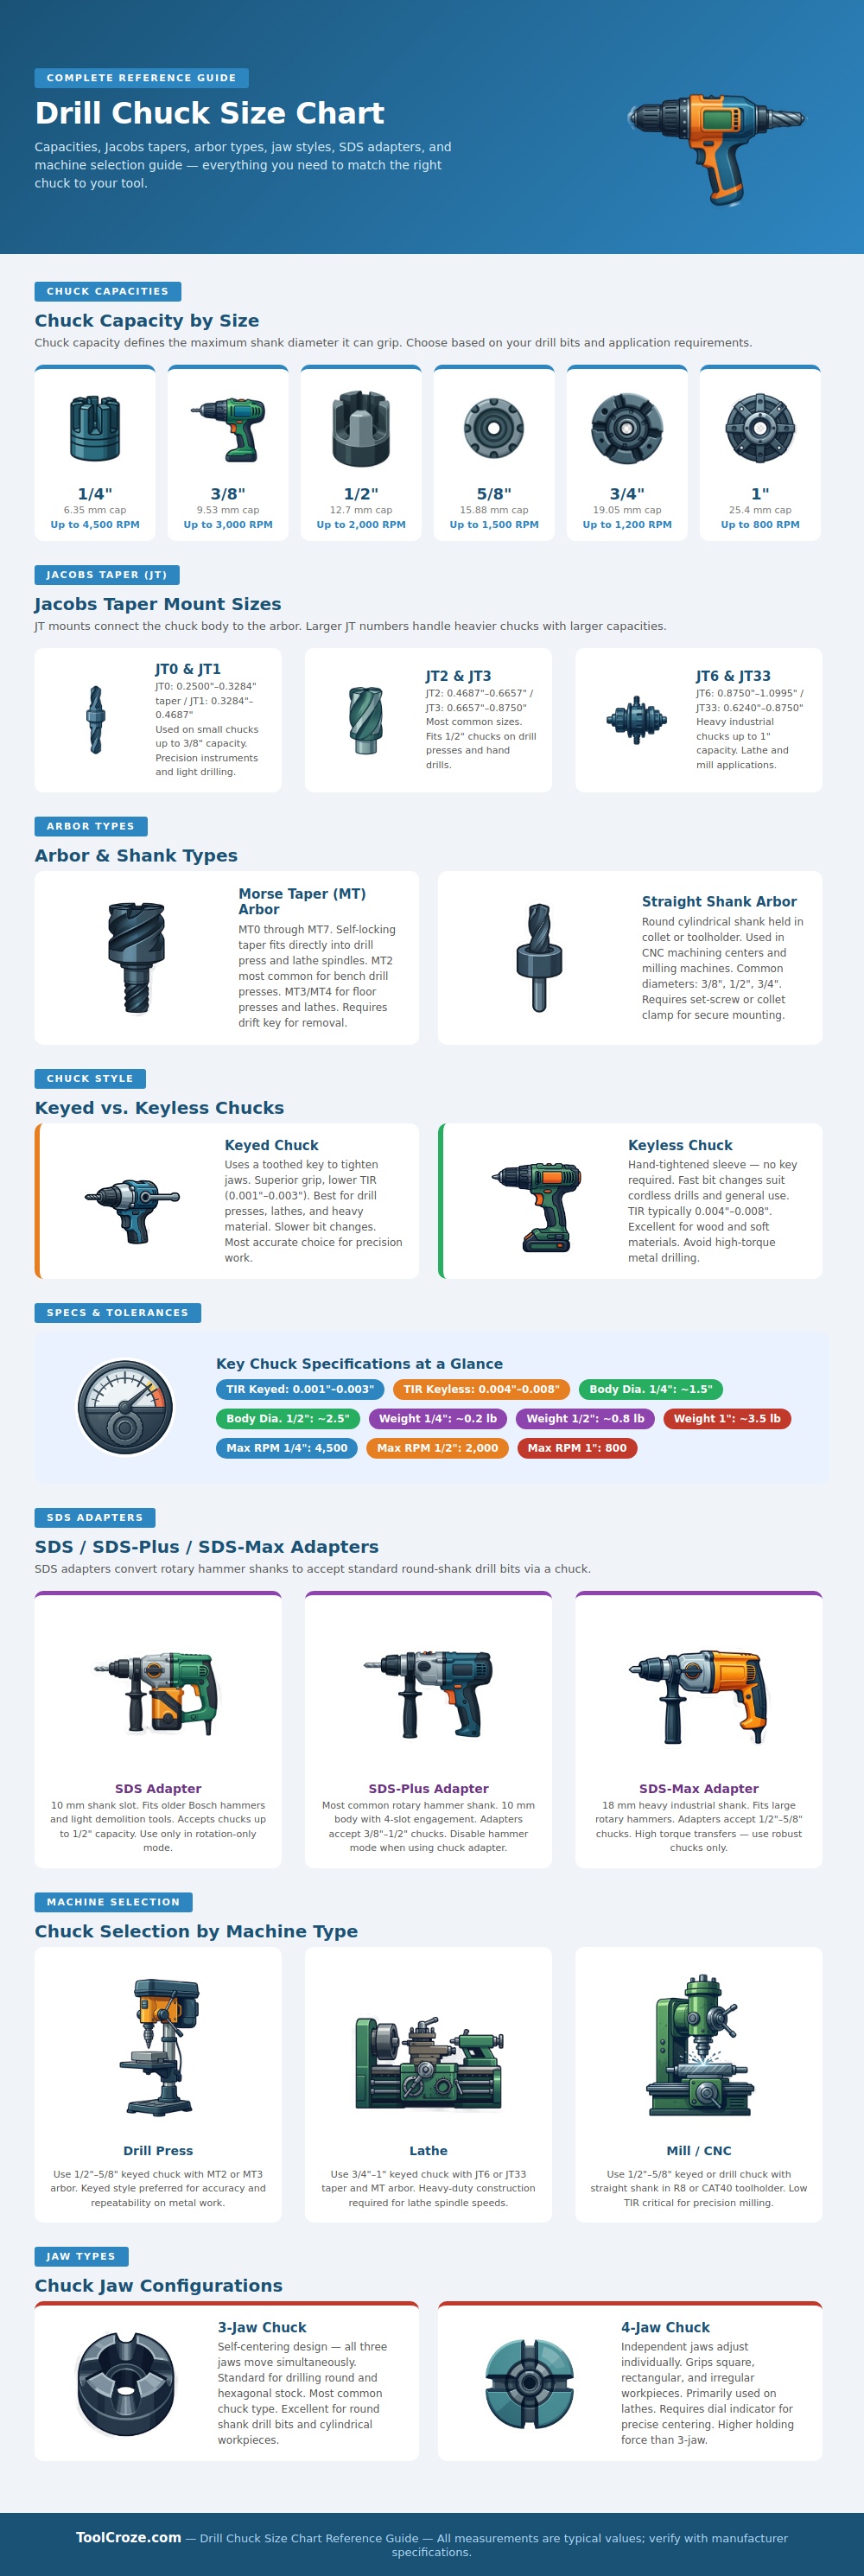
As you can see in the breakdown above, speed and capacity are a tradeoff. A lighter chuck spin faster (a quarter-inch chuck will be no problem), but it is built with less strength for torque. Meanwhile, as you increase to the half-inch or bigger range, your chuck rotational speed plummets. It’s not a design flaw; it’s physics. At four thousand RPM, a one-inch chuck has such great inertia that it would of break the arbor apart and probably break operator’s wrist. That’s why they reduces the max RPM numbers as the chuck size increase, it’s not a guess by some marketing department, it’s a safety limit.
The debate over key vs. Keyless chucks tends to boil down to two things: precision and convenience. On one hand, keyless chucks is awesome for speed. Twist your hand, grip the sleeve and change bit in a second. That’s great for hanging drywall anchors or doing general wood working when precision isn’t naturaly life or death.
But if you’re making repeated holes with drill press or drilling into steel, there’s a price to pay for the convenience. Total indicator runout is often greater on a keyless model because it relies totally on internal friction and hand pressure to grip. Instead of relying purely on friction to lock those jaws down, a keyed chuck use a toothed gear mechanism to mechanically lock the jaws down, which means less runout (your bit stays dead center).
That’s good. So yeah, it takes longer to change bits. Okay. But if you’re drilling holes that have to be spaced precisely for a jig, or you’re working metal and need hole to line up, then you’ll pay the half-minute for peace of mind of knowing you’ve got it right. This is why most of us who work in shops has a special keyed chuck we leave on our drill press all the time. Suddenly, it’s not just a rough driller anymore; it’s a precision instrument.
Equally important than the gripping method is the type of connection. To connect chucks to arbors, the standard use Jacobs tapers. JT2 and JT3 are the workhorse size in most shop. These depend on friction fit between the arbor and the chuck inside the spindle nose. Morse tapers are more sophisticated, as they lock right into the taper hole in machine itself (that’s why you’ll find Morse tapers used on lathes and floor standing drill presses). Because of the self-locking nature of a Morse taper, they will not slip out even if there is sudden changes in load. When upgrading an older bench drill press, check first if your spindle takes a certain Jacobs taper or if it has a straight shank; otherwise you’ll buy accessories that simply won’t fit.
SDS adapters are another example of a product that bridges the gap between conventional drilling and the world of demolition. If you’ve got a rotary hammer, an SDS adapter allow you to run conventional twist bits in concrete. This is useful when hammer action is unnecessary, such as when installing a sleeve anchor, but you still want to make holes for anchoring into masonry. Simply engage the chuck and turn off hammer mode. Running hammer mode (percussion mode) with the SDS adapter engaged will ruin the adapter and bit in very short order. It is a simple conversion that expands the capability of costly tools without requiring additional hardware purchases.
So what should you choose? It comes down to choosing the proper tool for the job requirements. If you’re going to hang a picture frame, you aren’t going to reach for heavy-duty chuck, nor will you want to grab a tiny handheld drill for a structural bolt application. Review the size chart again above before heading out to purchase your chuck. Find the capacity that matches your biggest bit. Verify the RPM limit for your material. Then pick the key type for the required precision of your hole(s). Do it correctly and your tools will last longer, with cleaner holes and less vibration.
