
Put a Morse taper drill in lathe’s spindle. Then smack it once sharply with the drill handle, and the tool drop down perfectly into place. It stays there, gripping so hard that it can be torqued heavily without coming loose and spinning around. There are no drawbars or screws. Just geometry and friction.
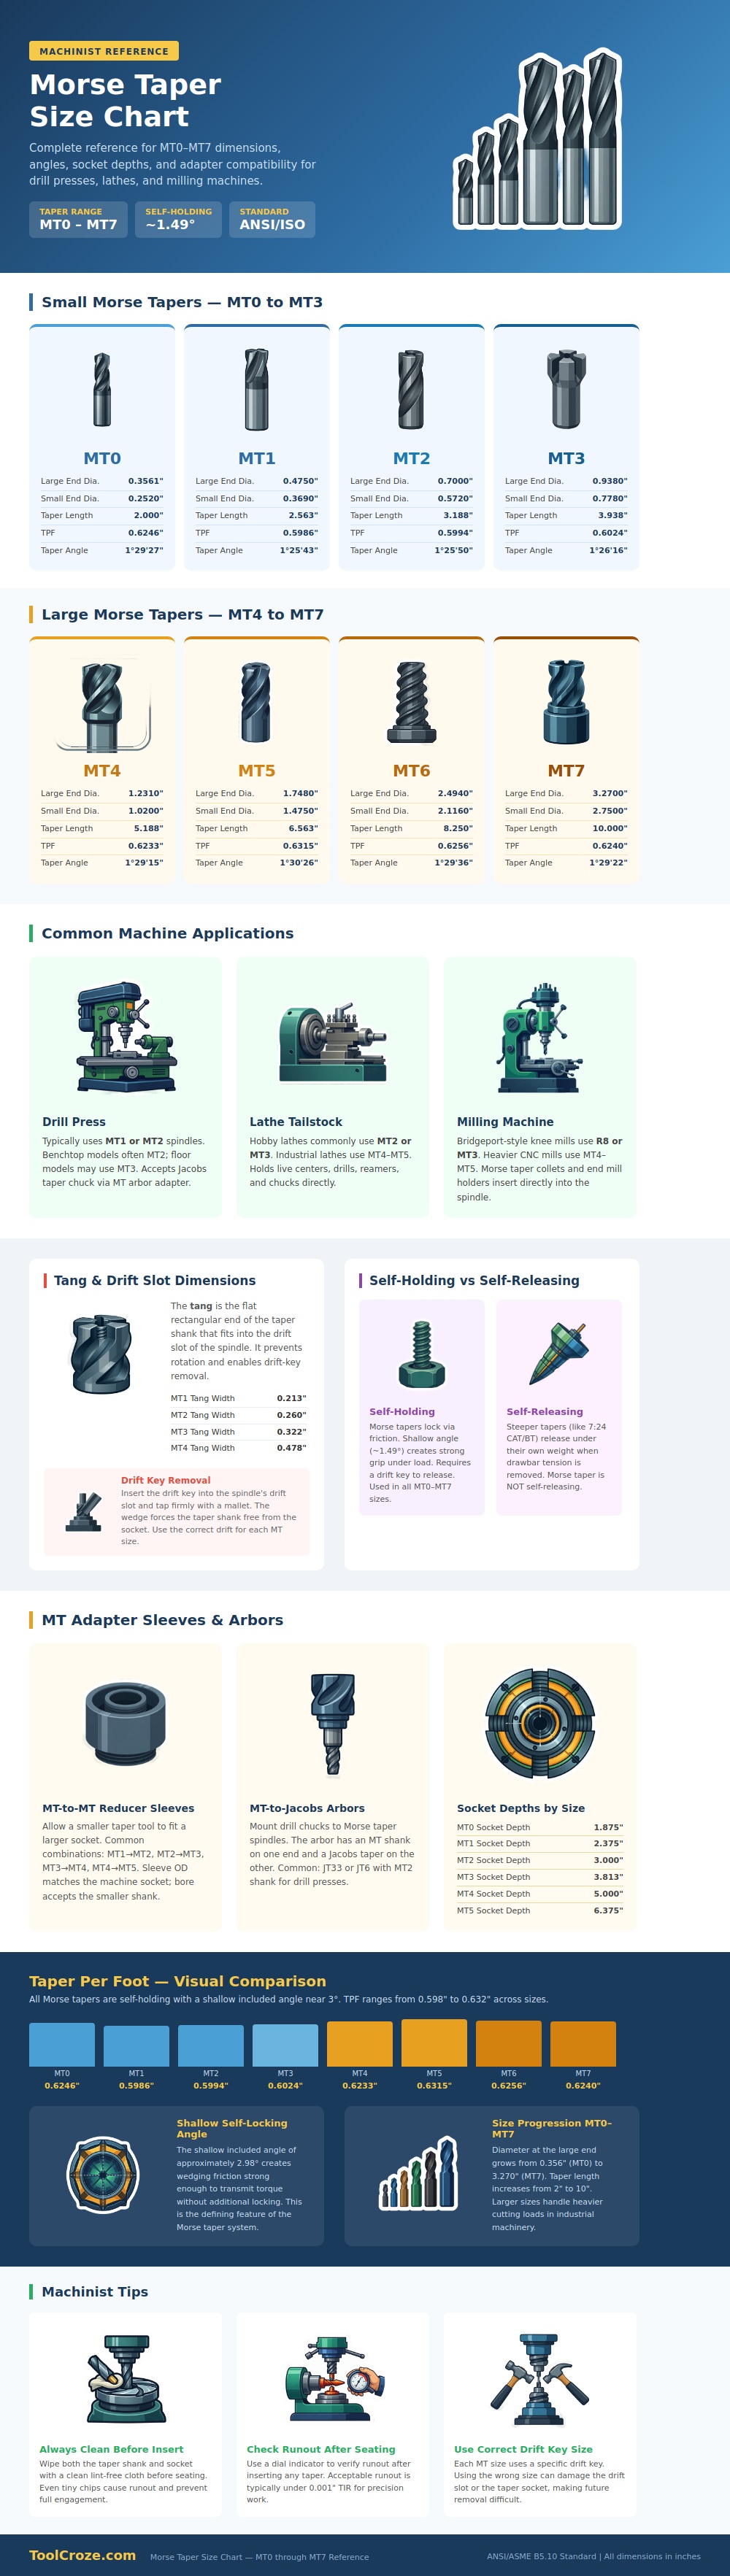
More than a hundred years into the development of industrial design, and still, machinists prefers these tapers because that physical assurance never changes. If you get it, you quit screwing around with your machines. It breaks the family down visually. The family break into smaller MT0 through MT3 sizes, and then into larger, heavier MT4 through MT7 sizes.
How to Use Morse Tapers Correctly
Why does this matter? One side is for light touch work on bench top. The other size are made for aggressive removal of metal. The chart details exactly what diameter goes with what size. Sizes range from the smallest MT0 that fits in your hand as a hobbyist up to the massive MT7 meant for heavy duty industrial mills.
Note the angle remain constant throughout sizes. It hovers around 1.49 degrees. That shallow taper allow it to slip in freely but have enough surface contact area to provide torque holding. Drawbars is needed in steeper tapers such as BT or CAT because they are made to slip free under load. Morse tapers don’t slip free. Morse tapers stays put. Until forced away.
Most home shop owners spends their lives between MT2 and MT4 sizes, as these cover the vast majority of drill press, lathes, and milling machines found in garages (MT stands for Morse Taper). The infographic breaks out typical uses for these different machine types. Typically a drill press will feature an MT1 or MT2. A heavy duty knee mill may require an MT3 or even MT4.
First thing to know is what taper does your machine take? Second thing to know is that you don’t often go swapping tools straight up. You go through adapters. With an arbor, you convert a Jacobs chuck to something the Morse spindle can grip. Or with a reducer sleeve, you put a smaller tool in a bigger hole. It’s a modular system. The taper is just the connection standard.
Those interfaces need to be kept clean. Which brings us to what everyone does wrong: Not wiping off dirt. A drop of old oil, a smudge of metal chip, nothing big, right? Wrong. A speck of crud prevents the taper from seating all the way into the socket. It feels like it is in there, but it actualy just hit an obstruction.
This causes chatter and runout. You’ll swear something is wrong with your machine or your tool when the actual cause were a dirty surface. Always wipe down inside of the socket with a lint-free rag and wipe the shank down too before inserting. If you’re sweating, do it again. It only takes a second and will save you hours of troubleshooting.
Respect the physics. When the tool take some load, you’re not pulling it out by hand. That’s asking for trouble. The taper holds on to tight. Time to call in the drift key. It’s a wedge shaped steel bar that goes into the slot at the end of the spindle and pries the taper free. The chart shows tang widths so you know which drift to use for your part. Scratch the socket bore or damage the slot if you uses the wrong one. Usually a soft hammer and gentle tap do the trick. Don’t smash it around if it doesn’t come loose. Clean up the tapers and retry.
This illustrates the consistency of the taper-per-foot throughout each size. There is a slight variation, but not much. Therefore, they are theoretically interchangeable (although different machines may have different tolerances). So whether you’re chucking an MT5 in your big old production mill, or a tiny MT0 in your little mini-lathe, it’s all the same principle.
You want to make sure you’ve got the right fit, the surfaces are clean and you remove it properly. If you get those three steps down then the taper becomes nothing more than another step in the process. Just something you do, slap it home, spin your cut, and when done drift it off. It is simple. It is reliable. It is stubbornly so. That is why it endures.
