
One Hand Clutches A Filler Rod. The Other A Torch. You stand in front of a copper fitting, staring down at it. Your Job Is To Make The Flame Hot Enough To Bend Thin Metal But Cool It So As Not To Melt Away The Base Material. That’s Brazing. And that is where the thermal comfort zone lie.
The Heat Has To Be Hot Enough To Melt The Alloy Yet Cool Enough To Avoid Melting The Parent Metals. It’s Not Welding; No Melt Of The Parent Metals. It’s Not Soldering, The Temperature’s More Than Eight Hundred and Forty Degrees Fahrenheit.
How to Brazing: Tips for Beginners
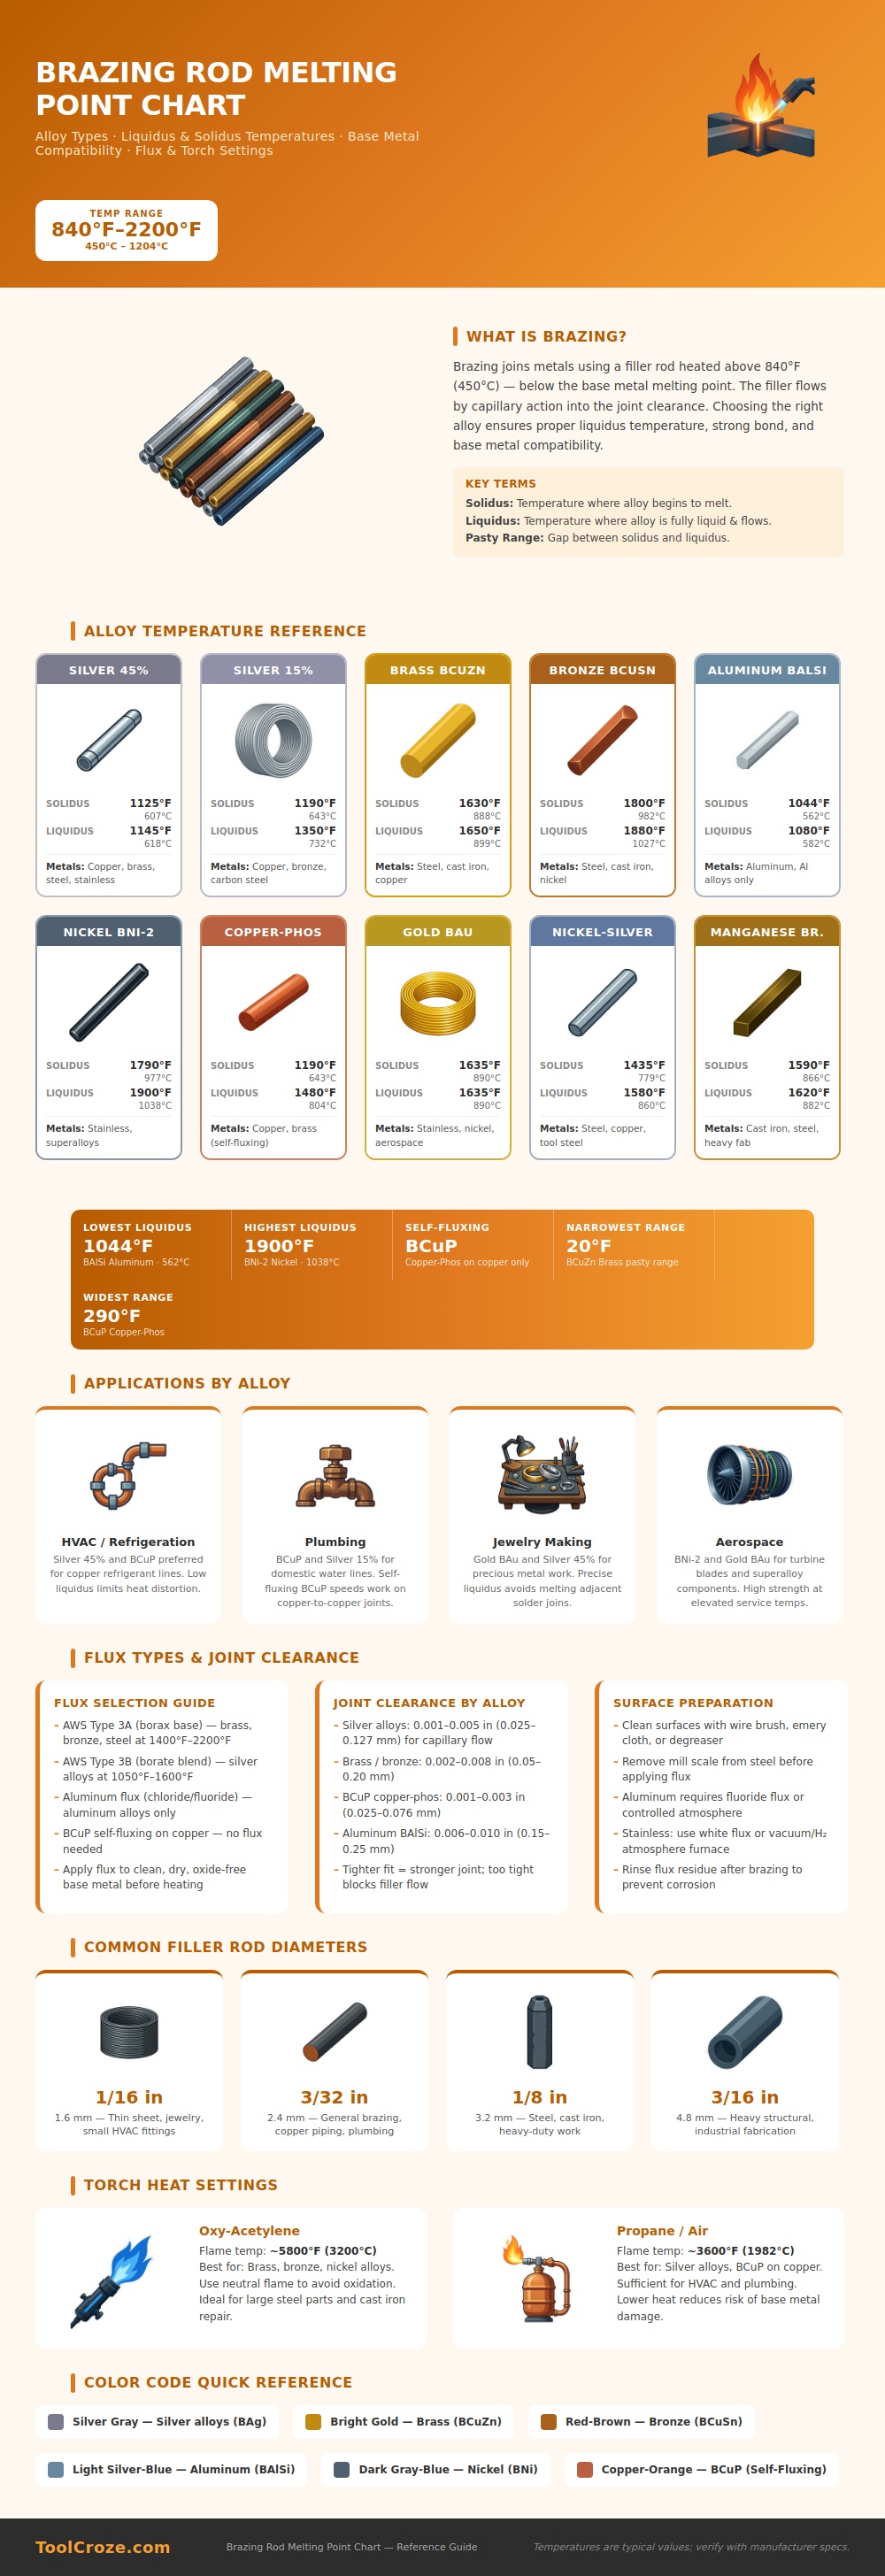
The alloy melts and fills a microscopic void created by capillary action between two clean surfaces. The chart above marks the transition points for all alloys, from solid to liquid, and it tells you how much heat you can throw at ’em without compromising the workpiece.
The main problem here is thermal control. If you use an alloy with a large gap between the liquidus and solidus temperatures, it will stay in a pasty state that is neither completely solid or liquid. This makes it gunky. You will also get weak connection if there is not enough time for it to completely liquefy while it is held together.
The reason to go with silver alloys such as Silver 45 percent is these alloys have tight thermal windows so when sufficiently heated the stuff flow nicely. Thin copper tube will warp if too hot which can be a serious issue with some HVAC jobs. Because brass and especially bronze rods work at even hotter temps with even tighter thermal window, they’re preferable to do heavier cast iron or steel-type repairs where strength is most important and delicate are secondary.
Which metal? Different metals require different rods; plumbers often use copper-phosphorus to join copper-to-copper pipes. It’s a self-fluxing metal that chemically cleans off the oxide, so you don’t even have to apply any nasty paste to the pipe before assembly. The trade-off with this handy feature is that it’s good at copper but fails on steel. Steel won’t like phosphorous and you’ll end up with a weak connection. If your project involve steel or stainless components, you’re more likely to use silver- or nickel-based alloys. These adhere well to ferrous metals without forming a corrosive intermetallic compound.
Flux choice is where newbies trip up. Flux acts as a way to stop oxidation, blocking air from reaching the still-molten metal until it has set. This isn’t like slathering some gooey stuff over the pieces; use the wrong flux and it may be gone long before the filler melts. Borax-based flux might burn off too fast when used for low-temp silver work, which turns into a dry joint; while aluminum-specific chloride flux on steel creates toxic fumes and unnecessary corrosion risk. Pairing flux with the right melting filler = correct flux activity. Avoid expensive mis-trials that lead to cracked welds or leaky pipes. Check out the infographic for clear pairings.
Another frequent problem is joint clearance. Too tight and there’s nowhere for the capillary action to go; the filler rests on top. Too loose and gravity pulls on the liquid metal which overcomes surface tension. You require precise fit-ups, typically in thousandths of an inch, depending on the viscosity of the alloy. Bronze is less fluid than silver alloys and therefore prefers a tighter joint. Mechanical precision trumps the cost of the torch you purchase. Regardless of how much you spend on equipment, a poorly fitted joint fail.
The same holds true with rod diameter. Heavy duty tasks feed at a higher rate then delicate tasks. This requires a thicker rod to keep up, while a thinner rod controls amount of heat being applied. A lot of hobbyists reach for the fattest rod available thinking that more fill = stronger bond. That simply isn’t true. Too much filler causes build-up, which can be a stress point when pressure changes and can also block the flow of fluids within the pipe. You want to penetrate deep into the joint but not have a pile of metal sitting on top (you want a thin penetrating fillet).
At the bench, quick color recognition tells you what kind of alloys you’re dealing with. A goldish hue signals brass; a silvery tone means it’s probably a silver-based filler. Under pressure and pulling a rod out of a messy toolbox, those colors tells you something important. If I know this color matches low-temp easy, and this other one matches high-temp stronger, then I can mentally plan my heat strategy prior to flicking the torch on.
Brazing is less about brute force and more about thermal patience. Warm it up evenly and don’t rush it. Let the metals pull the filler into them via capillary action. Don’t go too hot, and don’t go too cold. Get that mix right, and you have a leak-proof strong connection between two pieces of metal that looks virtualy seamless. The parts are not taped or glued, but are held together by well-prepared surfaces and exact heat.
