
How many times have you been working on your truck’s suspension only to realize that one of those little split pin is nowhere to be found? Yeah, that’s when it hits you. A cotter pin are a simple fastener. Nothing too fancy about it…until it fails and then you see just how important it realy is. It holds stuff together using nothing more than shape and a littel friction. No complicated engineering needed.
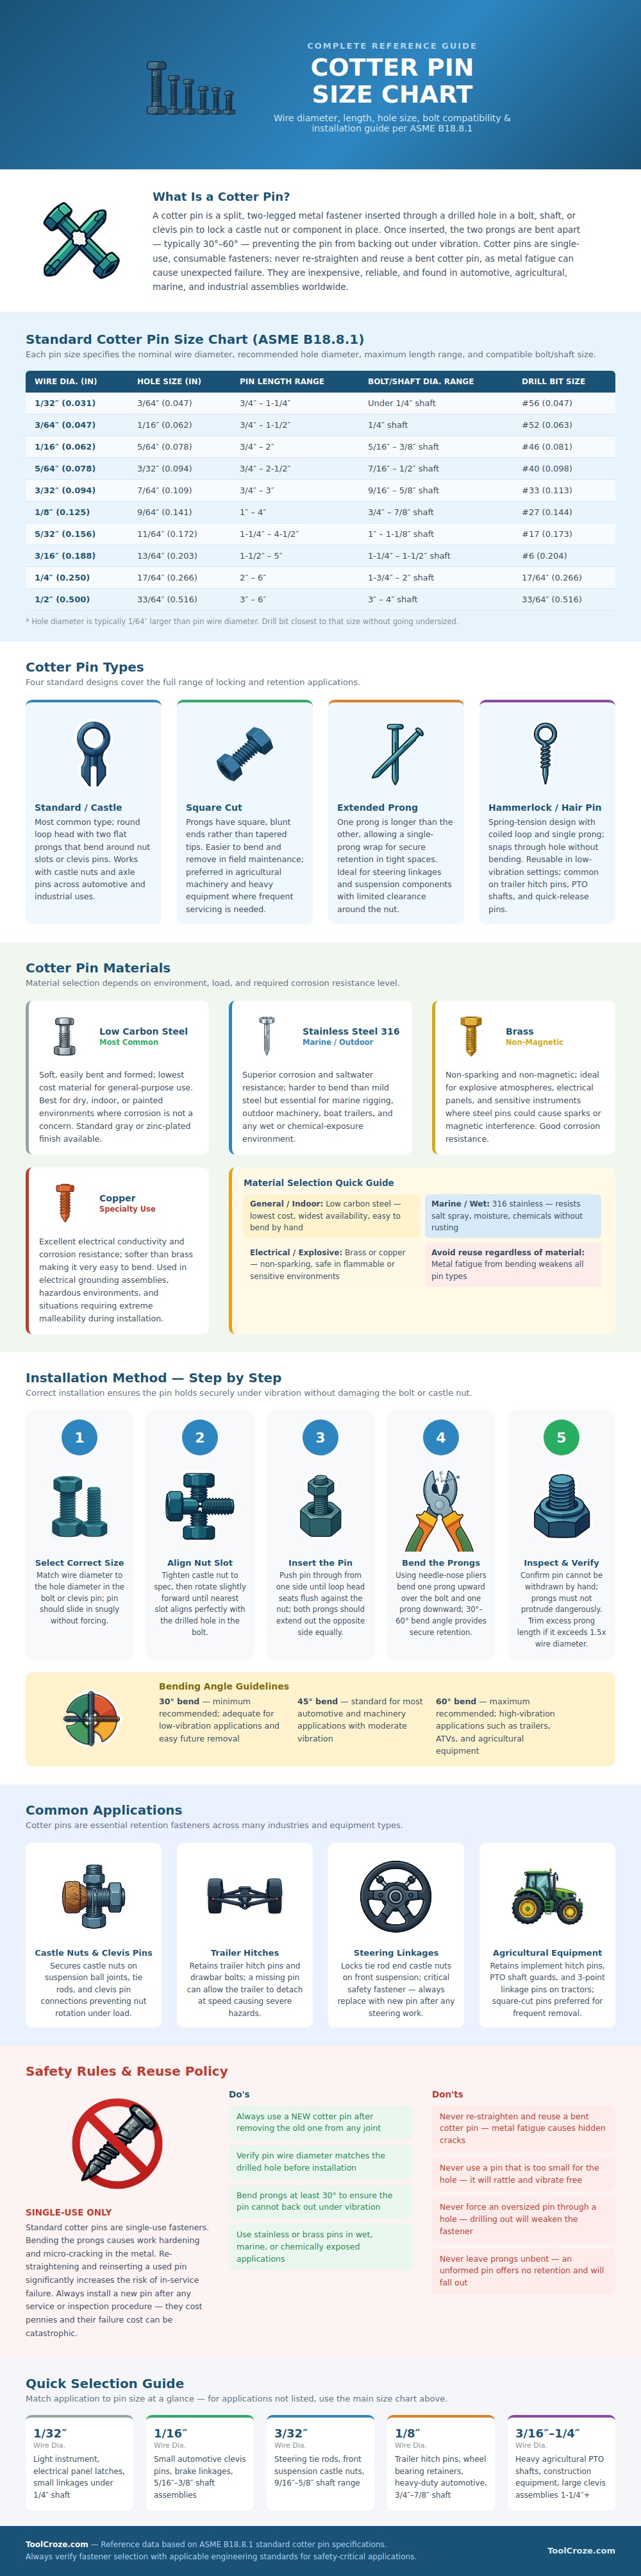
So what size hole does what size wire? Well that’s where this chart comes into play. You’ll never go home with a wrench in your hand and stand there wondering what size pin to use again, half the battle is getting the right fit.
Everything You Need to Know About Cotter Pins
A regular cotter pin has two legs that split apart when inserted which are then bent open to create some tension on either side of the drilled hole in your clevis pin or bolt. Those bent legs serves as clamps and hold onto the sides of the hole. That’s what holds the nut tight and keeps it from loosening up with vibration. It is a simple but smart use of basic physics.
But it’s all psychology realy; most folks don’t realize that particular bend angle is critical to holding power, and without it, the legs won’t be able to hold their grip very well. You have to strike the right balance with how much you bend them, bend them too hard and you run the risk of breaking off the leg.
Depending on what you’re looking for there are different types of designs. They all address a particular retention issue, but come in different shapes as well. The standard castle type works well with flat prongs against the nut’s slot and a round loop head. If you want square cut pins the end is blunt making it easy to remove with pliers during field repairs. For other instances like when you might need a little longer reach in tighter areas and need more leverage to hold the joint together extended prong designs works well. We also have hammerlock pins. These are spring tension pins that simply snap into position without tools required to bend them flat.
You can spend a lot of time worrying about exact size, but also consider what material is best suited to where you intend to use it. By default, low carbon steel is the choice. It’s relatively soft and easy to bend manually into shape, but that same characteristic make it prone to rusting when exposed to moisture for extended periods of time. If something is going outside permanently or being used in salt water (marine), then stainless steel 316 resist corrosion well enough to make it a must-have. For other uses requiring non-spark materials such as in hazardous situations, there are brass and copper versions available which offer the necessary safety considerations in these scenarios.
Attention to detail and patience are necessary during installation, and picking out the right pin will slip in place easy instead of being forced into the hole. Align the castle nut with the bolt hole and apply the correct torque. Insert the pin until its head sits flush against the nut surface. Use pliers to bend one leg downward and one leg upward making sure the prongs cannot be pulled out by hand. If they’re too long and might catch or hang something up, trim them off. It shouldn’t take more than a few seconds to install proper, but will keep you safe for many years.
One common error everyone makes is using previously bent pins. Standard cotter pins aren’t meant for reuse; they’re disposable after a single installation cycle. The metal bends which creates micro-cracks and weakens it immensely during the bending process. Re-bending an already-used pin gives you a false sense of security because it hides possible weakness. Whenever servicing a joint, use new pins. A pack costs pennies each and the threat of total failure goes far beyond whatever money you might save by using compromised pins.
Always make sure you have the proper sized pin for your application. An oversized pin forced into a smaller hole will damage the shaft/threads. Also make sure your pins is not left bent or misshapen. This gives zero retention value on your connectors. And always check all connections when putting gear back into service. A missing pin can result in lost trailer or broken steering linkage at speed. Those don’t go well fast.
Knowing the basics gives you confidence in your repair efforts. You’ll understand how material choices impact life expectancy. You would of also know the right way to bend them so they last. Now when picking up that package of cotter pins, keep in mind that little piece of wire holds everything together…literally and figuratively. Honor its role with new ones each and every time, it’s the attention to detail that keeps machines running safely long after they have been put together.
