A roller chain should be easy enough to select. However, until its time to change out a chain on your running equipment, you’ll realize selecting the incorrect pitch does nothing but mess up everything. Everything get chewed by the sprocket. What would of been a quick fix becomes an expensive afternoon of work. So that’s where having a good size reference comes in. What would have became a guessing game becomes a quick and confident selection process.
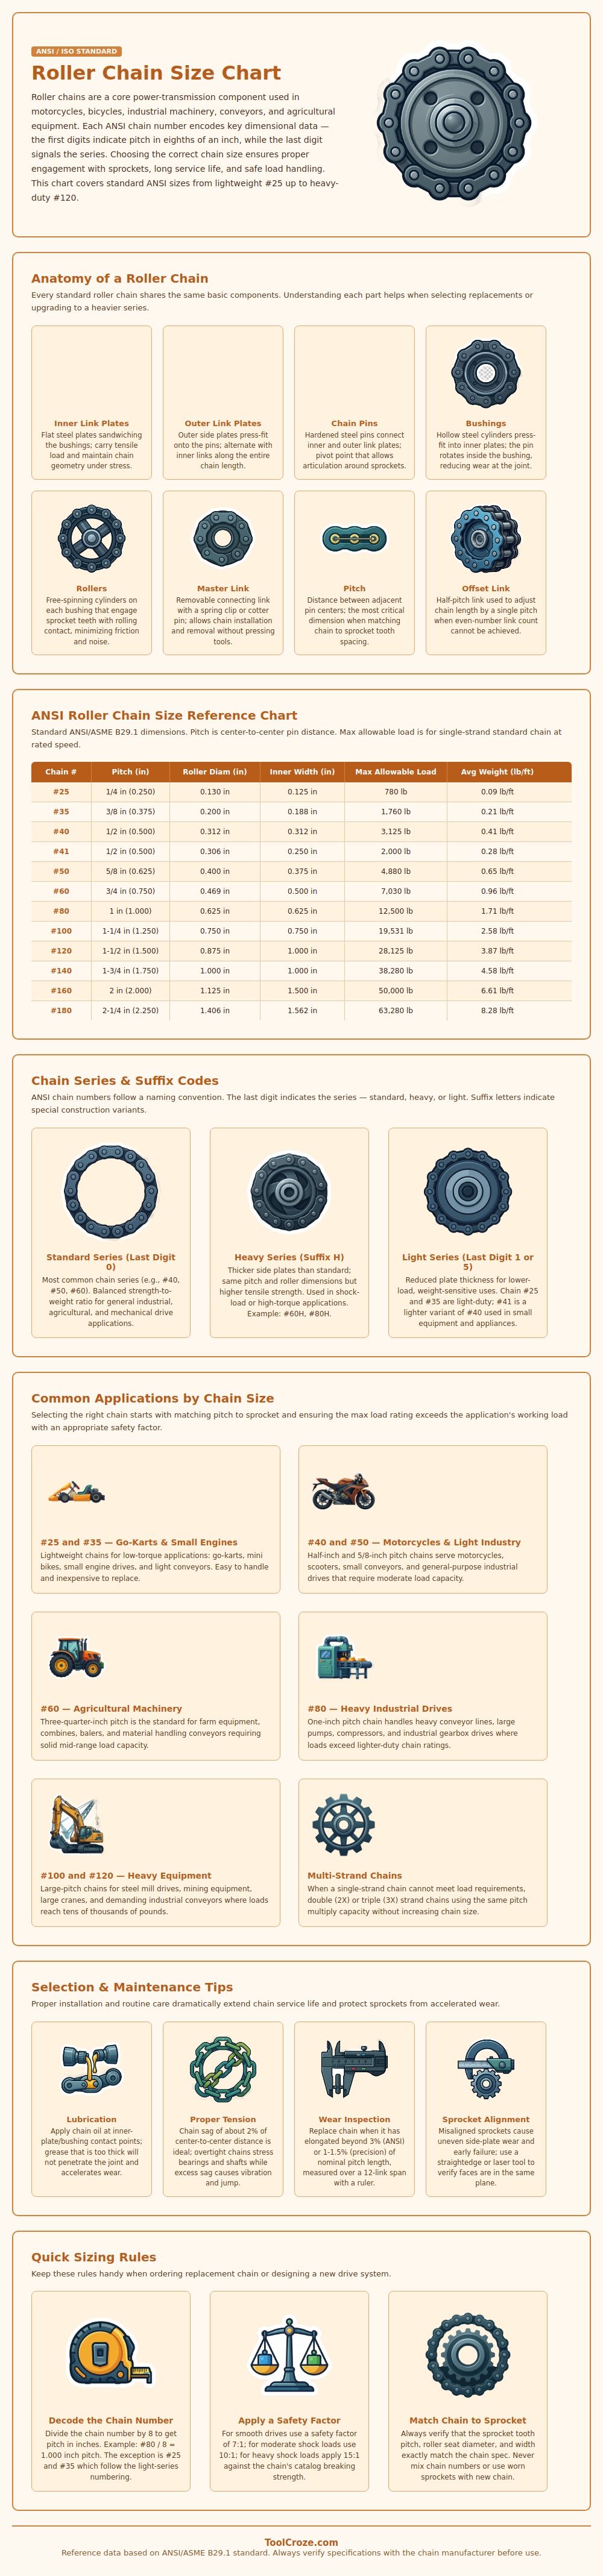
This is the chart that lists what we all typicaly run into in shops (see graph above). That number indicates the pitch in eights of an inch. Once you know the system, you can read the rest right off the chart. In this instance, the columns shows roller diameter, inner width, load rating, and weight per foot.
How to Choose the Right Chain Size
First, it tell you if the chain is going to fit on your sprocket. Second it gives you some idea of if it’ll be able to handle the load or stretch to fast for comfort. One glance down the chart and you can see the dramatic jump in capacity as numbers climb up. It’s not just about strength but the physical space the chain takes up and what kind of equipment it need to be on.
The most obvious match is to make your new chain match the old one; however, that’s assuming it was the correct size in the first place. Instead, consider what the drive actualy does. Smaller sizes work fine on light equipment such as go-karts and small engine without any drama. For moderate conveyors and motorcycles, use the five-eighths– and half-inch sizes, which offer reasonable weight while maintaining enough strength for the application. Heavier industrial applications and farm machinery moves into the one- and three-quarter-inch sizes where larger rollers and thicker plates withstand both torque and occasional shock well without giving out too soon.
In most cases, when one strand isn’t quite enough, we simply double or triple strands instead of leaping to an oversized pitch. Hidden in the naming structure are some helpful tips if you know what to look for. Standard construction is a final zero. An H after the number signal thicker side plates for higher shock loads. Finally, a light duty one for less torque is indicated by a final one or five. This prevents over building a drive that doesn’t require it and keeps you from under building one that will stretch out under real conditions.
Half the battle is selection. But even with the proper size, it will fail early if it are not installed properly. It can also fail if it is tensioned too tightly or if it wears out the sprocket teeth by running on them. The only way for lubrication to get down to where it needs to go (the bushings and pin contact points), is when it’s thinned out enough that it wicks in there. When you let the tension off, a gentle sag lets the chain move freely without binding or slapping. Alignment checks makes sure the side plates don’t wear into knife edge shapes. Elongation measured across a number of links detects wear before it ruins sprockets.
All this takes very little time but saves investment in the proper chain. It’s all pretty simple. Size it to the job, get the chain moving without slapping or binding, and change it before stretch turns into damage. That keeps the drive quiet and the downtime at a minimum.
