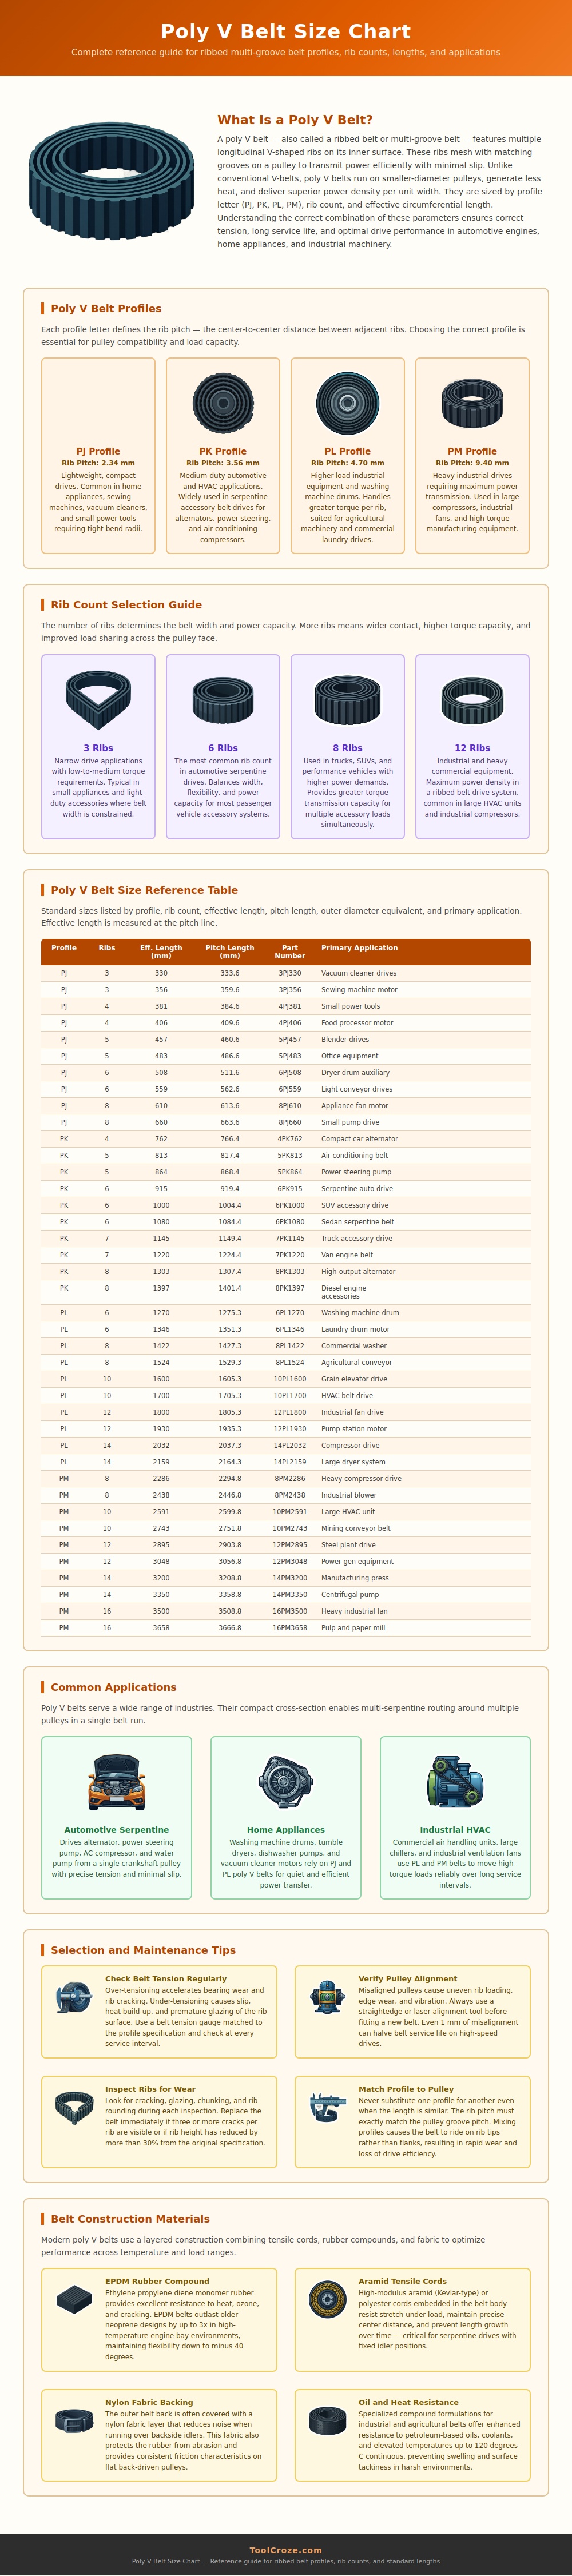
When a belt breaks, you need to replace it with one that fits. How do you know what to buy? Use a poly-v belt size chart. There are five common section of belt. Above is a chart that illustrates various belt sizes. Notice the changes in height, rib pitch, and min pulley diameter. These helps you know which size to get. No more guesswork, just math.
The popularity of poly-v belts stems from fact that they use multiple small ribs for the load. No one wide groove have to bear the whole burden. They has the ribs on the inside face. And, the flat back runs over idler pulleys. That enables them to be used as one belt going around industrial rollers or engine accessories. That saves space. And it means you only need to carry a few different belts.
How to Choose the Right Belt Size
But…the tradeoff is that the ribs has to precisely match the grooves in the pulley. So section letters are more important then bare length here. For example, the lightest household applications works best with the smallest section. In those applications, the pulley diameter is very small. Demand for power remains low.
As you progress up the scale of section letters, rib pitch and overall thicknesses grows. Bigger ribs support greater torque. But they also call for larger pulleys that won’t crack under bending of belt. This is where chart above helps. No need to commit all the numbers to memory. Just match the section to existing pulley size on your machine.
The same holds true for choosing rib counts. The more ribs there are to bear the load, the better. But remember, each additional rib increase width. Simple math: Rib count x Rib pitch = width. In practice, that translates into beginning with your current pulley width and working backwards. Fewer ribs means less width so possibly a bit greater tension. The width is unlikely to help overbuild it, that will just cause the belt to heat up from rubbing against the pulley flanges.
Besides making sure to start out with the right size, good maintenance practices is also important. Age, heat and oil reduce belt life. A belt may appear OK from the top but actualy be cracked between the ribs. The best way to test tension is with a gauge, not by thumb pressure. Too little tension results in slipping, too much tension tears up bearings. If you change a belt, inspect rib face for glazing. That indicates a misalignment of a pulley or too-low tension.
That’s where the chart realy shines. It breaks down belts by their similarities. Look at section letter. Make sure your pulley accepts this many ribs. Read the length code off the belt. Speed, load and pulley diameter remains out of view. If you do that then basic match will be right. You should of checked size first.
